> ## Documentation Index
> Fetch the complete documentation index at: https://docs.tryprofound.com/llms.txt
> Use this file to discover all available pages before exploring further.
# AEM Integration Setup Guide
This guide walks you through connecting Adobe Experience Manager (AEM) as a Cloud Service to Profound using an Adobe OAuth Server-to-Server credential. Once connected, Profound Agents can access, create, and update the Content Fragment models, folders, and content allowed by the credential's AEM permissions.
## Before you start
You'll need:
* An [AEM as a Cloud Service](https://experienceleague.adobe.com/en/docs/experience-manager-cloud-service/content/overview/introduction) program and **Author** environment
* [AEM Cloud Manager](https://experience.adobe.com/#/cloud-manager) access to commit to an Adobe-managed repository and run a config pipeline (**Deployment Manager** role required)
* Permissions to manage product profiles in the [Adobe Admin Console](https://adminconsole.adobe.com/) and to create OAuth credentials in the [Adobe Developer Console](https://developer.adobe.com/console)
* A [Profound](https://www.tryprofound.com/) account
## Setup guide
* Open [Adobe Cloud Manager](https://experience.adobe.com/#/cloud-manager).
* Sign in under the organization that owns the AEM program you intend to use with Profound.
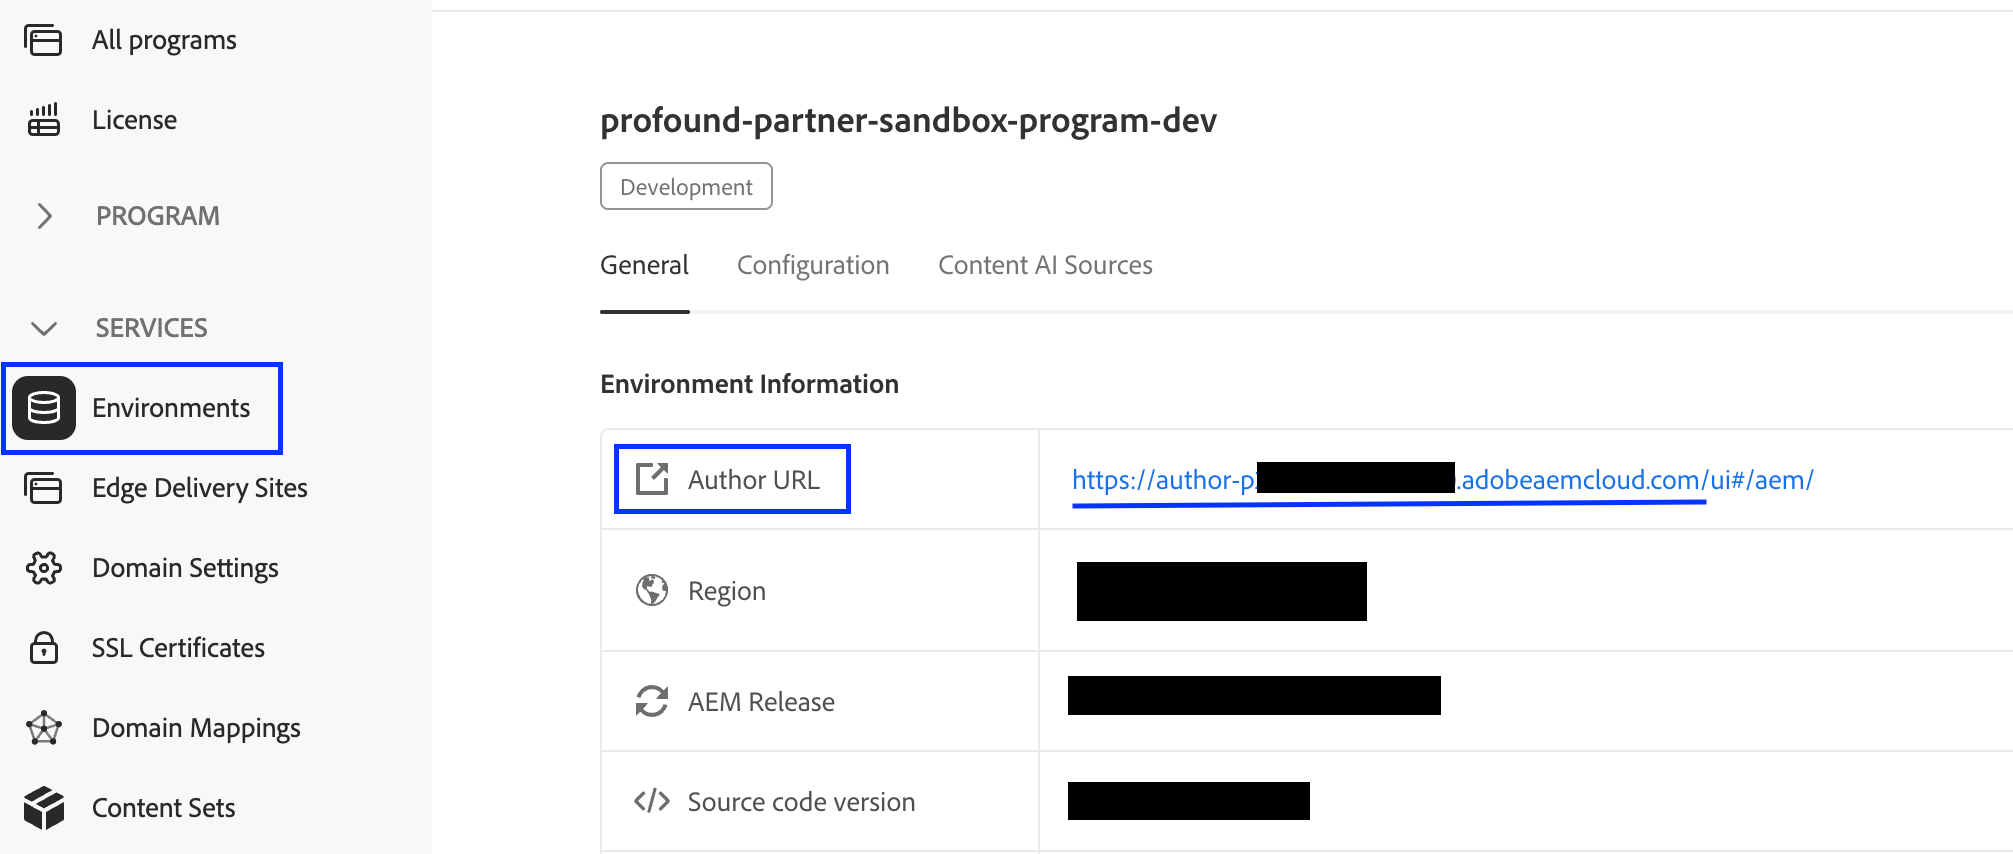
* Select and open the program, then select **Environments** in the left sidebar.
* Open the environment you intend to use and copy its base **Author URL**. It should look like: `https://author-p12345-e67890.adobeaemcloud.com`.
 To enable API access in your environment, follow [Adobe's AEM APIs setup guide](https://experienceleague.adobe.com/en/docs/experience-manager-learn/cloud-service/aem-apis/openapis/setup).
Once done, confirm that you have the correct product profile to use with the AEM API:
* Go back to your AEM program environment page in [Adobe Cloud Manager](https://experience.adobe.com/#/cloud-manager) (where you left off in [Step 1](#step-1)).
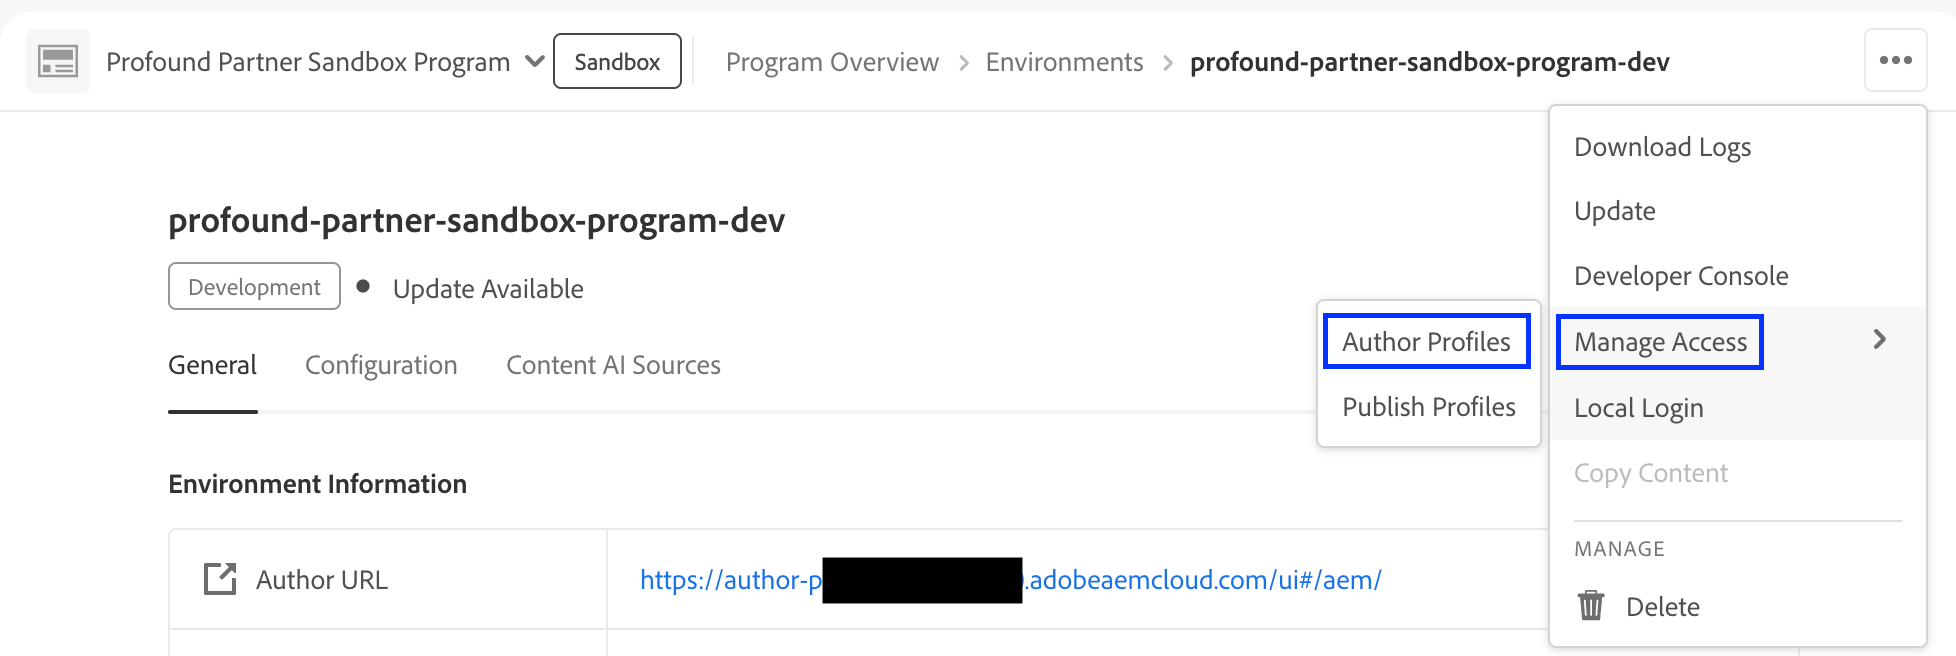
* Open the environment's action menu and select **Manage Access** > **Author Profiles**. [Adobe Admin Console](https://adminconsole.adobe.com/) opens your environment's page.
To enable API access in your environment, follow [Adobe's AEM APIs setup guide](https://experienceleague.adobe.com/en/docs/experience-manager-learn/cloud-service/aem-apis/openapis/setup).
Once done, confirm that you have the correct product profile to use with the AEM API:
* Go back to your AEM program environment page in [Adobe Cloud Manager](https://experience.adobe.com/#/cloud-manager) (where you left off in [Step 1](#step-1)).
* Open the environment's action menu and select **Manage Access** > **Author Profiles**. [Adobe Admin Console](https://adminconsole.adobe.com/) opens your environment's page.
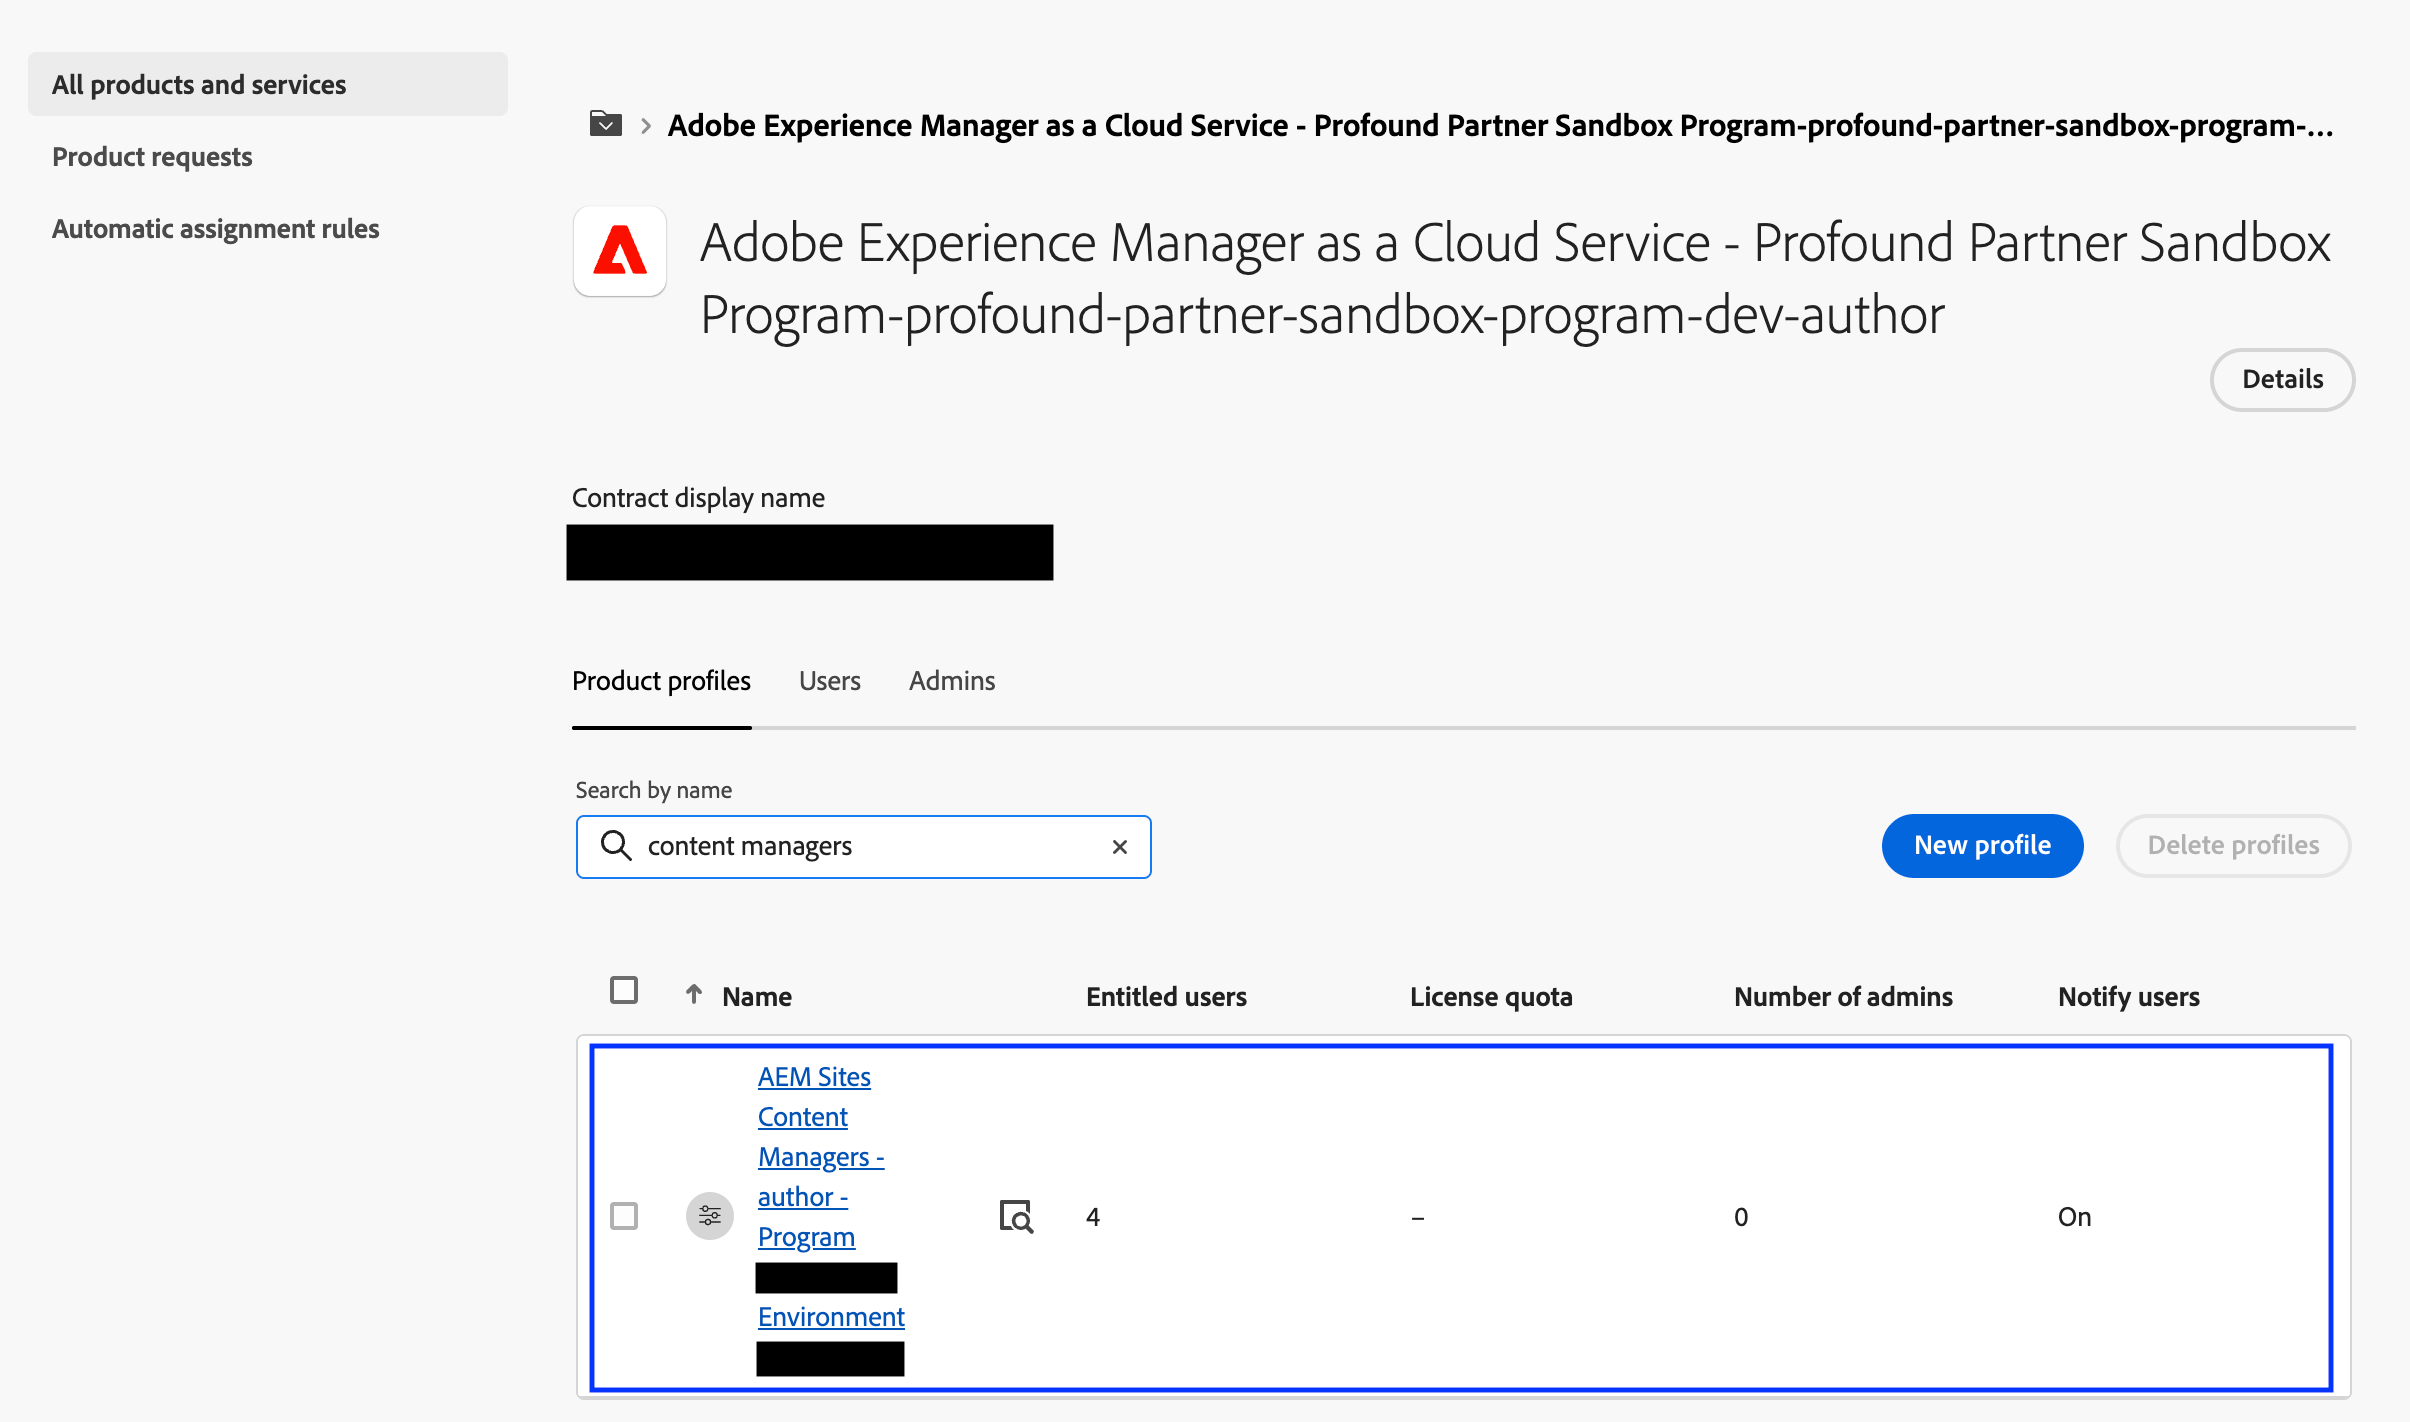
 * Confirm that the **AEM Sites Content Managers - author...** profile exists for your program and environment.
 To authenticate with Profound, create an OAuth credential. You, or anyone with a **Developer** role in your **AEM Sites Content Managers** product profile, can create it.
To assign a **Developer** role to the credential creator, continue where you left off in [Step 2](#step-2):
* On your environment's page in [Adobe Admin Console](https://adminconsole.adobe.com/), select the **AEM Sites Content Managers - author...** product profile.
* Open the **Developers** tab, then select **Add developers**.
To authenticate with Profound, create an OAuth credential. You, or anyone with a **Developer** role in your **AEM Sites Content Managers** product profile, can create it.
To assign a **Developer** role to the credential creator, continue where you left off in [Step 2](#step-2):
* On your environment's page in [Adobe Admin Console](https://adminconsole.adobe.com/), select the **AEM Sites Content Managers - author...** product profile.
* Open the **Developers** tab, then select **Add developers**.
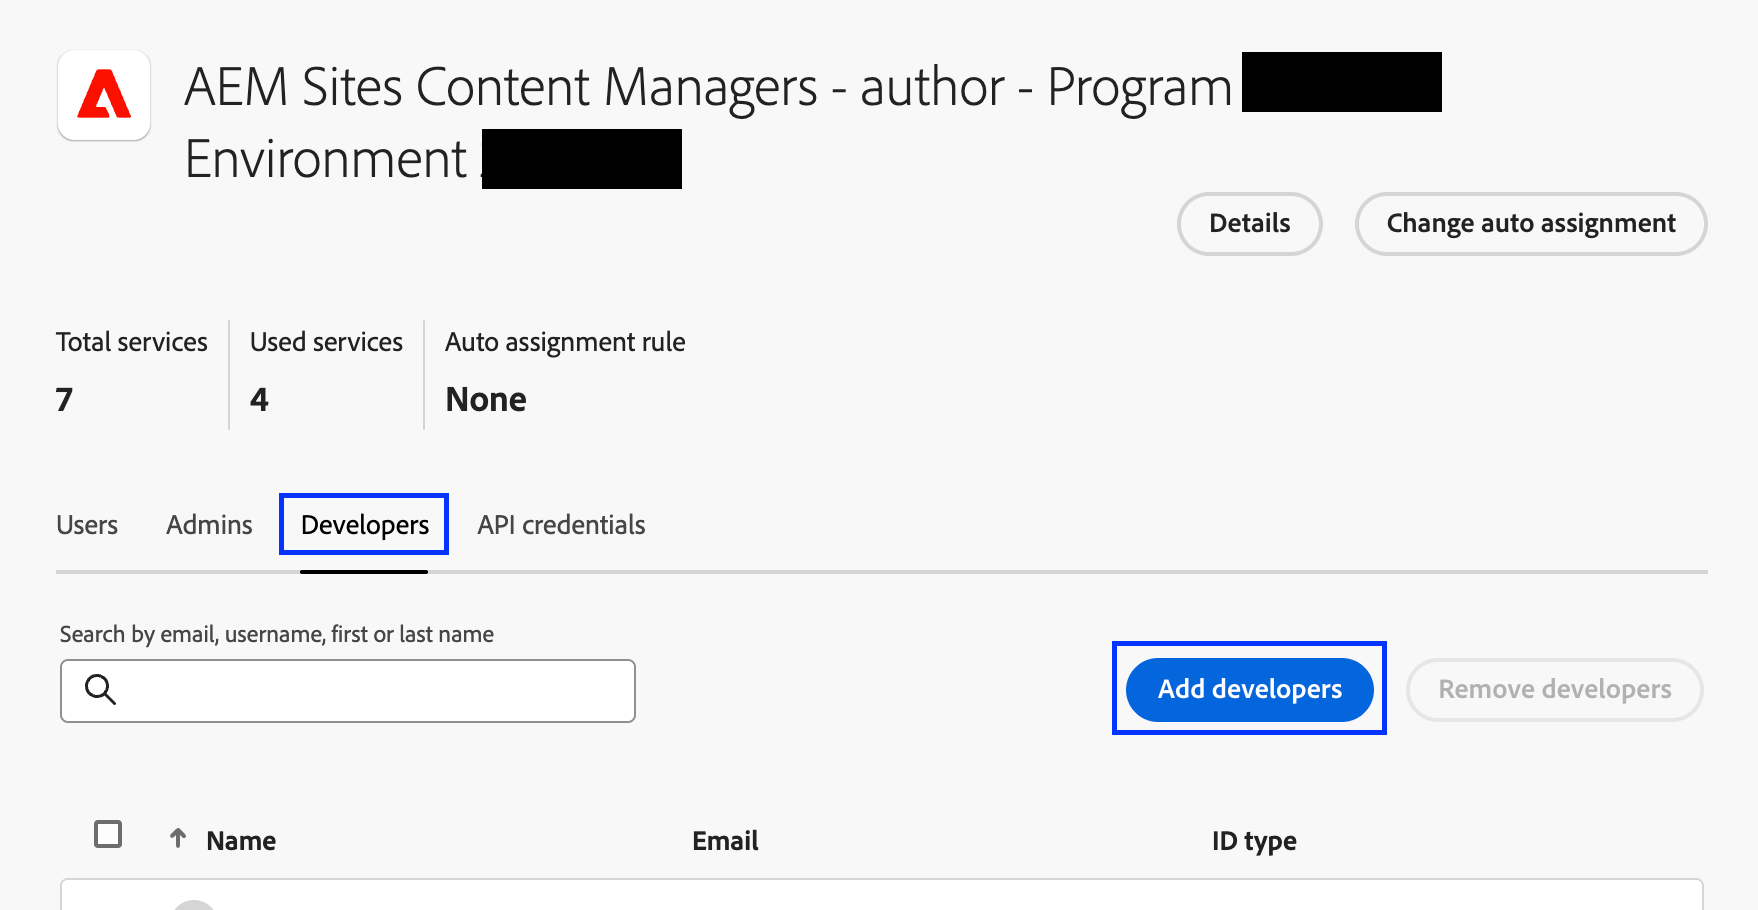 * Add the email or username of the person creating the OAuth credential, then select **Save**.
Learn more about assigning developers to Adobe product profiles in Adobe's [Manage developers in Adobe Admin Console](https://helpx.adobe.com/enterprise/using/manage-developers.html) guide.
* Open the [Adobe Developer Console](https://developer.adobe.com/console). If you're following these steps in sequence, you should already be signed in under the organization that owns your Author AEM environment (same as in [Step 1](#step-1)).
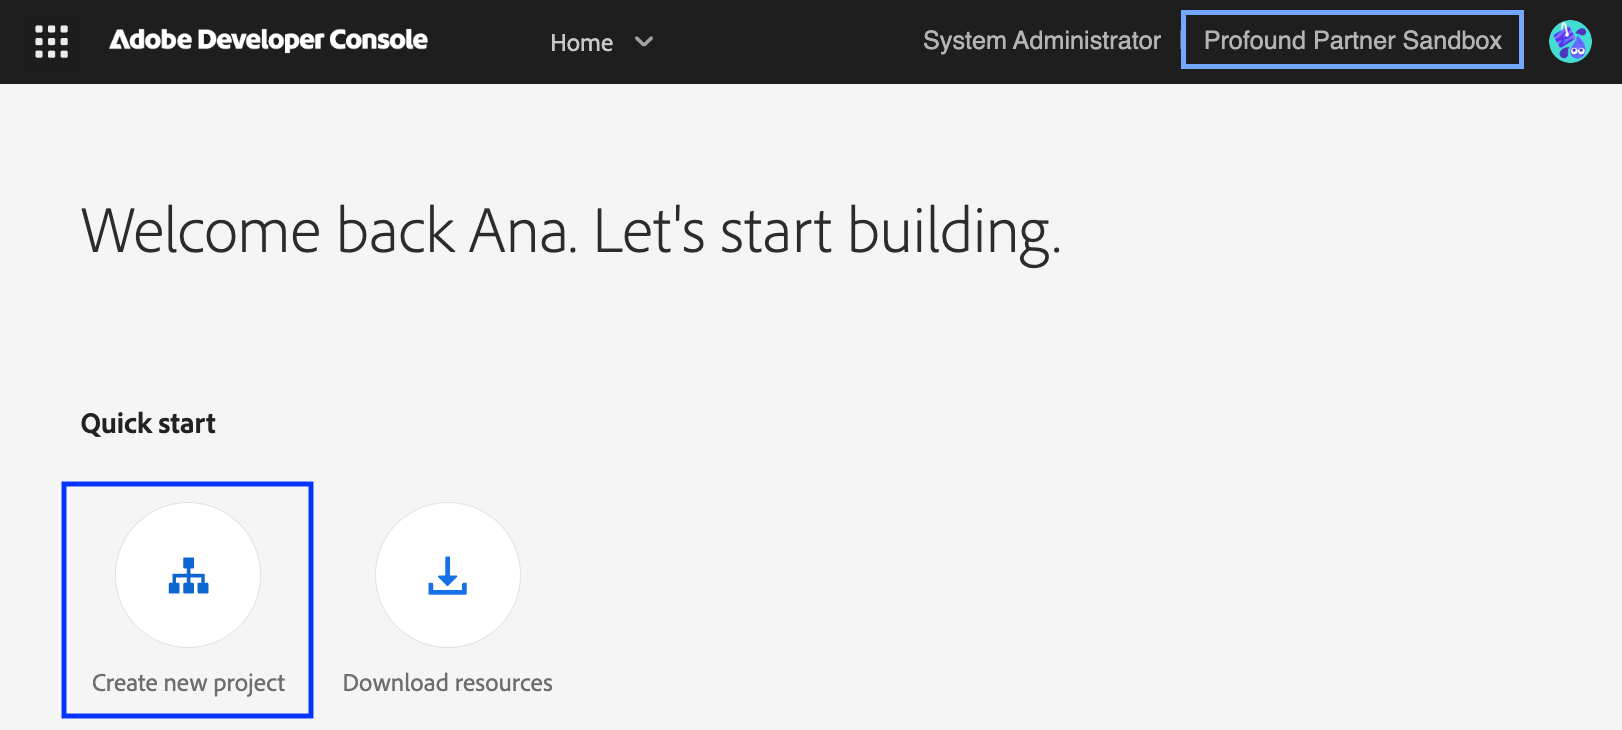
* Select **Create new project** in the **Quick start** section, or go to **Projects** in the top navigation menu and select **Create new project**.
* Add the email or username of the person creating the OAuth credential, then select **Save**.
Learn more about assigning developers to Adobe product profiles in Adobe's [Manage developers in Adobe Admin Console](https://helpx.adobe.com/enterprise/using/manage-developers.html) guide.
* Open the [Adobe Developer Console](https://developer.adobe.com/console). If you're following these steps in sequence, you should already be signed in under the organization that owns your Author AEM environment (same as in [Step 1](#step-1)).
* Select **Create new project** in the **Quick start** section, or go to **Projects** in the top navigation menu and select **Create new project**.
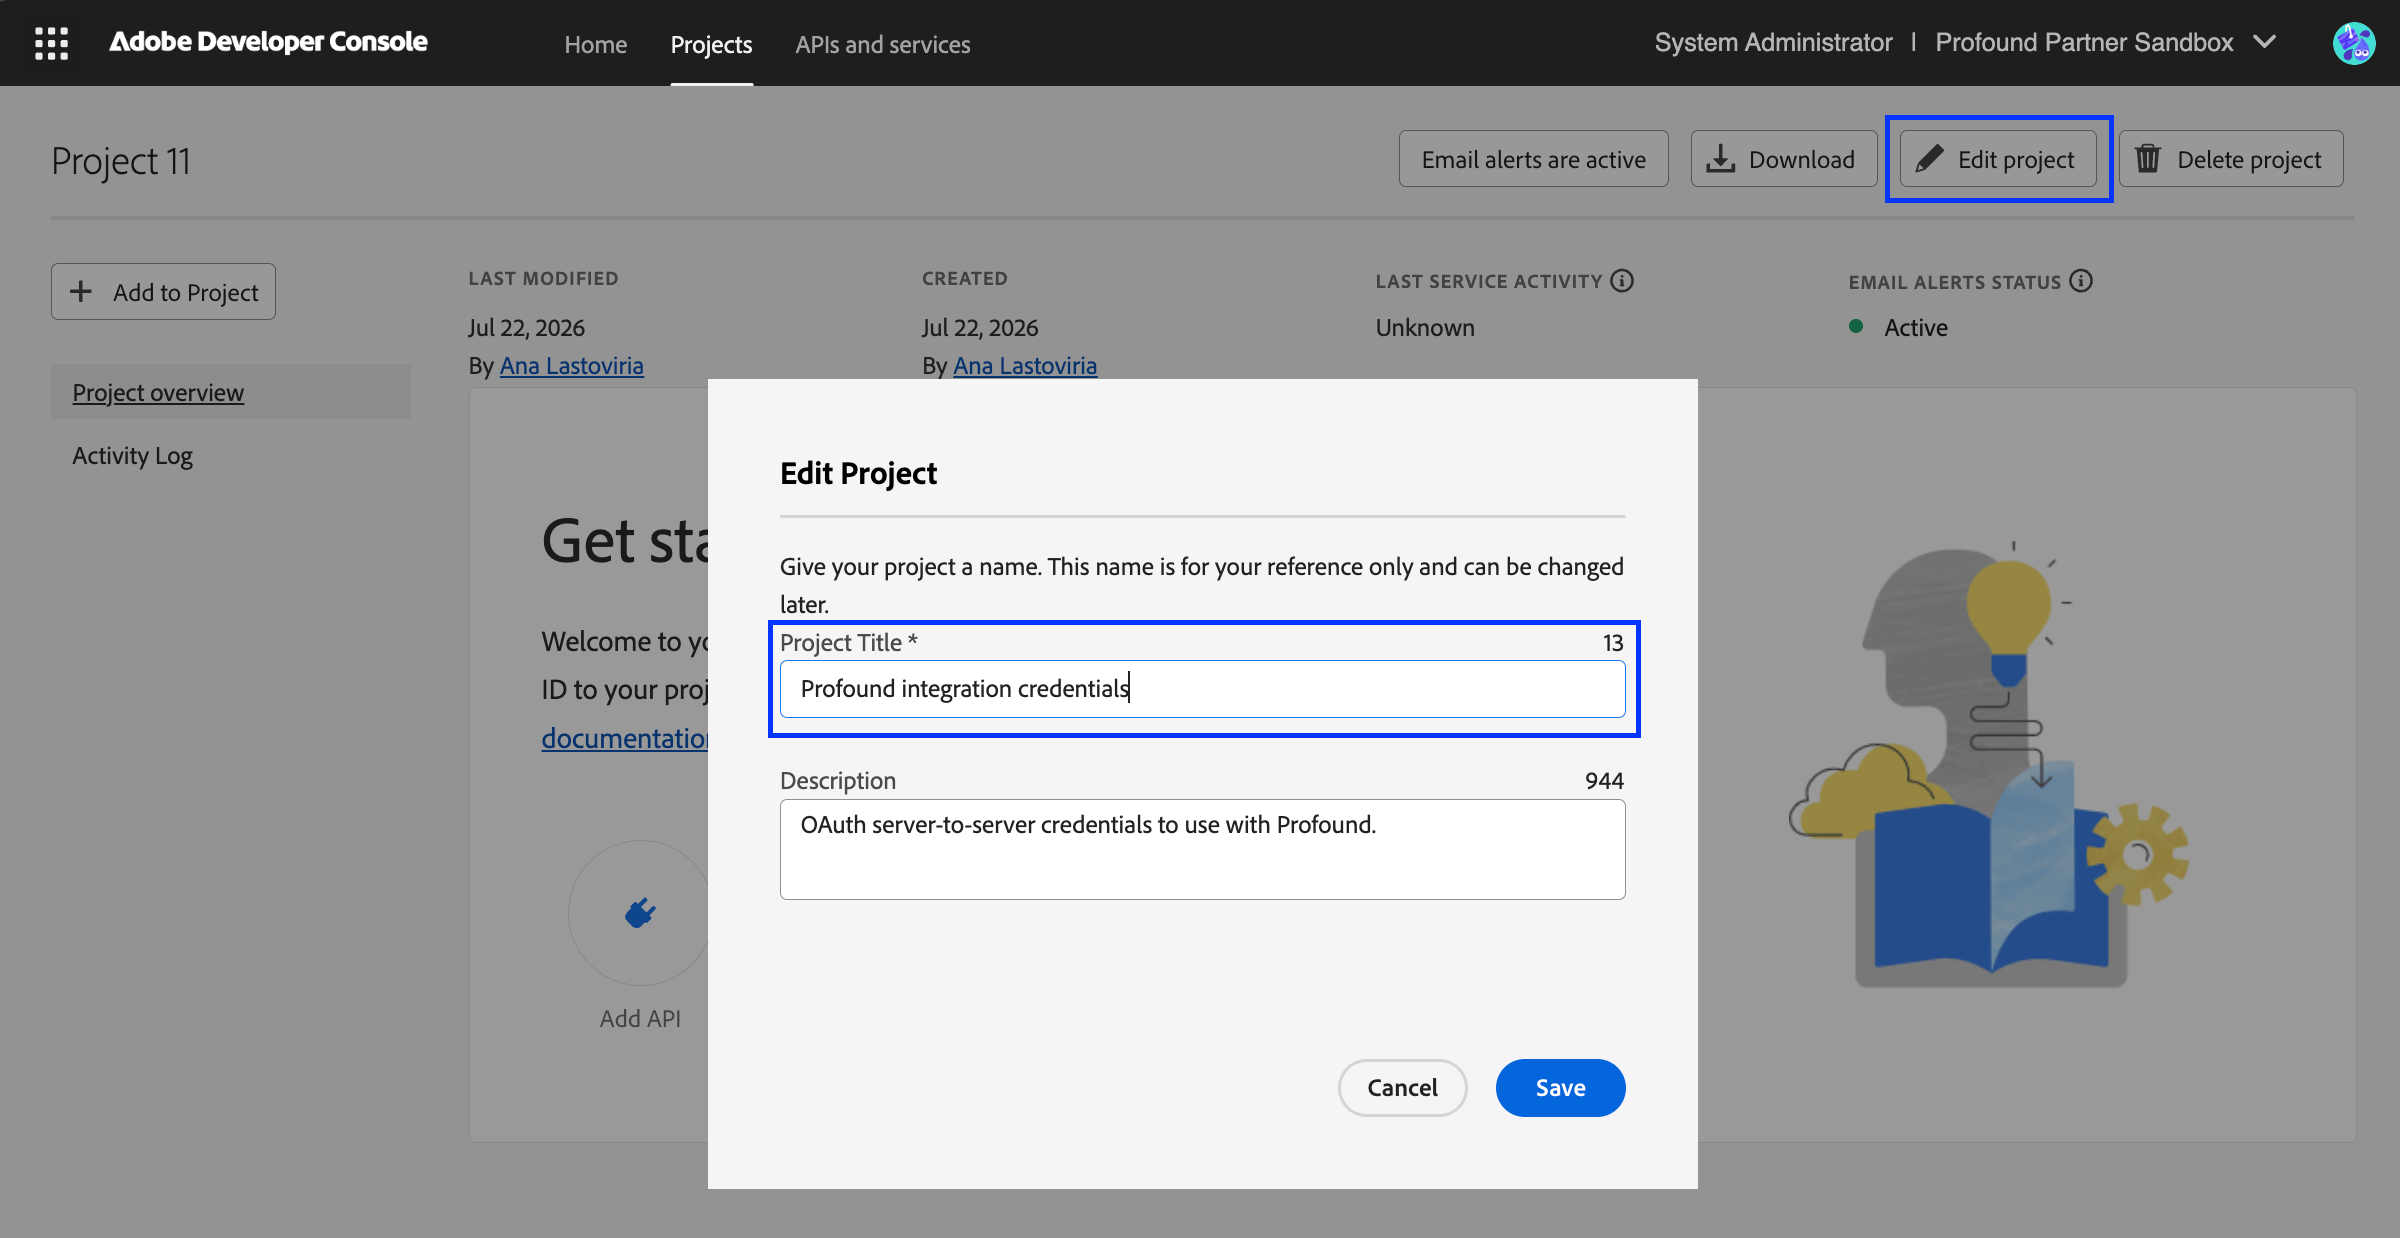
 * On the project page, select **Edit project**, give your project a descriptive name (such as **Profound integration credentials**), then select **Save**.
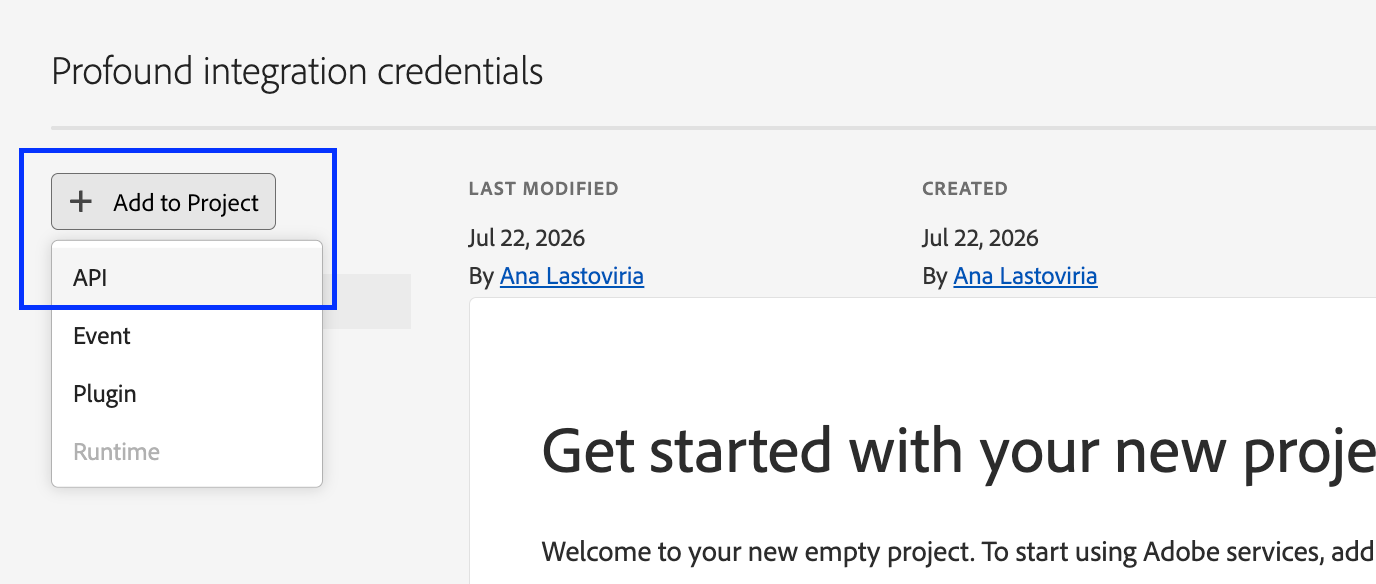
 * Select **Add to Project** > **API**.
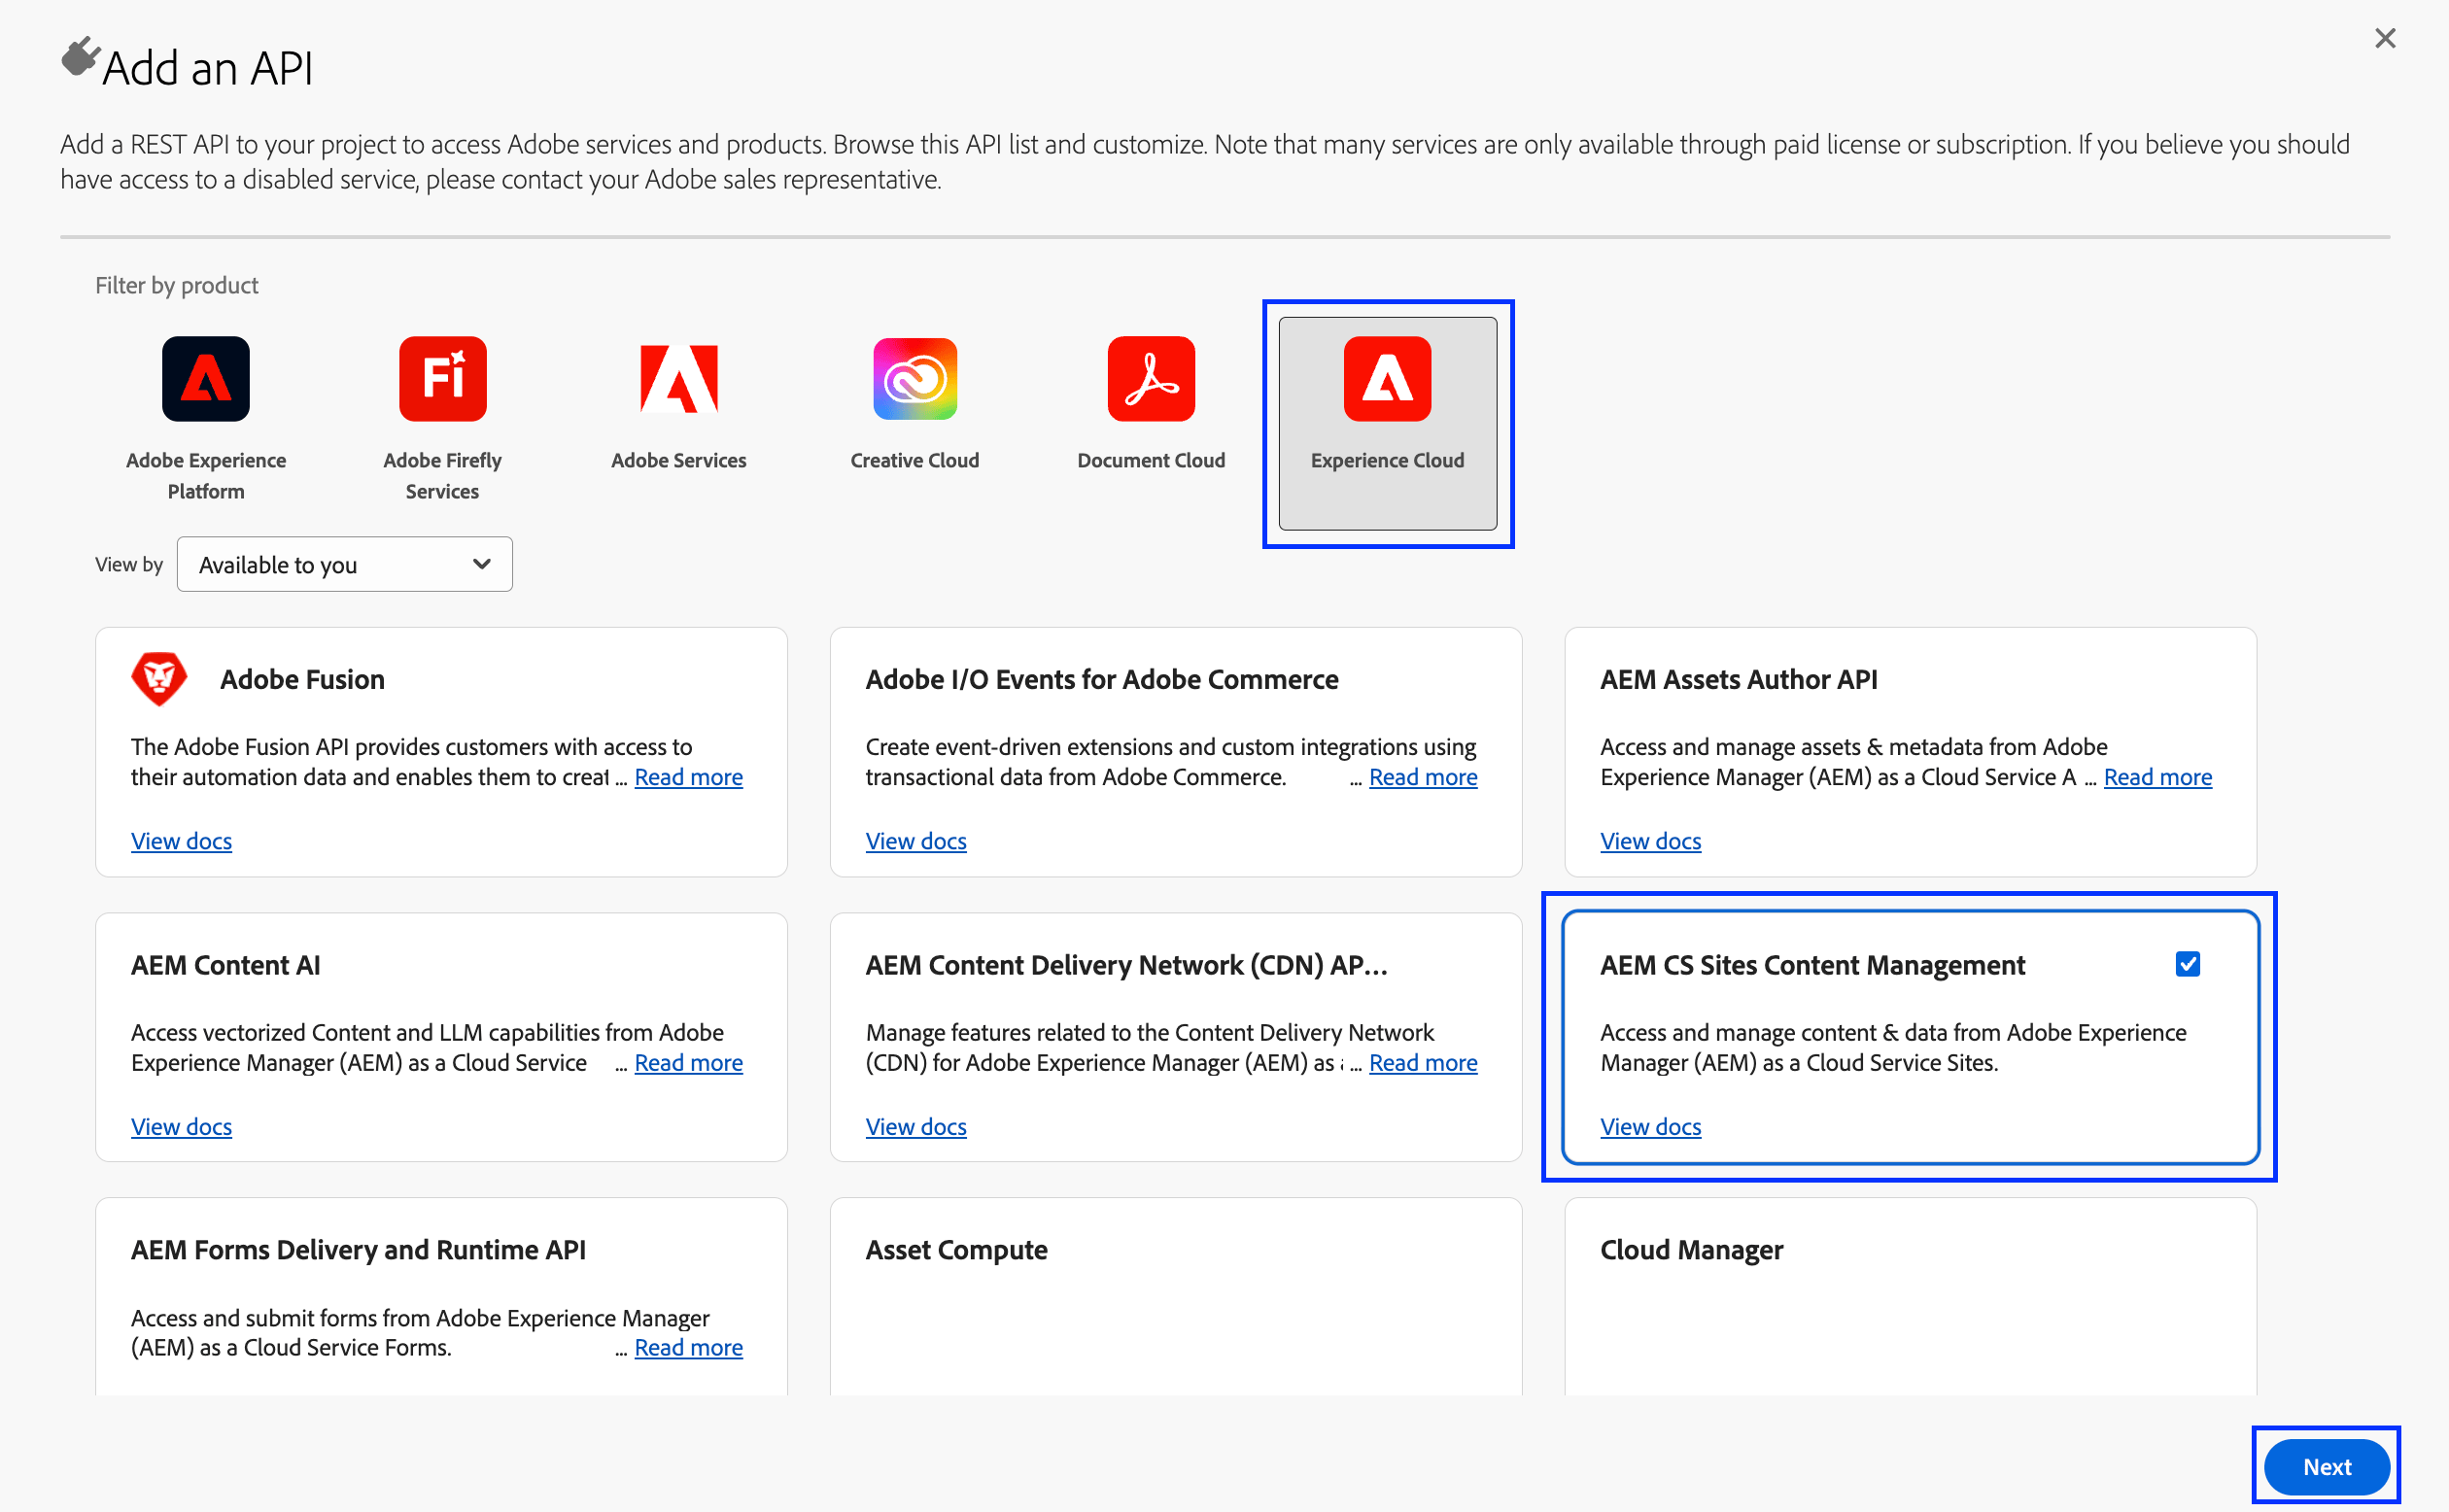
 * On the **Add an API** page, filter the API list by **Experience Cloud**, select **AEM CS Sites Content Management**, then select **Next**.
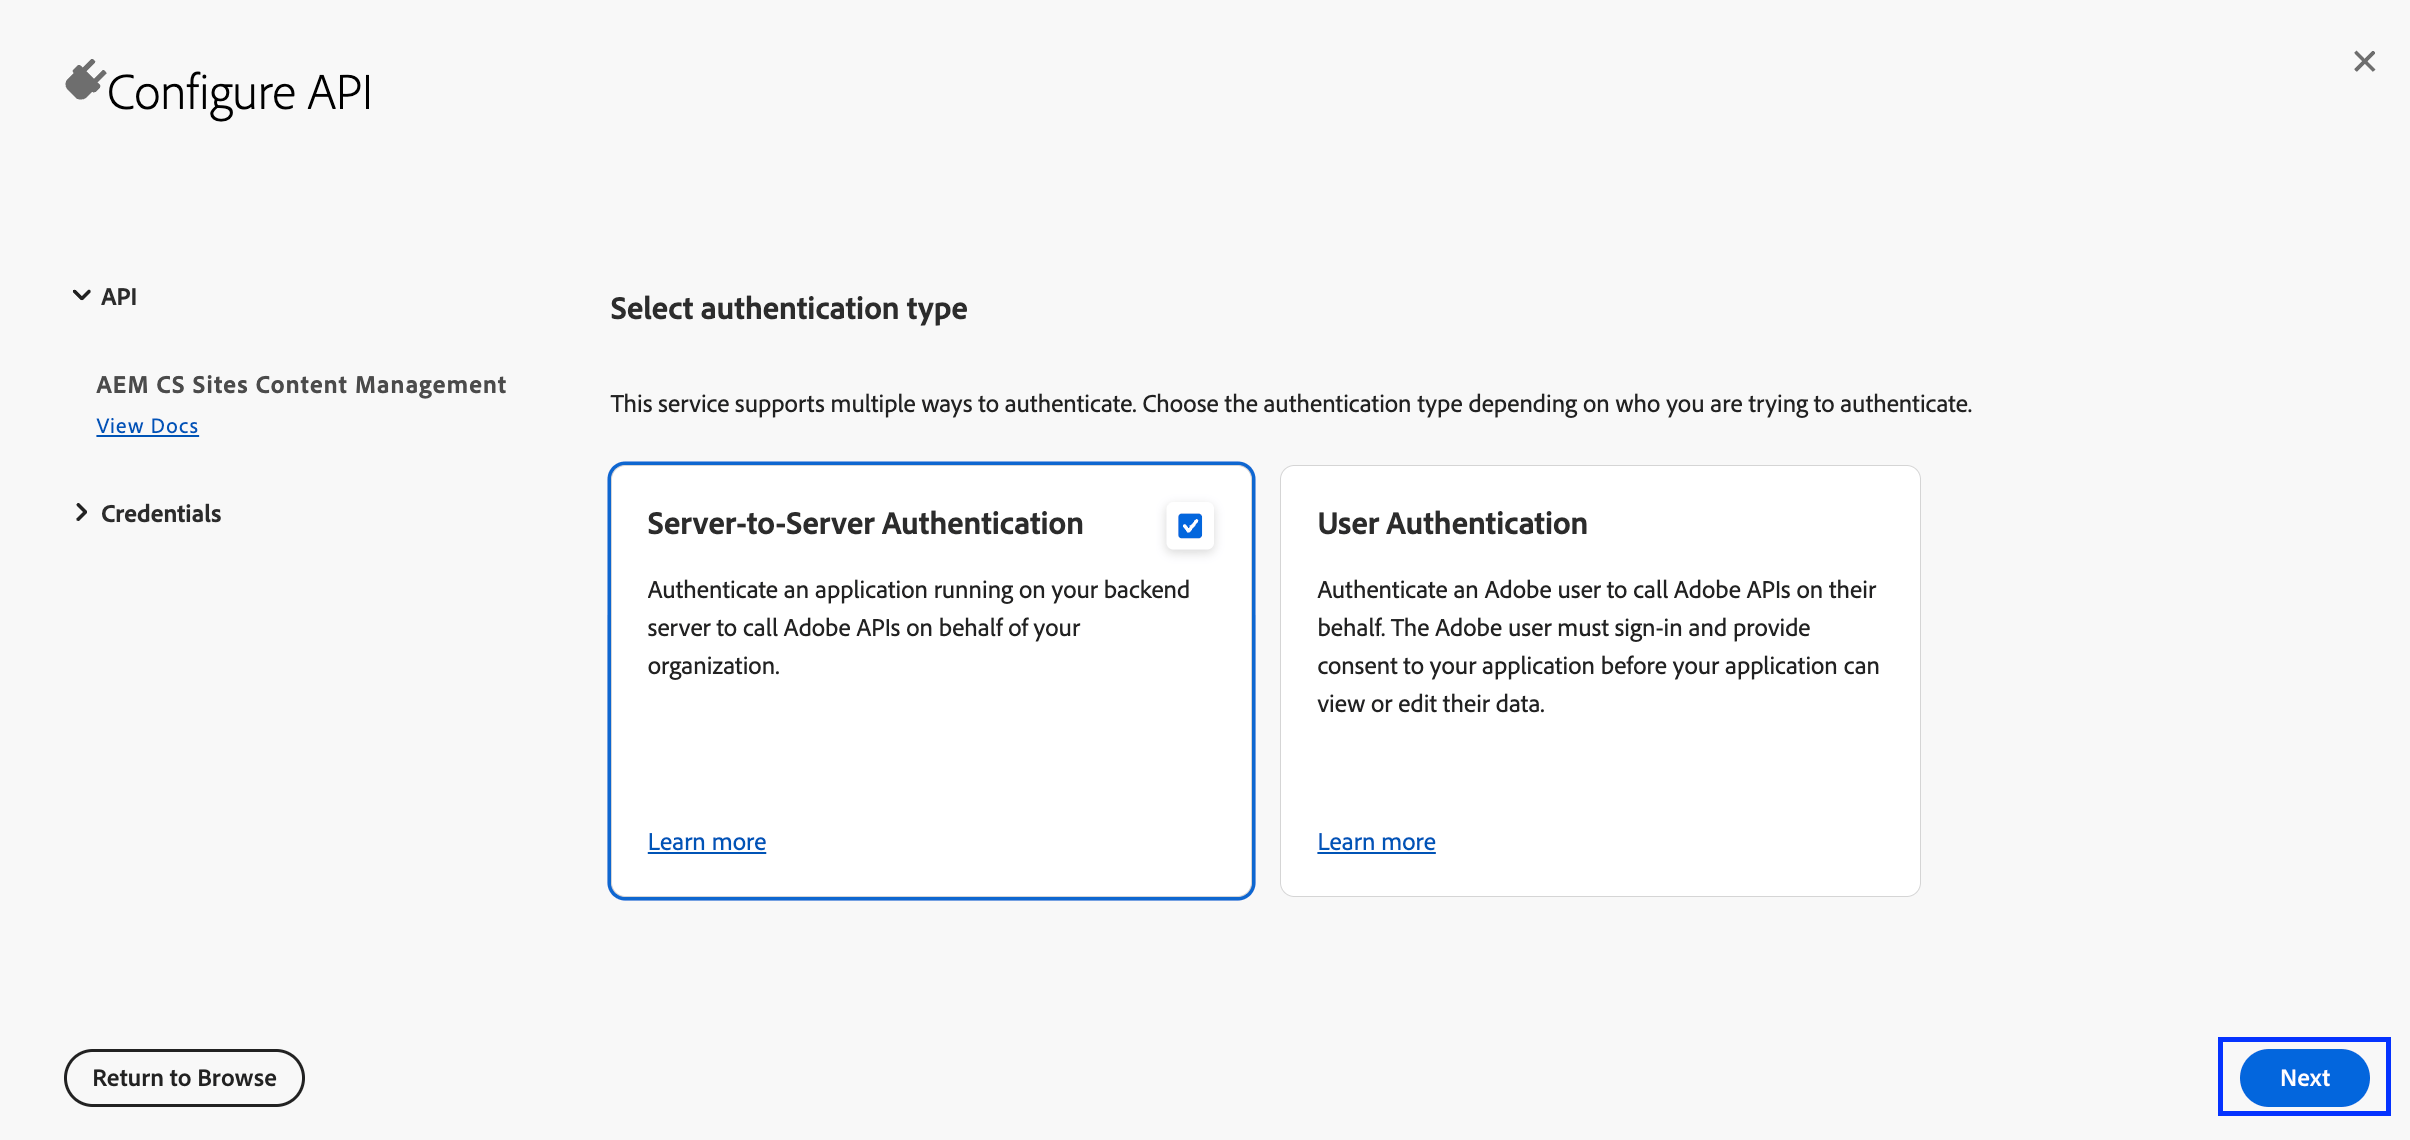
 * Select **Server-to-Server** > **OAuth Server-to-Server** as the authentication type.
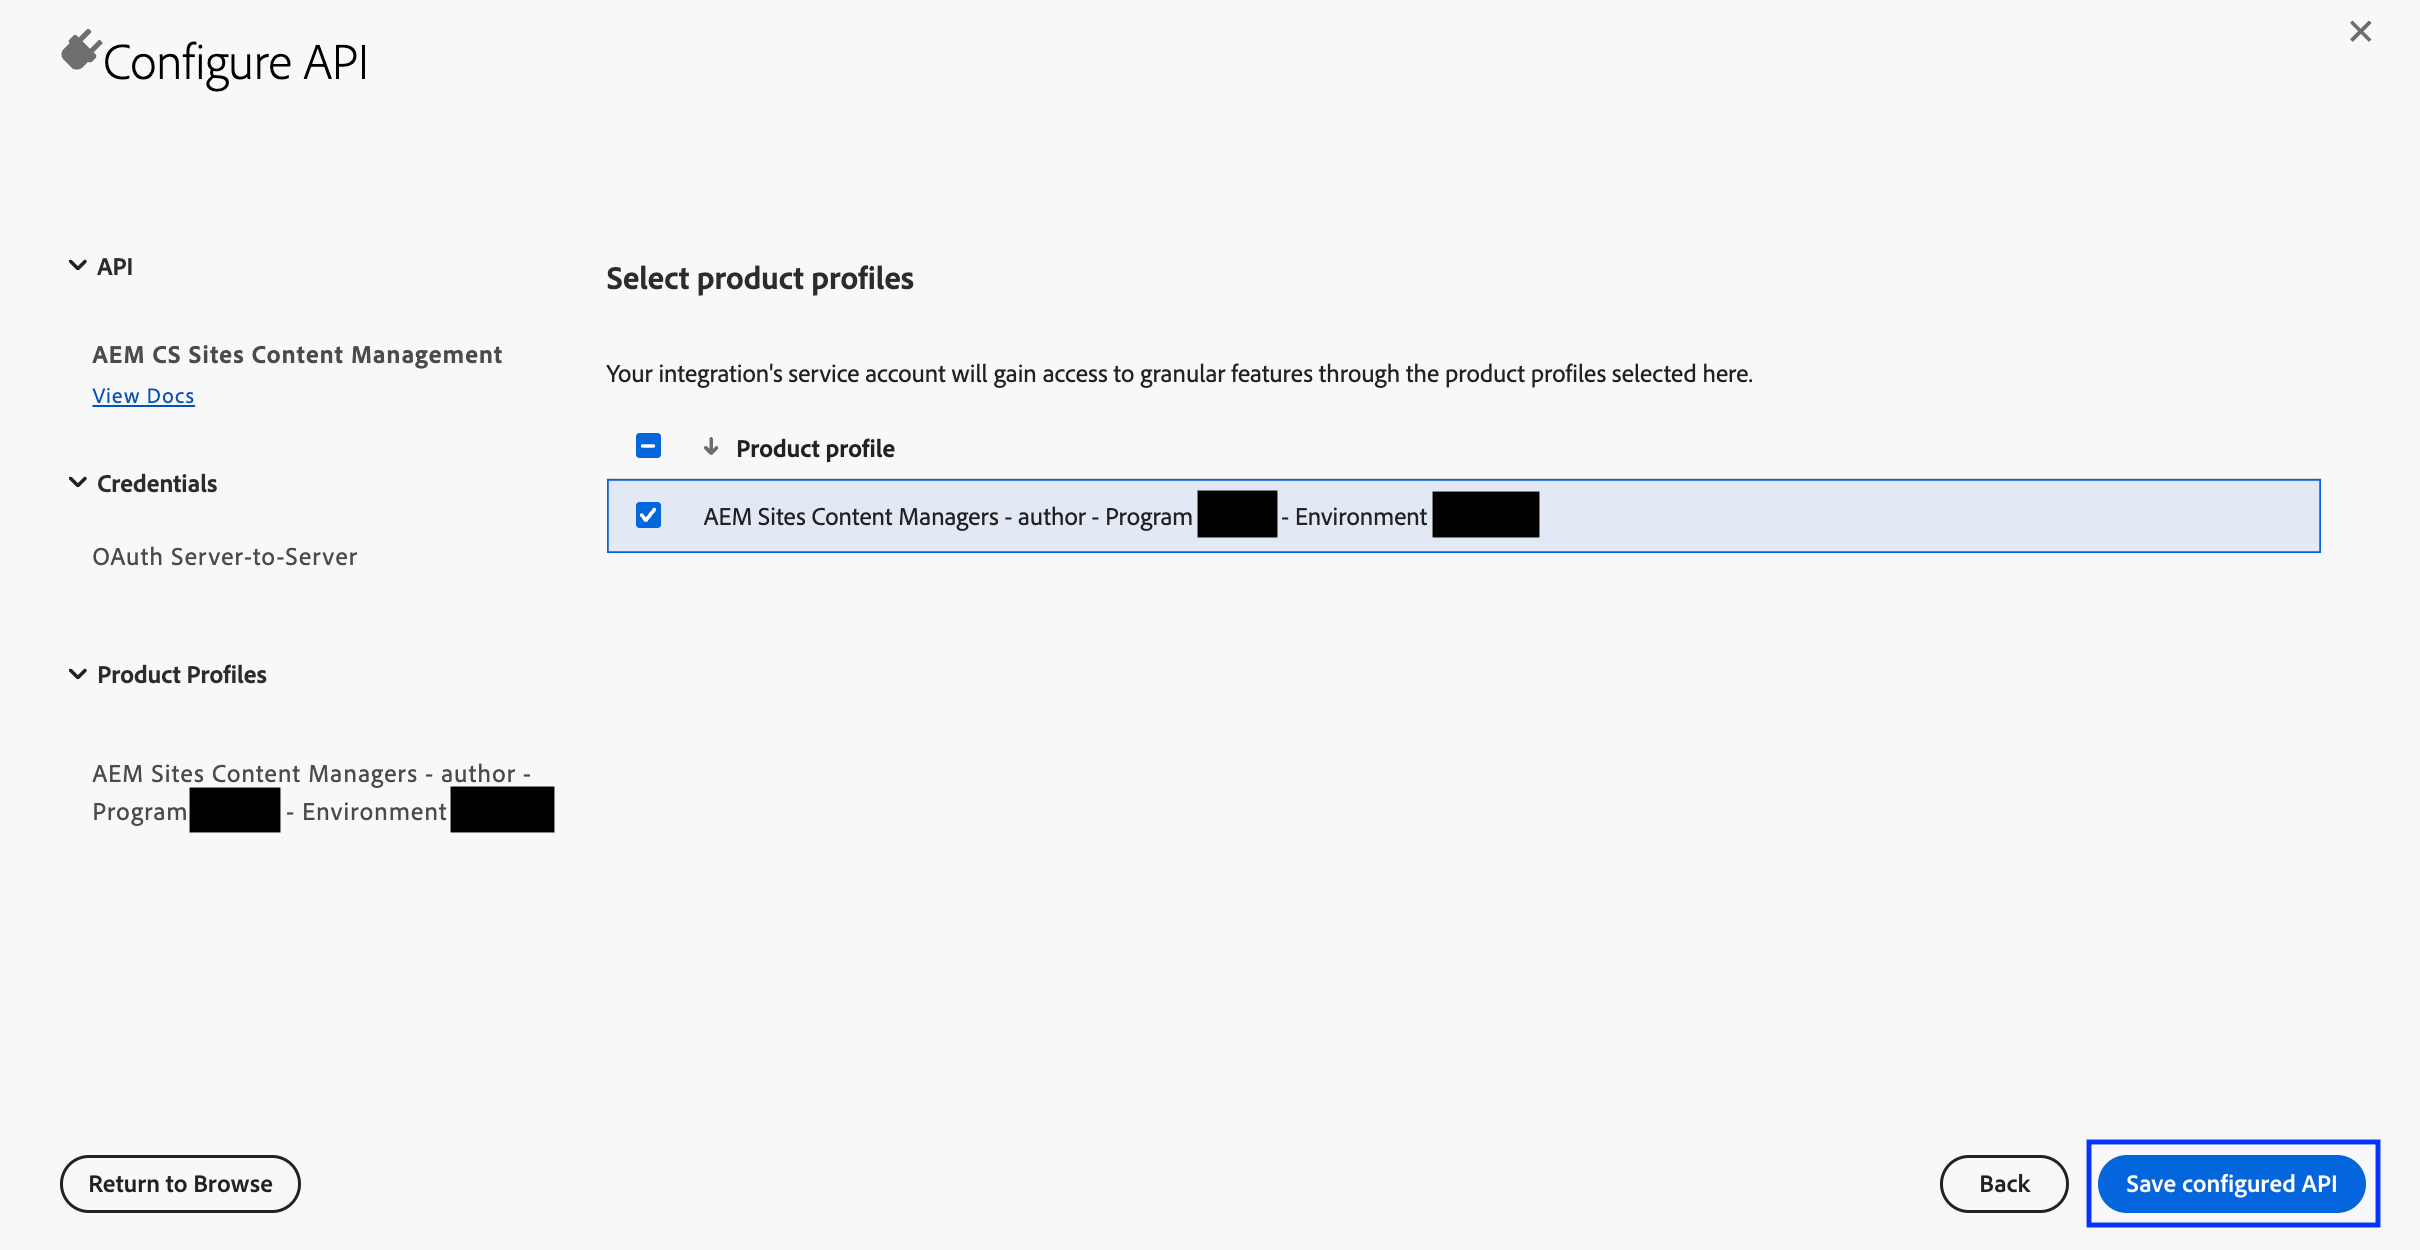
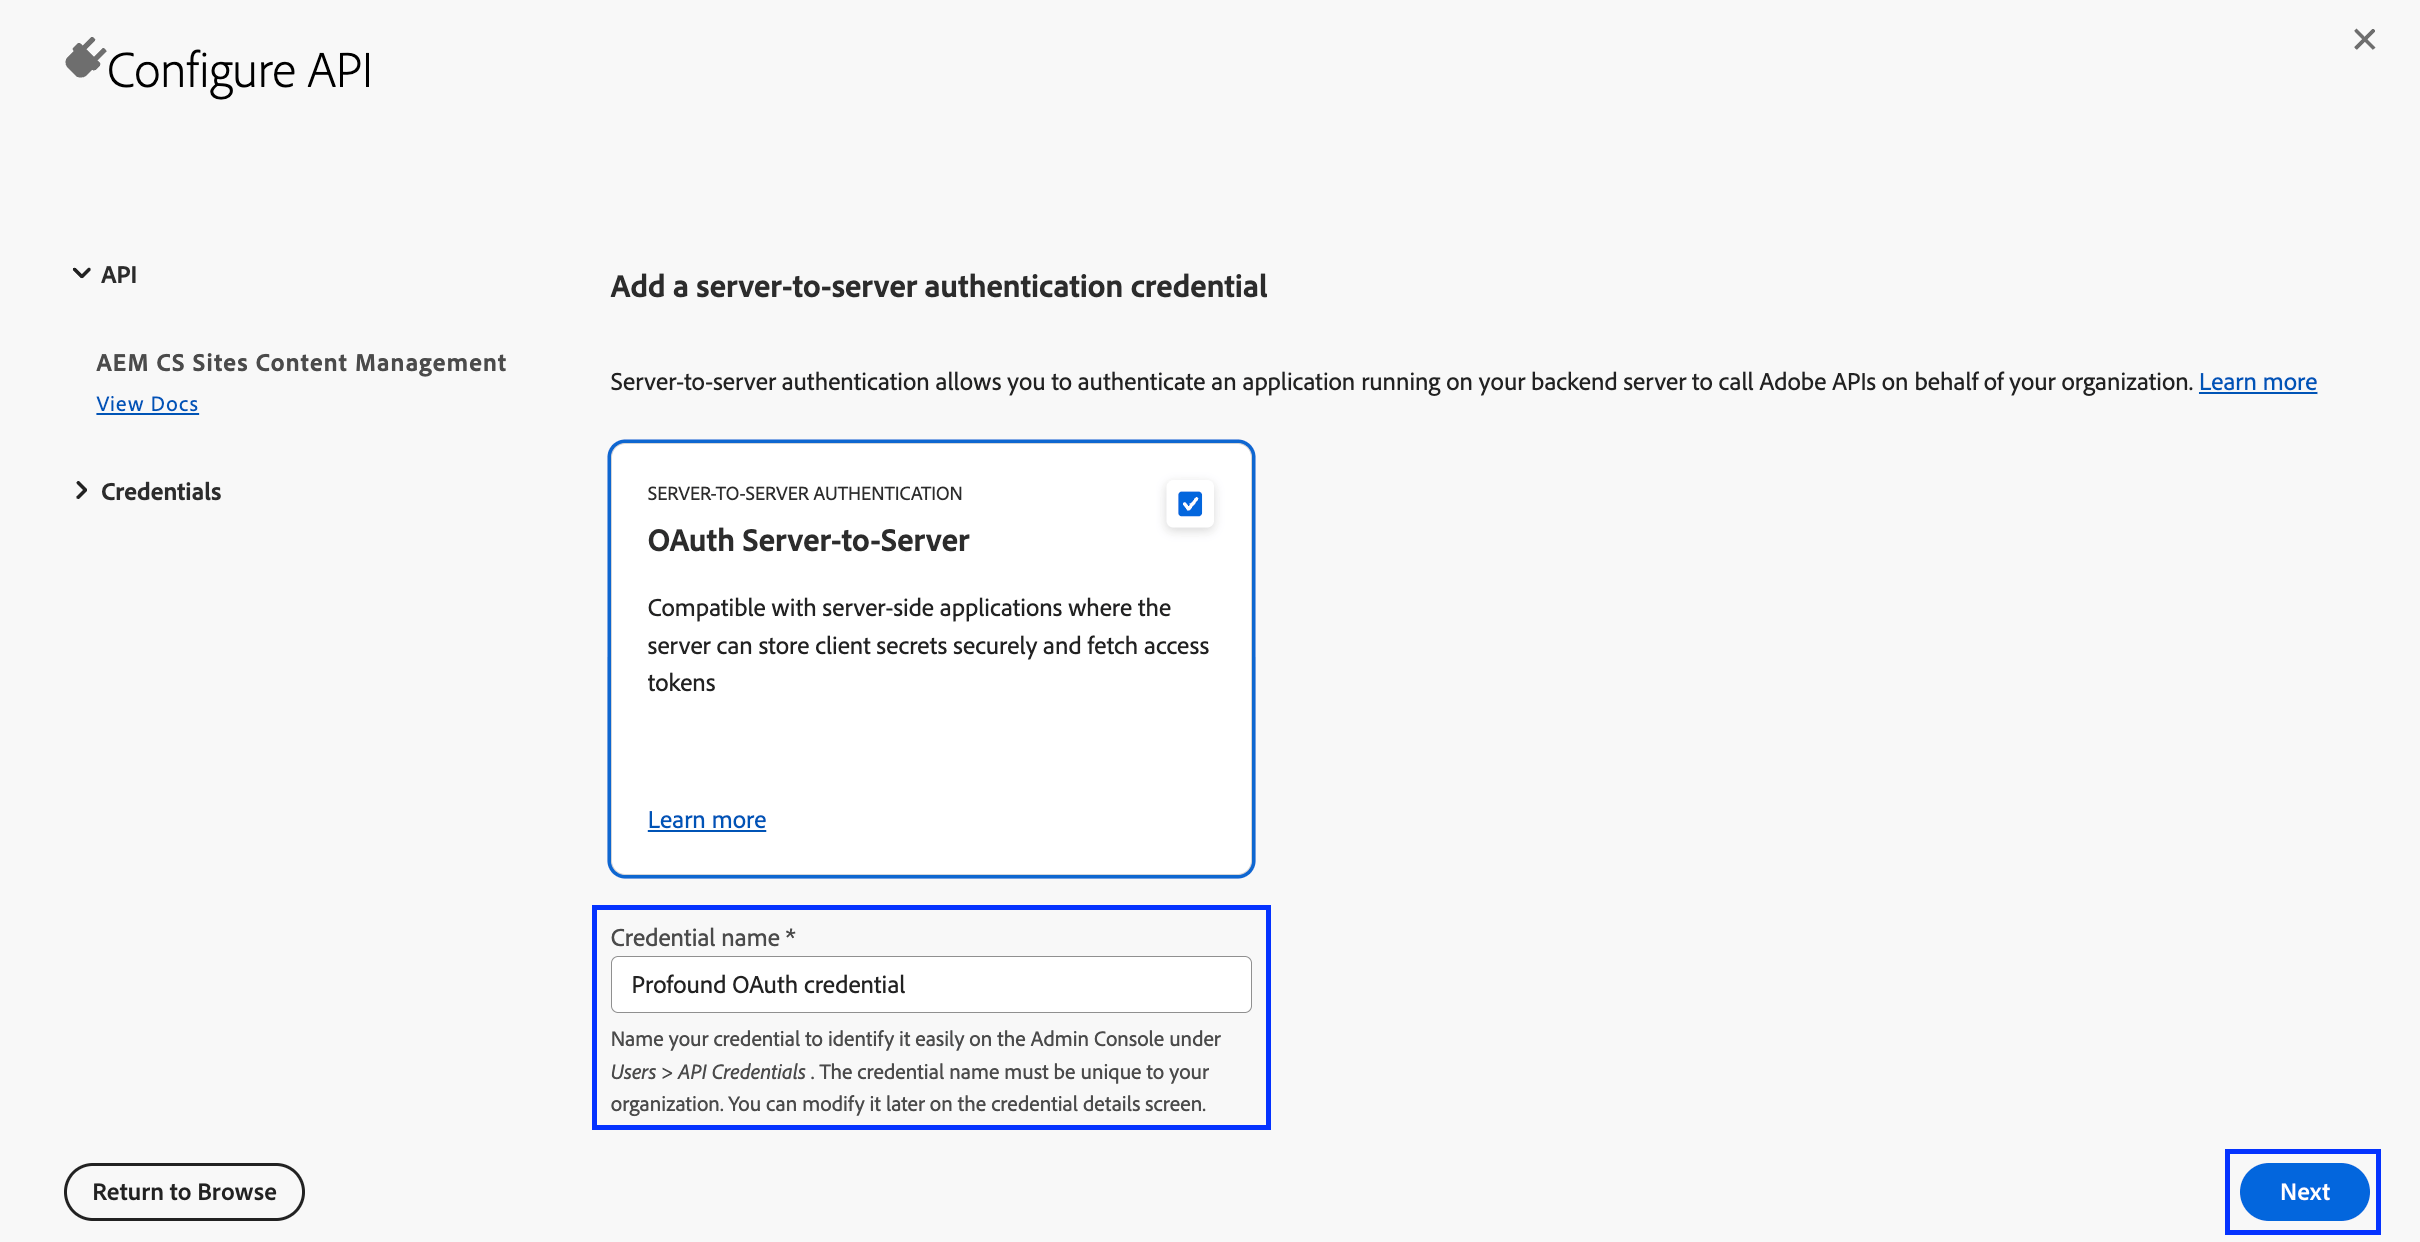 * Select the Author product profile you prepared in [Step 2](#step-2), then save the configuration.
 The AEM Sites Content Management API also provides the folder access Profound uses. No additional credentials are required.
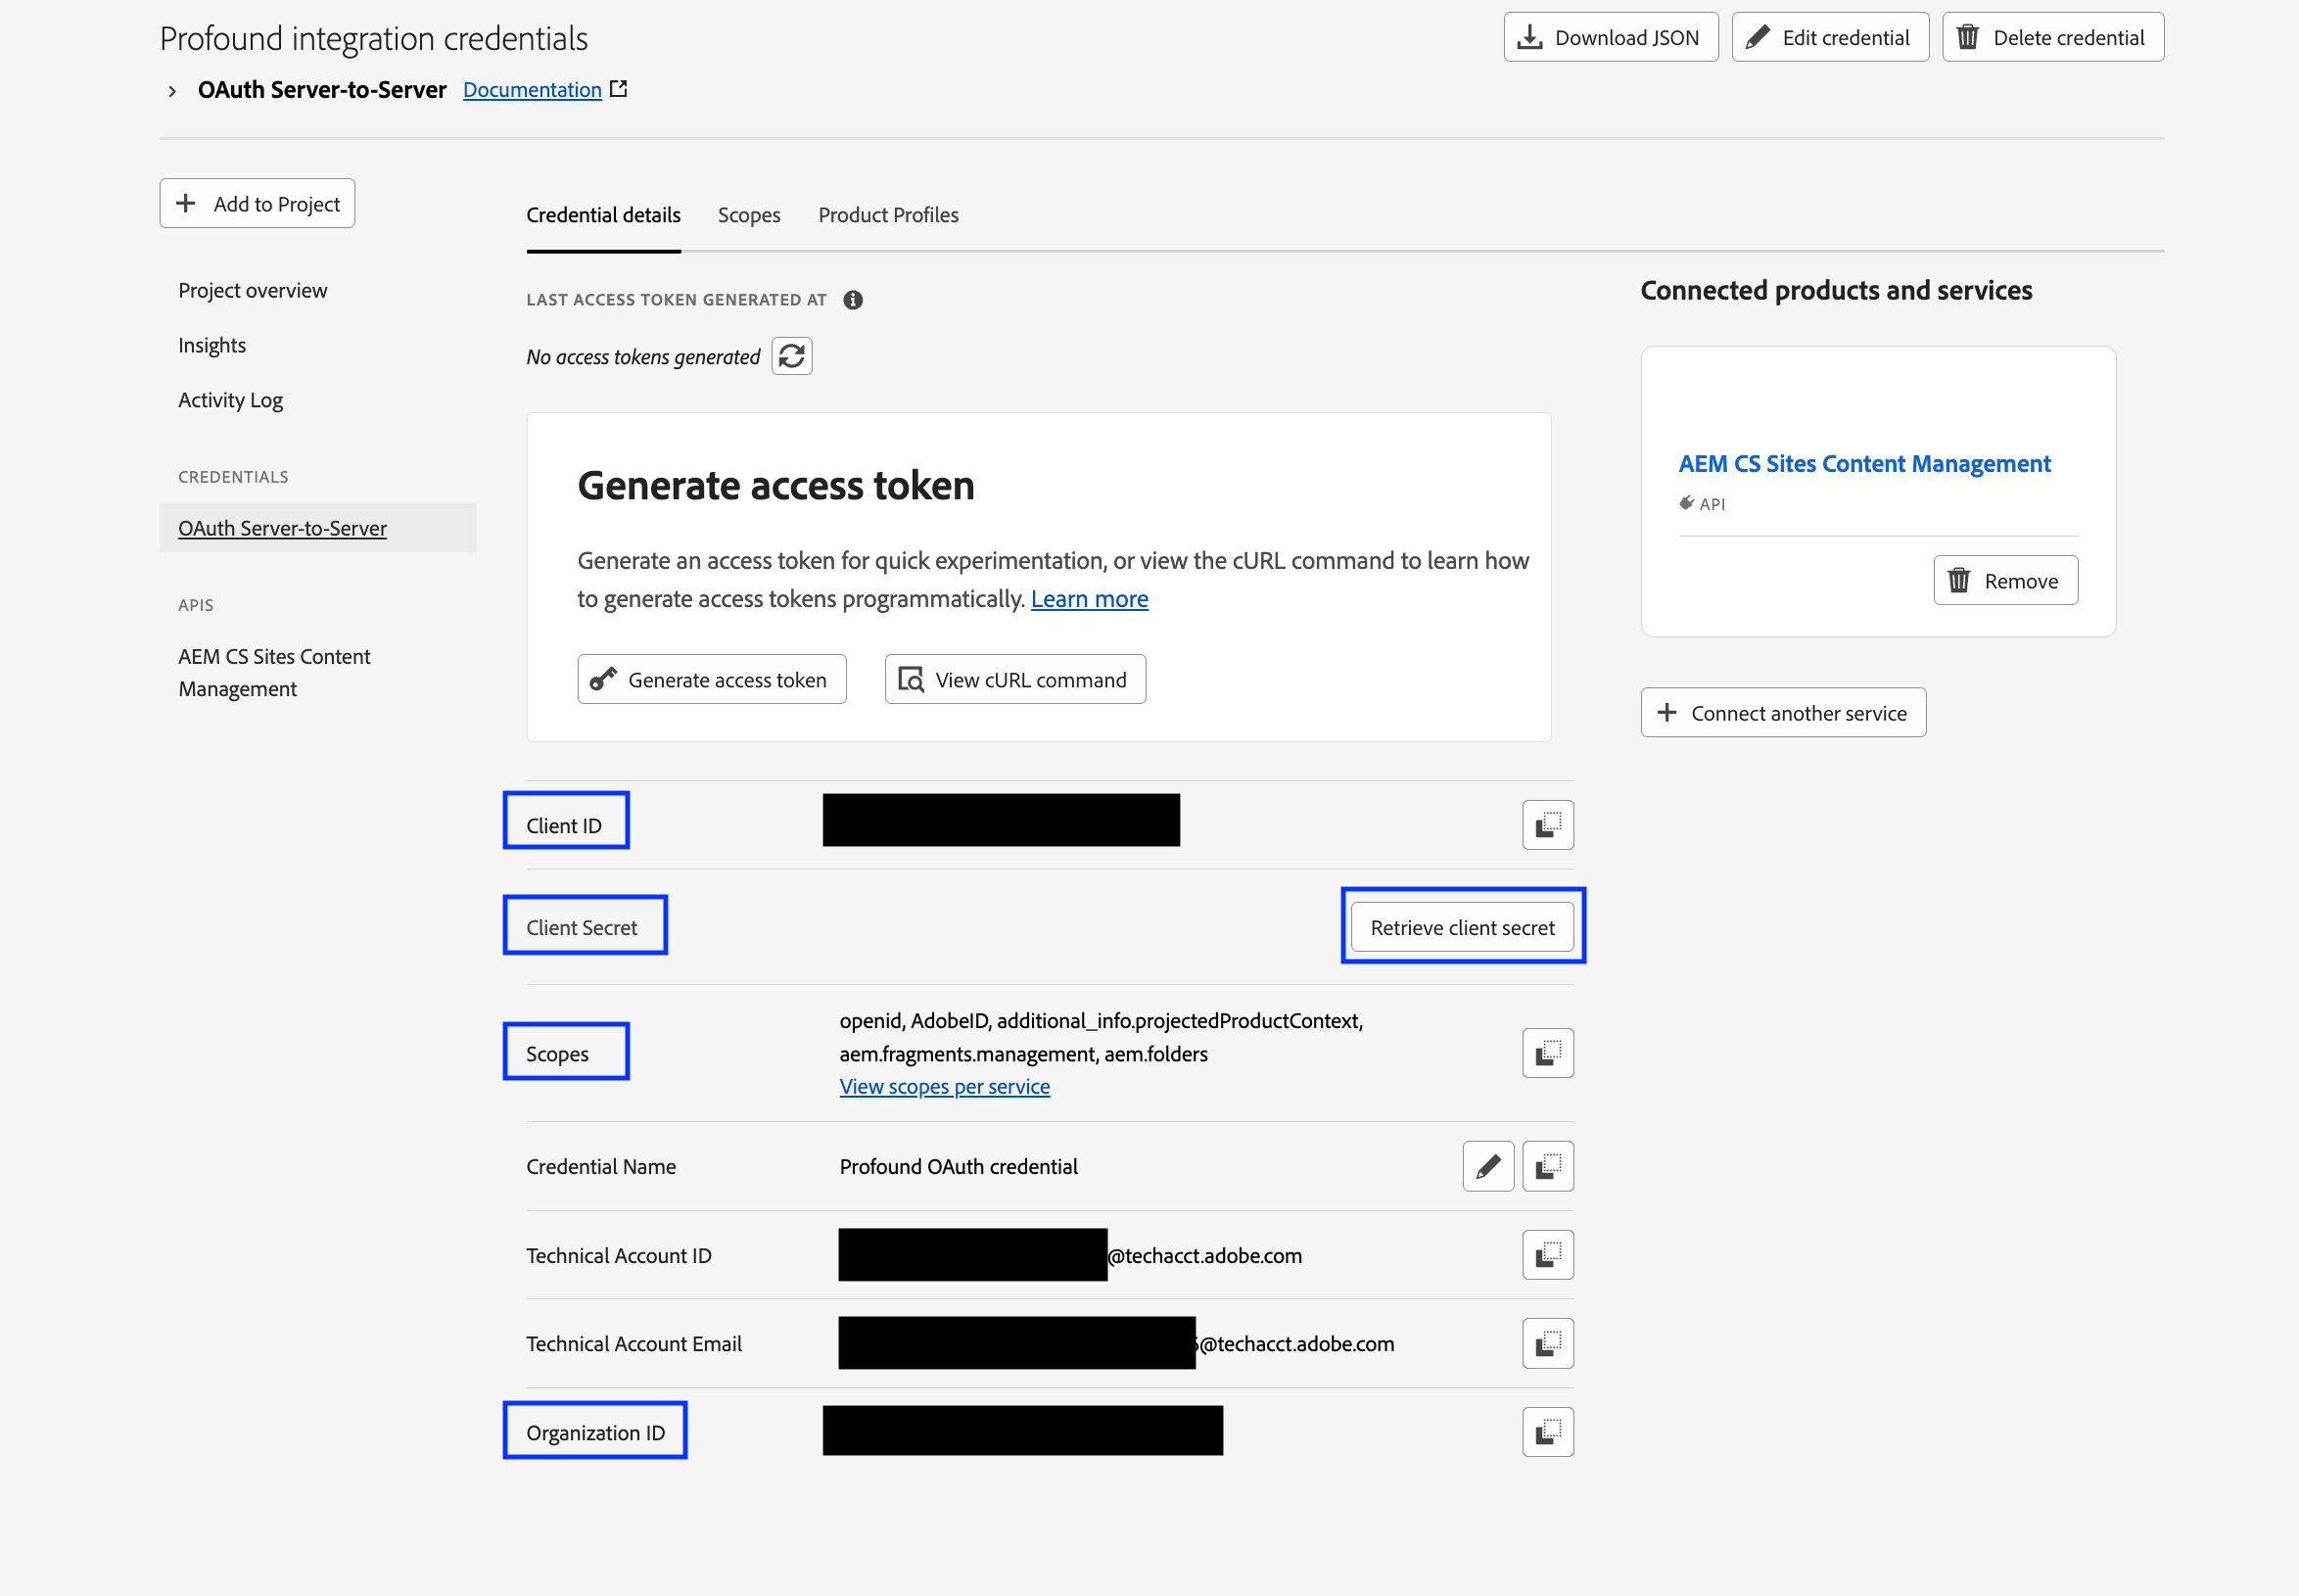
After you save the API configuration, [Adobe Developer Console](https://developer.adobe.com/console) returns you to the project page. In the **Credentials** section, select your new OAuth Server-to-Server credential. From the credential page, copy the values you need to create the AEM integration in Profound:
* **Client ID**
* **Client Secret**
* **Scopes** — copy the complete value exactly as Adobe displays it
* **Organization ID** — optional; copy it only if the AEM tenant requires the `x-gw-ims-org-id` header
The AEM Sites Content Management API also provides the folder access Profound uses. No additional credentials are required.
After you save the API configuration, [Adobe Developer Console](https://developer.adobe.com/console) returns you to the project page. In the **Credentials** section, select your new OAuth Server-to-Server credential. From the credential page, copy the values you need to create the AEM integration in Profound:
* **Client ID**
* **Client Secret**
* **Scopes** — copy the complete value exactly as Adobe displays it
* **Organization ID** — optional; copy it only if the AEM tenant requires the `x-gw-ims-org-id` header
 Before you can use the credential, register its client ID with your Author environment.
* Back in [Adobe Cloud Manager](https://experience.adobe.com/#/cloud-manager), open the program and select **Repositories** in the left sidebar.
* Identify the Adobe-managed repository and branch used by your environment's config pipeline.
Before you can use the credential, register its client ID with your Author environment.
* Back in [Adobe Cloud Manager](https://experience.adobe.com/#/cloud-manager), open the program and select **Repositories** in the left sidebar.
* Identify the Adobe-managed repository and branch used by your environment's config pipeline.
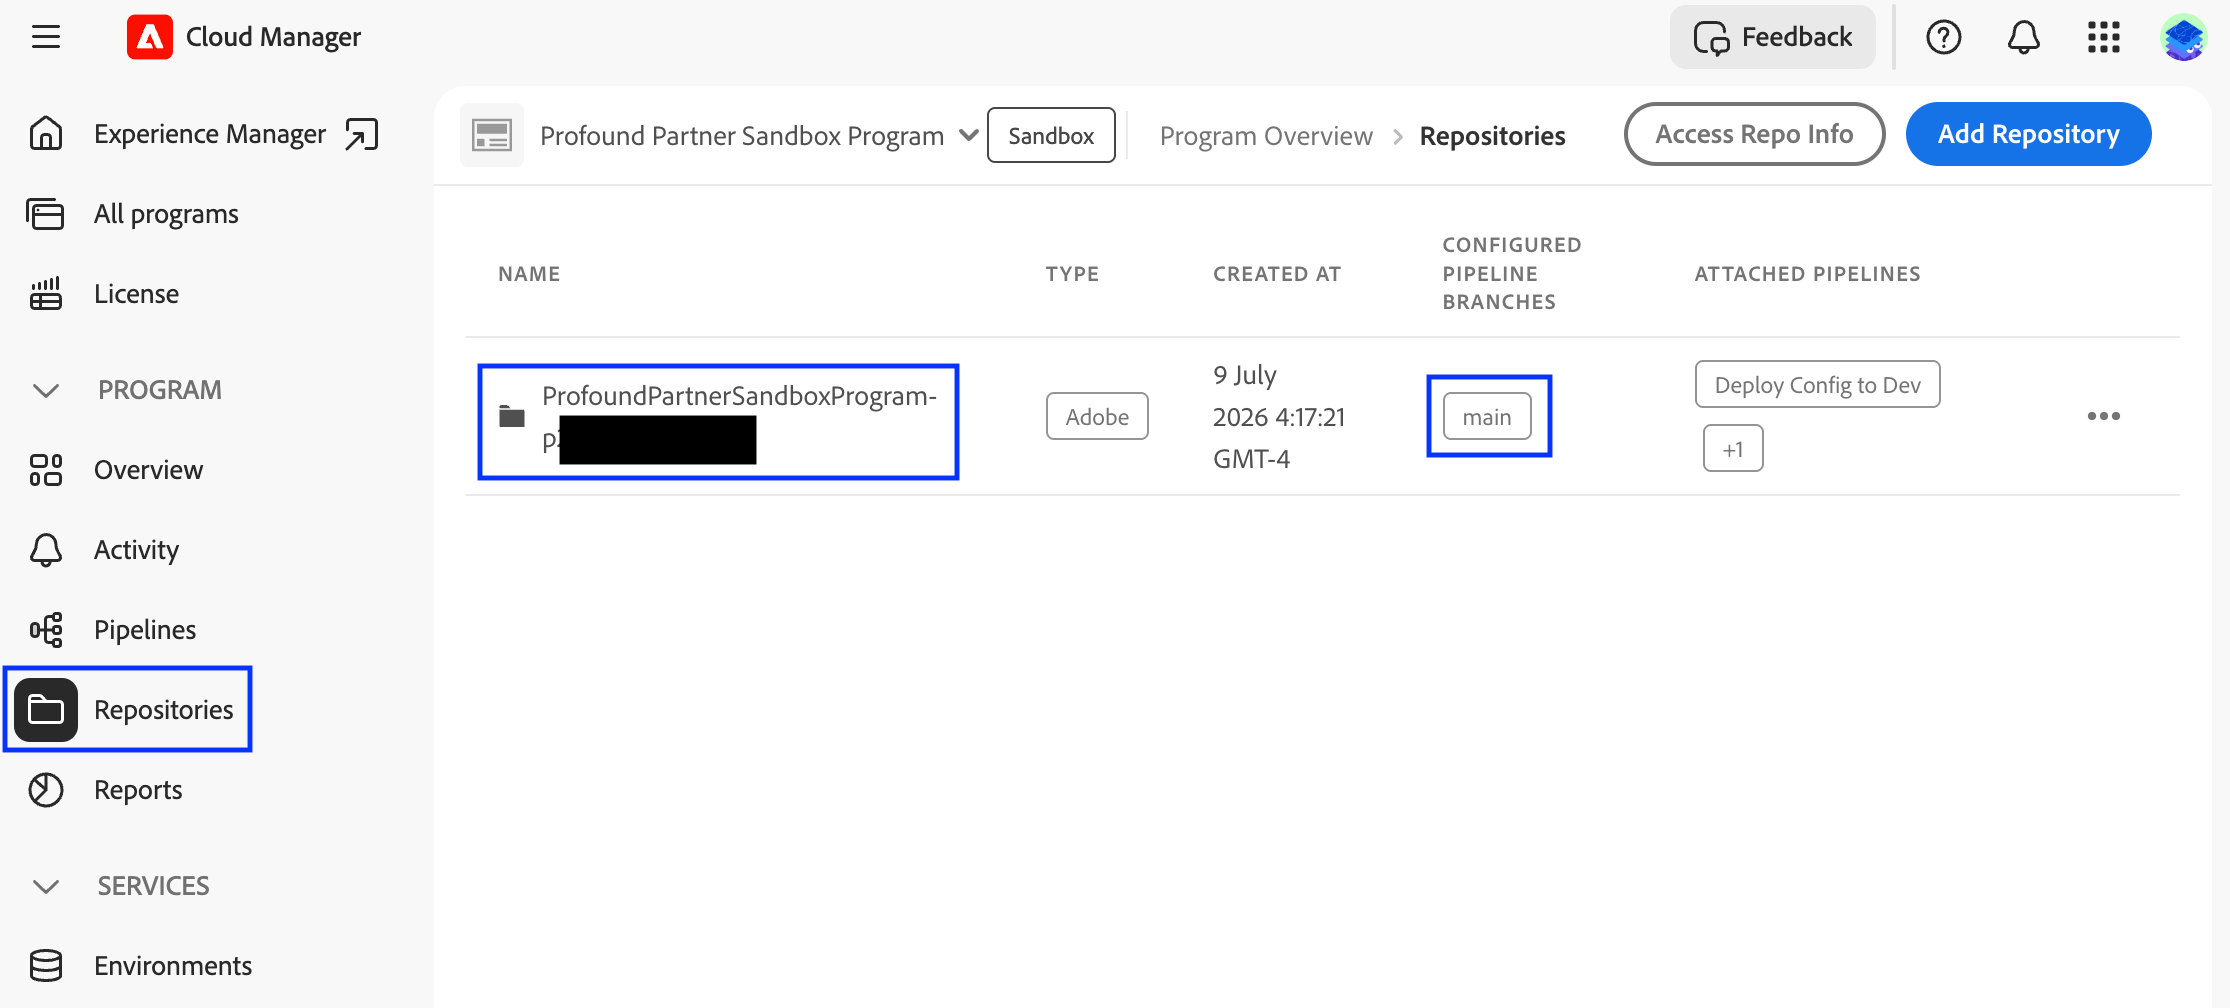 * Select **Access Repo Info** and copy the repository URL and access credentials.
* Using your regular development workflow, clone the repository onto your machine and create or update the `config/api.yaml` file in the root directory with the following configuration:
```yaml theme={null}
kind: "API"
version: "1"
metadata:
envTypes: ["dev", "stage", "prod"]
data:
allowedClientIDs:
author:
- ""
```
Replace `` with the client ID you copied from Developer Console in [Step 5](#step-5).
If you already have other API credentials configured, keep the existing configuration and add the client ID to the `author` list under `allowedClientIDs`.
Learn more about managing repositories and configuring pipelines in the following Adobe resources:
* [AEM API client ID registration guide](https://experienceleague.adobe.com/en/docs/experience-manager-cloud-service/content/implementing/developing/open-api-based-apis#registering-a-client-id)
* [Manage repositories in Cloud Manager](https://experienceleague.adobe.com/en/docs/experience-manager-cloud-service/content/implementing/using-cloud-manager/managing-code/managing-repositories)
* [Use config pipelines](https://experienceleague.adobe.com/en/docs/experience-manager-cloud-service/content/operations/config-pipeline) guide
* [Invoke OpenAPI-based AEM APIs using OAuth Server-to-Server authentication](https://experienceleague.adobe.com/en/docs/experience-manager-learn/cloud-service/aem-apis/openapis/invoke-api-using-oauth-s2s) tutorial
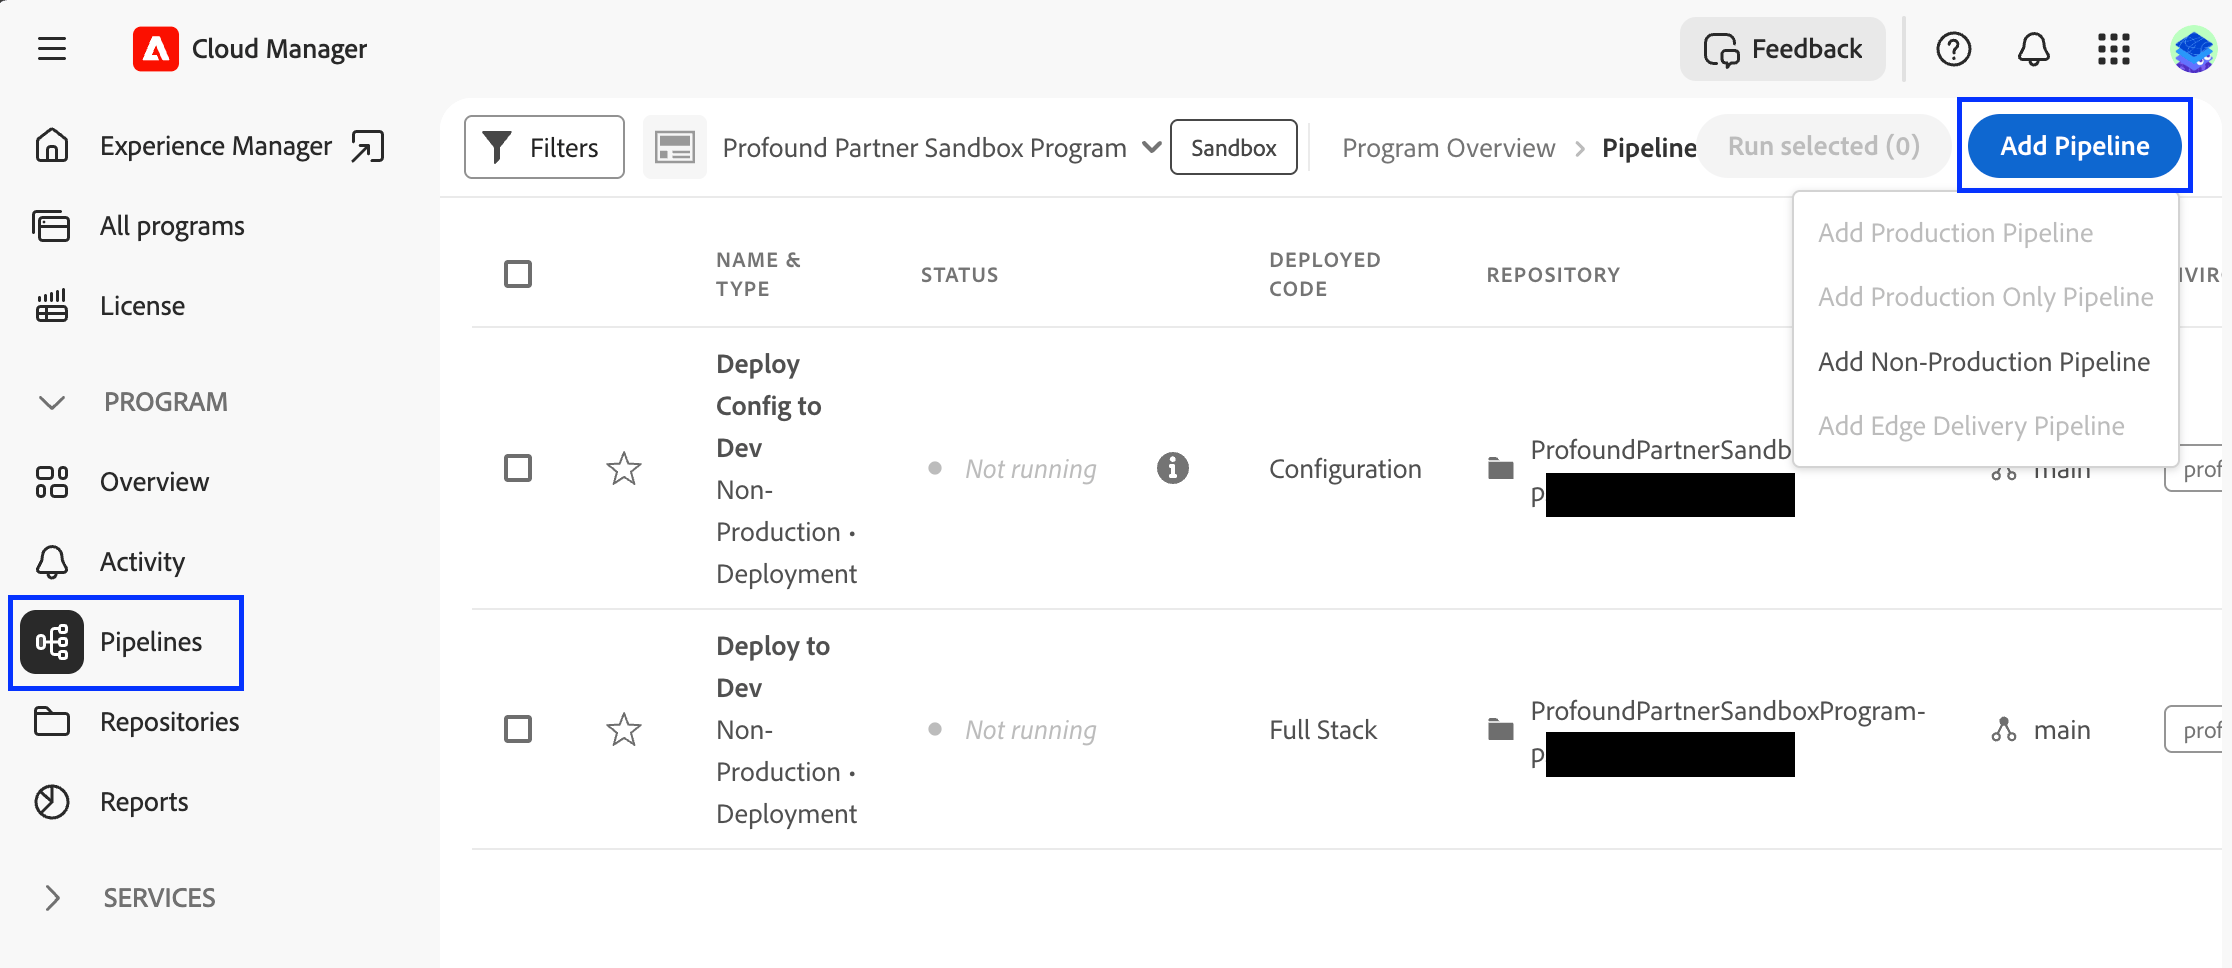
* Still on your program page in [Adobe Cloud Manager](https://experience.adobe.com/#/cloud-manager), select **Pipelines** in the left sidebar.
* Select **Add Pipeline**, then select **Add Non-Production Pipeline** for the development environment, or **Add Production Pipeline** for stage and production.
* Select **Access Repo Info** and copy the repository URL and access credentials.
* Using your regular development workflow, clone the repository onto your machine and create or update the `config/api.yaml` file in the root directory with the following configuration:
```yaml theme={null}
kind: "API"
version: "1"
metadata:
envTypes: ["dev", "stage", "prod"]
data:
allowedClientIDs:
author:
- ""
```
Replace `` with the client ID you copied from Developer Console in [Step 5](#step-5).
If you already have other API credentials configured, keep the existing configuration and add the client ID to the `author` list under `allowedClientIDs`.
Learn more about managing repositories and configuring pipelines in the following Adobe resources:
* [AEM API client ID registration guide](https://experienceleague.adobe.com/en/docs/experience-manager-cloud-service/content/implementing/developing/open-api-based-apis#registering-a-client-id)
* [Manage repositories in Cloud Manager](https://experienceleague.adobe.com/en/docs/experience-manager-cloud-service/content/implementing/using-cloud-manager/managing-code/managing-repositories)
* [Use config pipelines](https://experienceleague.adobe.com/en/docs/experience-manager-cloud-service/content/operations/config-pipeline) guide
* [Invoke OpenAPI-based AEM APIs using OAuth Server-to-Server authentication](https://experienceleague.adobe.com/en/docs/experience-manager-learn/cloud-service/aem-apis/openapis/invoke-api-using-oauth-s2s) tutorial
* Still on your program page in [Adobe Cloud Manager](https://experience.adobe.com/#/cloud-manager), select **Pipelines** in the left sidebar.
* Select **Add Pipeline**, then select **Add Non-Production Pipeline** for the development environment, or **Add Production Pipeline** for stage and production.
 * In the **Add Pipeline** dialog, select **Deployment Pipeline**, give your pipeline a descriptive name, then select **Continue**.
* On the next screen, fill in the values as follows:
* Select code to deploy: **Targeted deployment**
* Include: **Config**
* Eligible Deployment Environments: select your AEM environment from the dropdown
* Repository, Git Branch, Code Location: the repository, branch, and config directory from [Step 6](#step-6)
* Select **Save**.
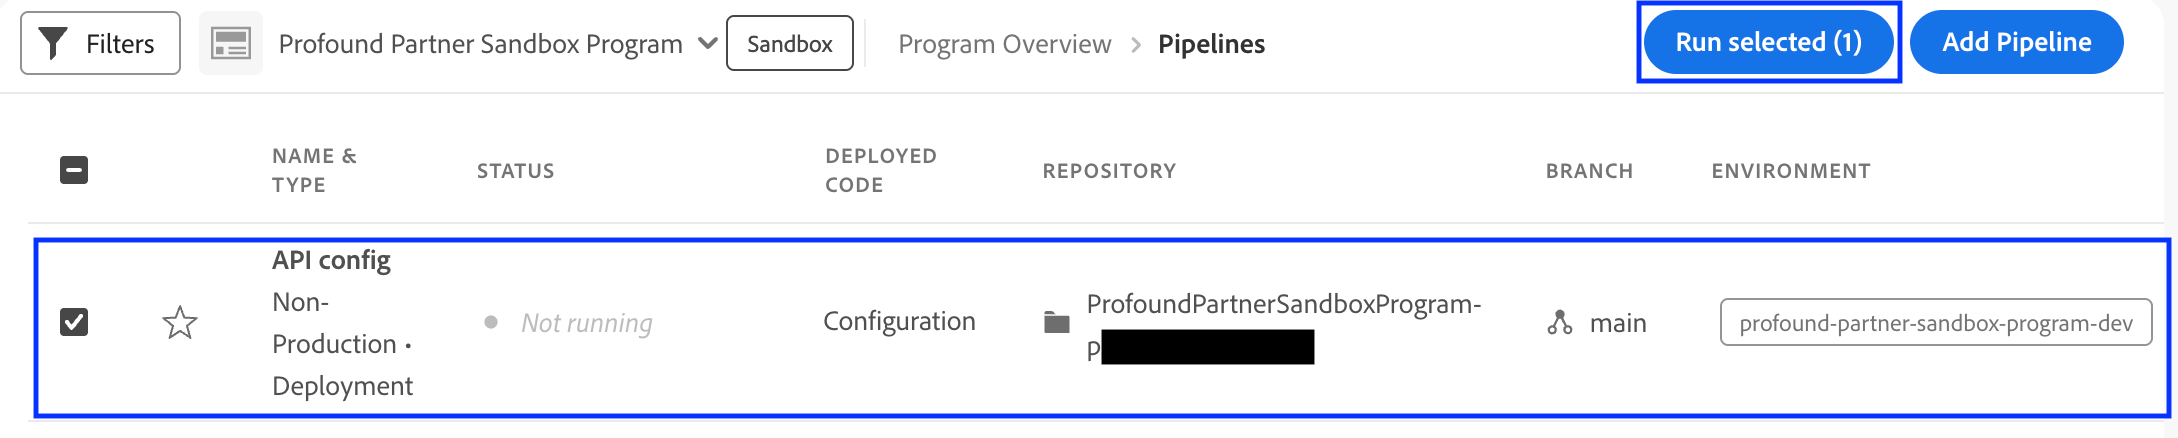
Your new config pipeline appears in the list of pipelines in the **Pipelines** section. Select the pipeline, then select **Run selected**. Wait for the deployment to complete successfully.
* In the **Add Pipeline** dialog, select **Deployment Pipeline**, give your pipeline a descriptive name, then select **Continue**.
* On the next screen, fill in the values as follows:
* Select code to deploy: **Targeted deployment**
* Include: **Config**
* Eligible Deployment Environments: select your AEM environment from the dropdown
* Repository, Git Branch, Code Location: the repository, branch, and config directory from [Step 6](#step-6)
* Select **Save**.
Your new config pipeline appears in the list of pipelines in the **Pipelines** section. Select the pipeline, then select **Run selected**. Wait for the deployment to complete successfully.
 Learn more about deploying config pipelines in the following Adobe resources:
* [Use config pipelines](https://experienceleague.adobe.com/en/docs/experience-manager-cloud-service/content/operations/config-pipeline) guide
* [Cloud Manager CI/CD pipelines](https://experienceleague.adobe.com/en/docs/experience-manager-cloud-service/content/implementing/using-cloud-manager/cicd-pipelines/introduction-ci-cd-pipelines) overview
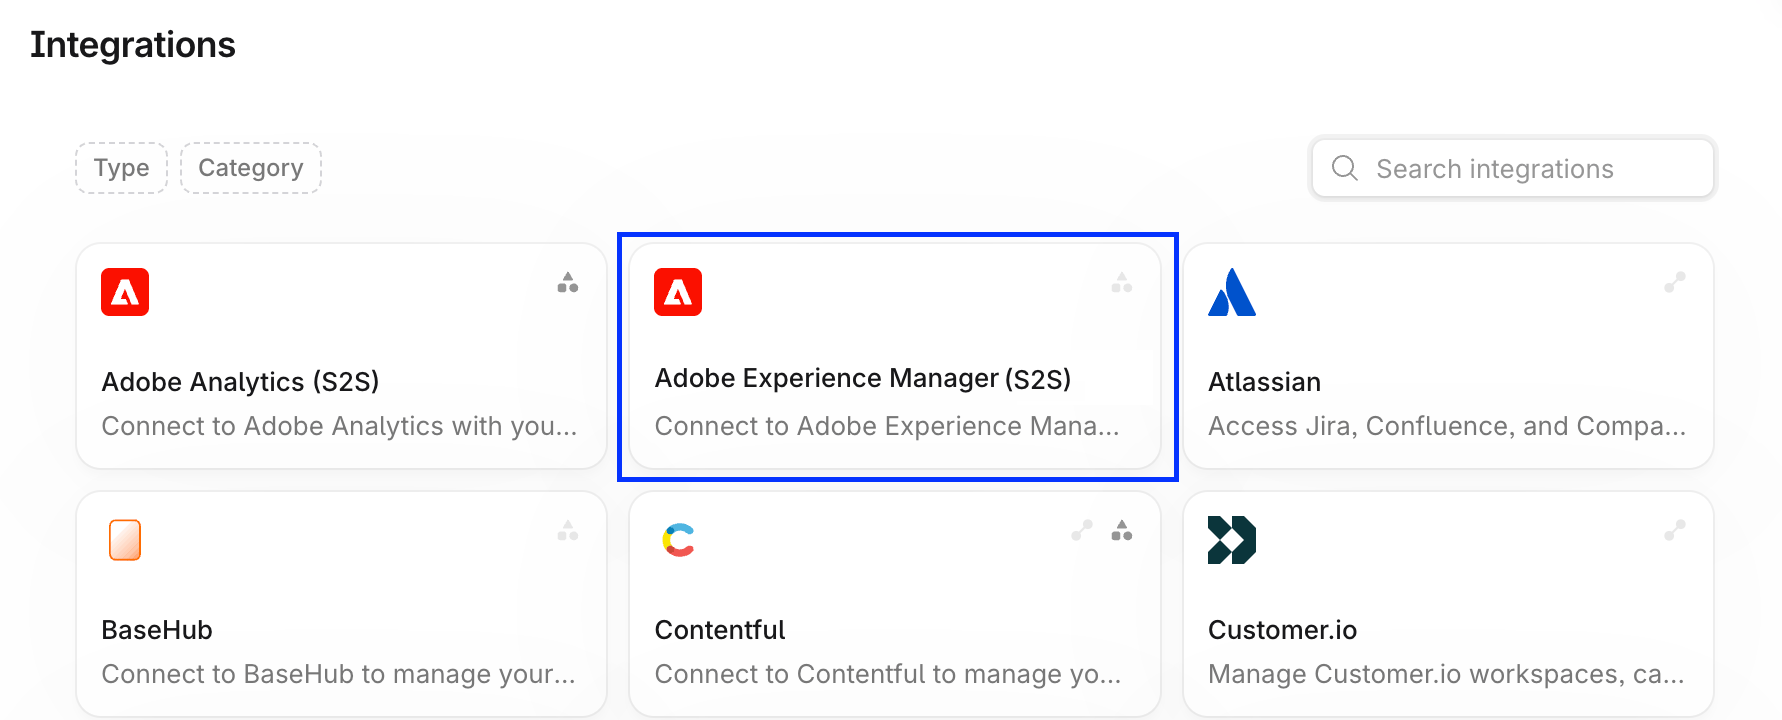
* In [Profound](https://platform.tryprofound.com), go to **Integrations** in the left sidebar.
* Search for **Adobe Experience Manager (S2S)** and select it.
Learn more about deploying config pipelines in the following Adobe resources:
* [Use config pipelines](https://experienceleague.adobe.com/en/docs/experience-manager-cloud-service/content/operations/config-pipeline) guide
* [Cloud Manager CI/CD pipelines](https://experienceleague.adobe.com/en/docs/experience-manager-cloud-service/content/implementing/using-cloud-manager/cicd-pipelines/introduction-ci-cd-pipelines) overview
* In [Profound](https://platform.tryprofound.com), go to **Integrations** in the left sidebar.
* Search for **Adobe Experience Manager (S2S)** and select it.
 * In the Adobe Experience Manager (S2S) integration view, select **+ Add account**.
* In the **Connect Adobe Experience Manager (S2S)** dialog, enter the Author URL from [Step 1](#step-1) and the client secret, client ID, scopes, and organization ID you retrieved in [Step 5](#step-5).
* Select **Connect account**.
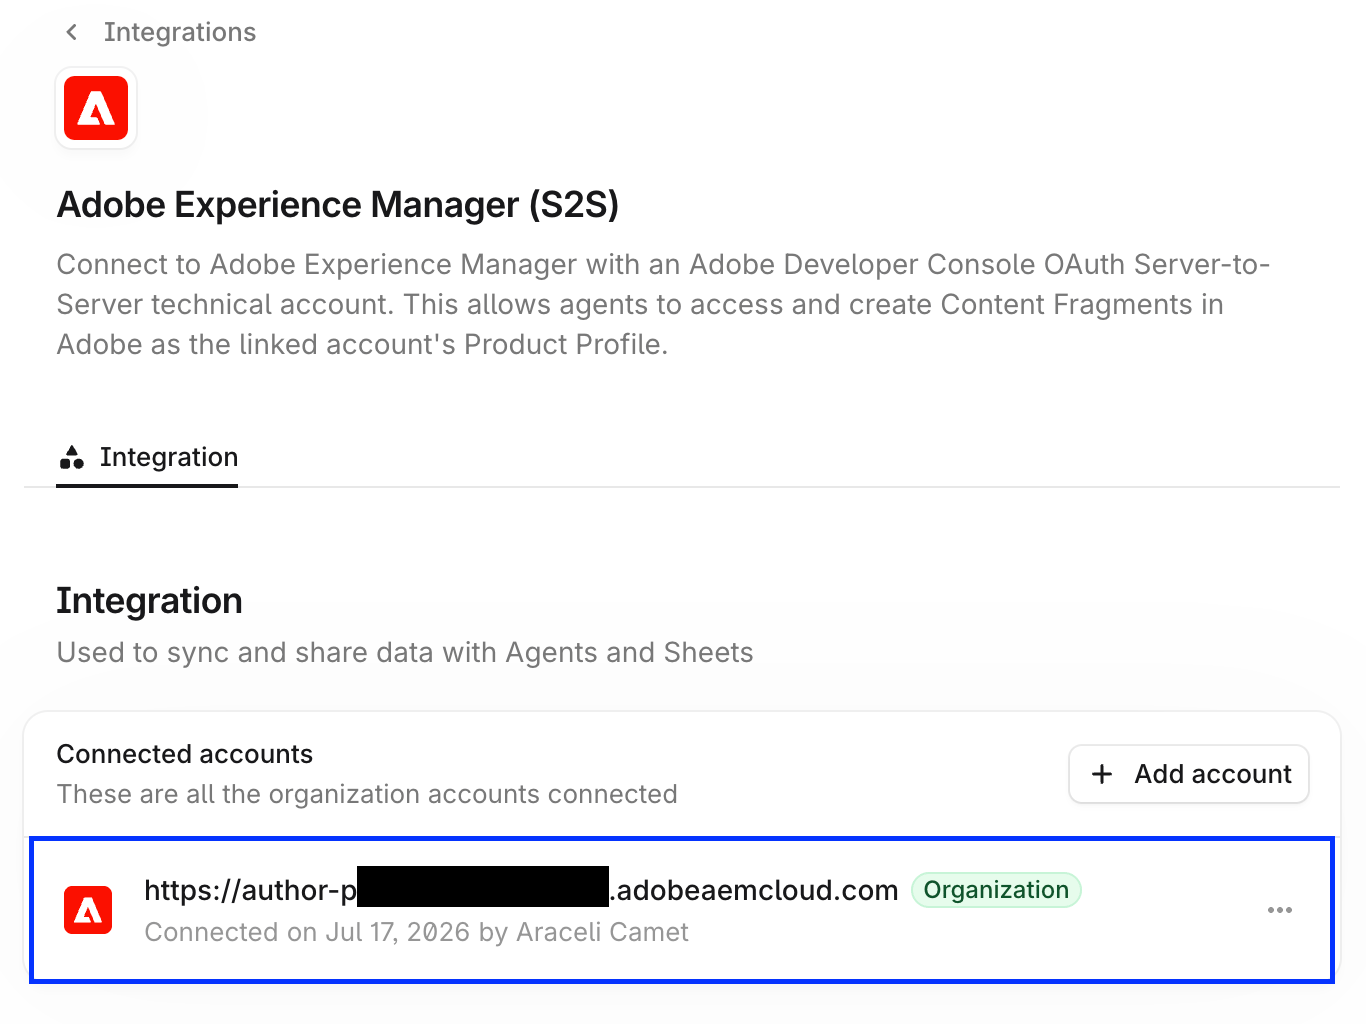
If the connection succeeds, your AEM environment appears in the list of connected accounts.
* In the Adobe Experience Manager (S2S) integration view, select **+ Add account**.
* In the **Connect Adobe Experience Manager (S2S)** dialog, enter the Author URL from [Step 1](#step-1) and the client secret, client ID, scopes, and organization ID you retrieved in [Step 5](#step-5).
* Select **Connect account**.
If the connection succeeds, your AEM environment appears in the list of connected accounts.
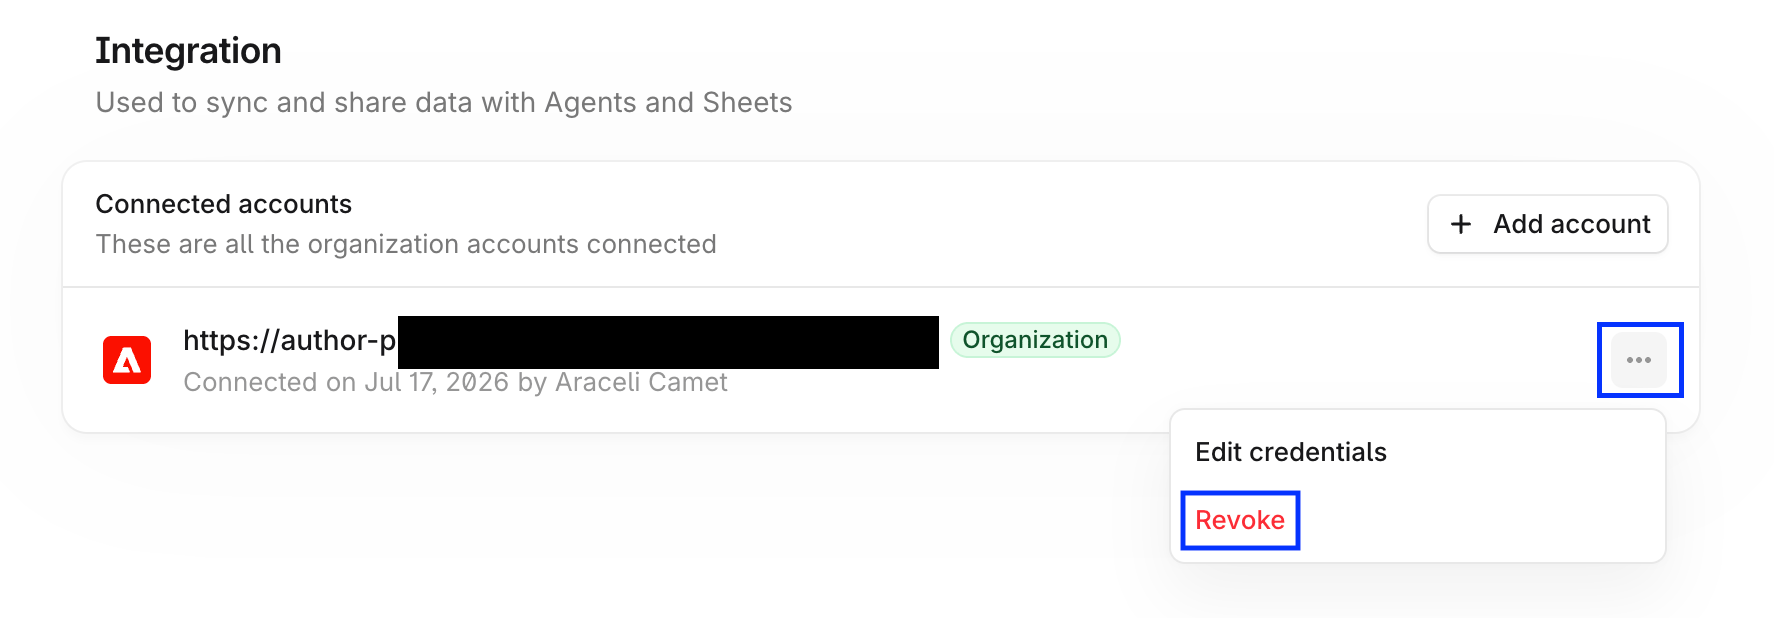
 Revoke Profound's access to your AEM environment at any time by selecting **Revoke** in the integration account action menu.
 To make sure Profound has all the permissions it needs to work with your AEM environment, verify that the AEM Agent nodes run successfully.
* In [Profound](https://platform.tryprofound.com), [create a new Agent](https://help.tryprofound.com/articles/2212787792-create-an-agent), or open an existing Agent draft.
* Add the Adobe Experience Manager **List Content Fragments** and **Get Content Fragment** nodes, then select the connected AEM instance.
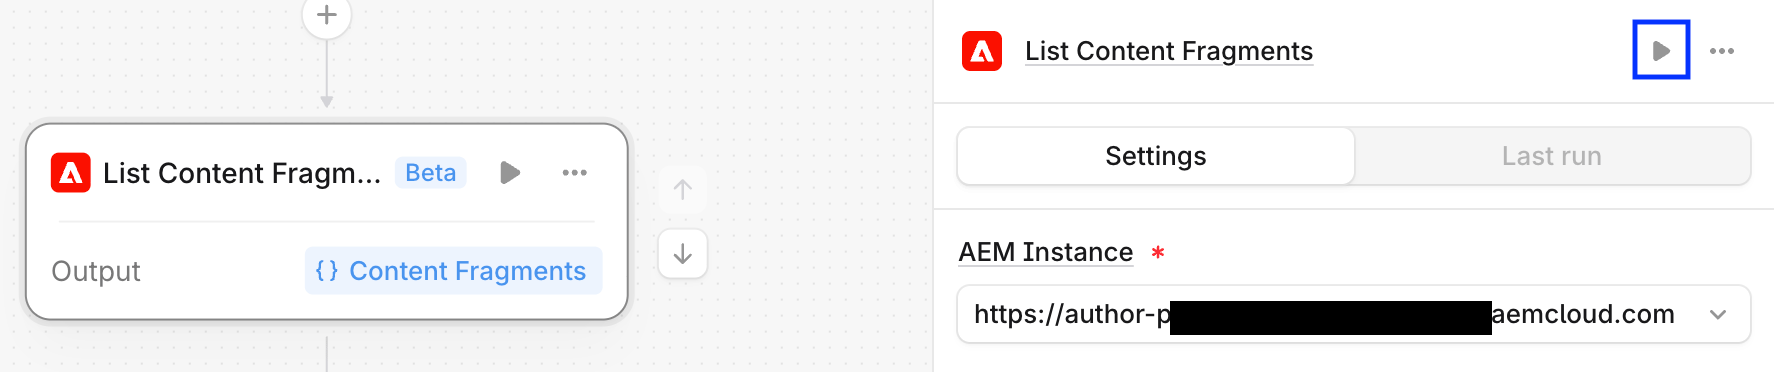
* Select **Test node** (a play icon) in the node configuration panel and confirm that the AEM output contains the expected data.
To make sure Profound has all the permissions it needs to work with your AEM environment, verify that the AEM Agent nodes run successfully.
* In [Profound](https://platform.tryprofound.com), [create a new Agent](https://help.tryprofound.com/articles/2212787792-create-an-agent), or open an existing Agent draft.
* Add the Adobe Experience Manager **List Content Fragments** and **Get Content Fragment** nodes, then select the connected AEM instance.
* Select **Test node** (a play icon) in the node configuration panel and confirm that the AEM output contains the expected data.
 * If you intend to create or update content fragments with Profound Agents, test the **Create Content Fragment** and **Update Content Fragment** nodes the same way.
Delete test content directly in the AEM environment. Current Profound Agent nodes don't include a delete operation.
## Rotating AEM credentials
### Rotate a client secret only
Adobe supports two client secrets on one OAuth Server-to-Server credential, which allows rotation without changing the client ID.
Rotate your client secret as instructed in [Adobe developer documentation](https://developer.adobe.com/developer-console/docs/guides/authentication/ServerToServerAuthentication/implementation#rotating-client-secrets), then update the credentials in Profound (**Integrations** > **Adobe Experience Manager (S2S)** > **Edit credentials** in a connected account's action menu).
The client ID doesn't change during this process, so you don't need to update or redeploy `api.yaml`.
### Rotate the entire OAuth credential
To replace the entire AEM OAuth credential:
1. Generate a new credential as described in [Step 4](#step-4) of the setup guide.
2. Deploy the new client ID in `config/api.yaml` as instructed in [Step 6](#step-6) of the setup guide.
3. Update the credentials in Profound.
Keep the old client ID registered until you've verified the new connection.
## Best practices
* Use an **Author** environment only. Profound doesn't connect to AEM Publish or Preview. Learn more about environments in [AEM as a Cloud Service tutorials](https://experienceleague.adobe.com/en/docs/experience-manager-learn/cloud-service/cloud-manager/environments).
* Test the read and write Profound Agent nodes separately to verify their folder and repository permissions.
* Always store your client secret and other credentials in an approved secret manager, and never include them in screenshots, tickets, or source control.
* If you intend to create or update content fragments with Profound Agents, test the **Create Content Fragment** and **Update Content Fragment** nodes the same way.
Delete test content directly in the AEM environment. Current Profound Agent nodes don't include a delete operation.
## Rotating AEM credentials
### Rotate a client secret only
Adobe supports two client secrets on one OAuth Server-to-Server credential, which allows rotation without changing the client ID.
Rotate your client secret as instructed in [Adobe developer documentation](https://developer.adobe.com/developer-console/docs/guides/authentication/ServerToServerAuthentication/implementation#rotating-client-secrets), then update the credentials in Profound (**Integrations** > **Adobe Experience Manager (S2S)** > **Edit credentials** in a connected account's action menu).
The client ID doesn't change during this process, so you don't need to update or redeploy `api.yaml`.
### Rotate the entire OAuth credential
To replace the entire AEM OAuth credential:
1. Generate a new credential as described in [Step 4](#step-4) of the setup guide.
2. Deploy the new client ID in `config/api.yaml` as instructed in [Step 6](#step-6) of the setup guide.
3. Update the credentials in Profound.
Keep the old client ID registered until you've verified the new connection.
## Best practices
* Use an **Author** environment only. Profound doesn't connect to AEM Publish or Preview. Learn more about environments in [AEM as a Cloud Service tutorials](https://experienceleague.adobe.com/en/docs/experience-manager-learn/cloud-service/cloud-manager/environments).
* Test the read and write Profound Agent nodes separately to verify their folder and repository permissions.
* Always store your client secret and other credentials in an approved secret manager, and never include them in screenshots, tickets, or source control.