> ## Documentation Index
> Fetch the complete documentation index at: https://docs.tryprofound.com/llms.txt
> Use this file to discover all available pages before exploring further.
# AEM インテグレーション設定ガイド
このガイドでは、Adobe OAuth Server-to-Server 認証情報を使用して、Adobe Experience Manager(AEM)as a Cloud Service を Profound に接続する手順を説明します。接続すると、Profound Agents は、認証情報の AEM 権限で許可されている Content Fragment モデル、フォルダー、コンテンツへのアクセス、作成、更新を行えるようになります。
## 始める前に
以下が必要です。
* [AEM as a Cloud Service](https://experienceleague.adobe.com/en/docs/experience-manager-cloud-service/content/overview/introduction) のプログラムと **Author** 環境
* Adobe が管理するリポジトリへのコミットと設定パイプラインの実行を行うための [AEM Cloud Manager](https://experience.adobe.com/#/cloud-manager) へのアクセス権(**Deployment Manager** ロールが必要)
* [Adobe Admin Console](https://adminconsole.adobe.com/) でプロダクトプロファイルを管理する権限と、[Adobe Developer Console](https://developer.adobe.com/console) で OAuth 認証情報を作成する権限
* [Profound](https://www.tryprofound.com/) アカウント
## セットアップガイド
* [Adobe Cloud Manager](https://experience.adobe.com/#/cloud-manager) を開きます。
* Profound で使用する予定の AEM プログラムを所有している組織でサインインします。
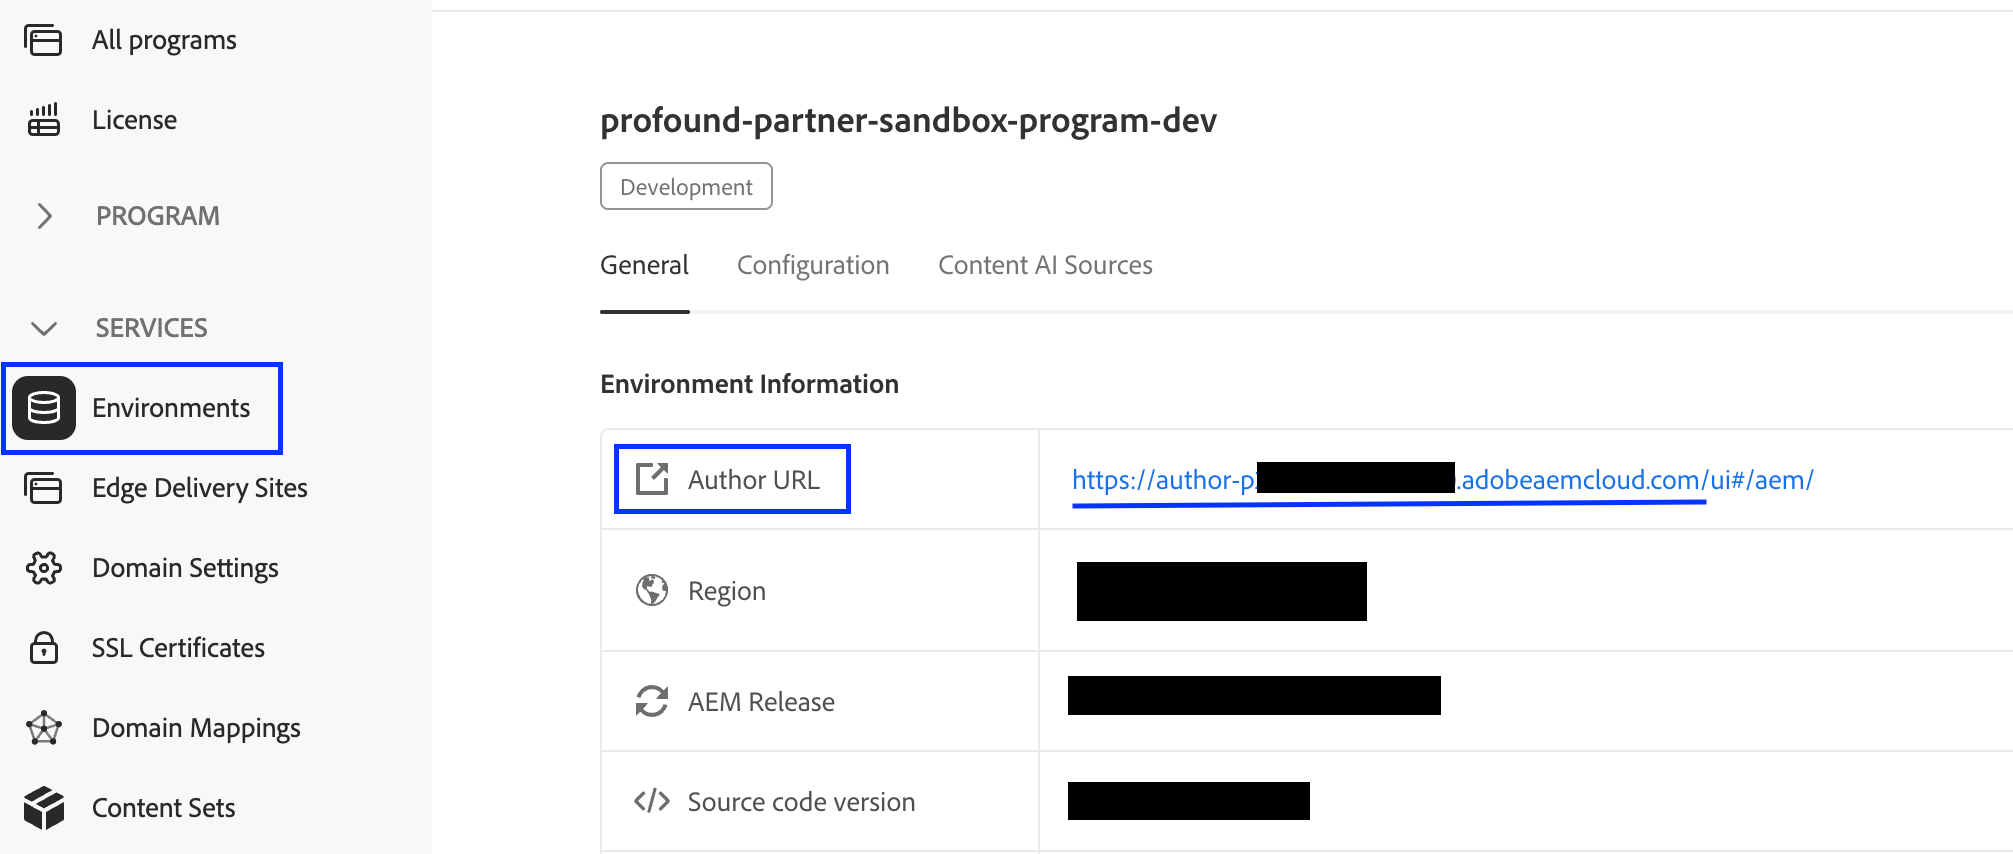
* プログラムを選択して開き、左サイドバーで **Environments** を選択します。
* 使用する予定の環境を開き、ベースの **Author URL** をコピーします。URL は `https://author-p12345-e67890.adobeaemcloud.com` のような形式です。
 環境で API アクセスを有効にするには、[Adobe の AEM API セットアップガイド](https://experienceleague.adobe.com/en/docs/experience-manager-learn/cloud-service/aem-apis/openapis/setup)に従ってください。
完了したら、AEM API で使用する正しいプロダクトプロファイルがあることを確認します。
* [Adobe Cloud Manager](https://experience.adobe.com/#/cloud-manager) の AEM プログラムの環境ページ([ステップ 1](#step-1) で作業していたページ)に戻ります。
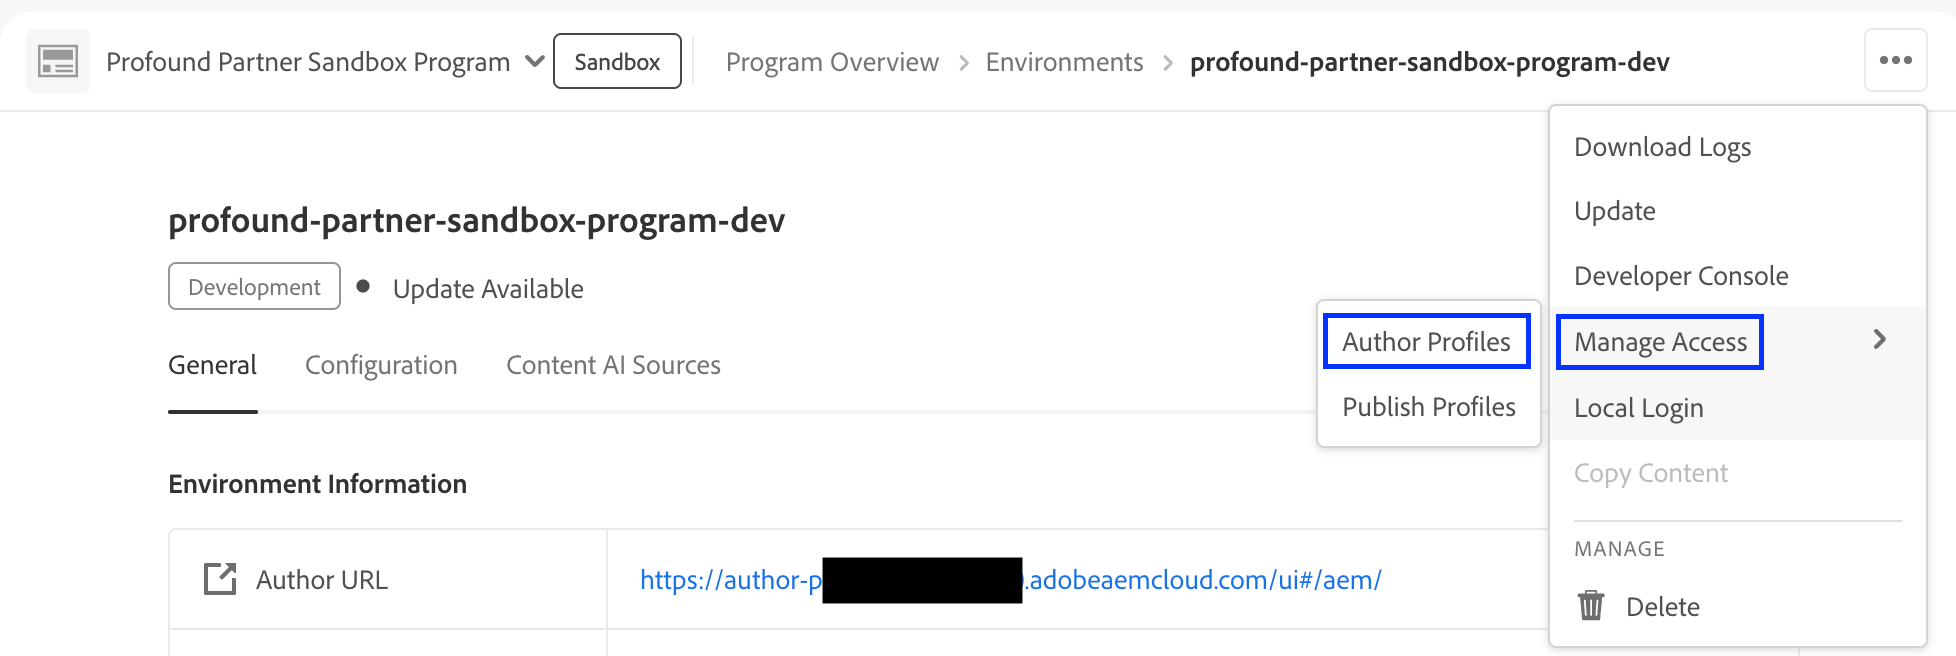
* 環境のアクションメニューを開き、**Manage Access** > **Author Profiles** を選択します。[Adobe Admin Console](https://adminconsole.adobe.com/) で環境のページが開きます。
環境で API アクセスを有効にするには、[Adobe の AEM API セットアップガイド](https://experienceleague.adobe.com/en/docs/experience-manager-learn/cloud-service/aem-apis/openapis/setup)に従ってください。
完了したら、AEM API で使用する正しいプロダクトプロファイルがあることを確認します。
* [Adobe Cloud Manager](https://experience.adobe.com/#/cloud-manager) の AEM プログラムの環境ページ([ステップ 1](#step-1) で作業していたページ)に戻ります。
* 環境のアクションメニューを開き、**Manage Access** > **Author Profiles** を選択します。[Adobe Admin Console](https://adminconsole.adobe.com/) で環境のページが開きます。
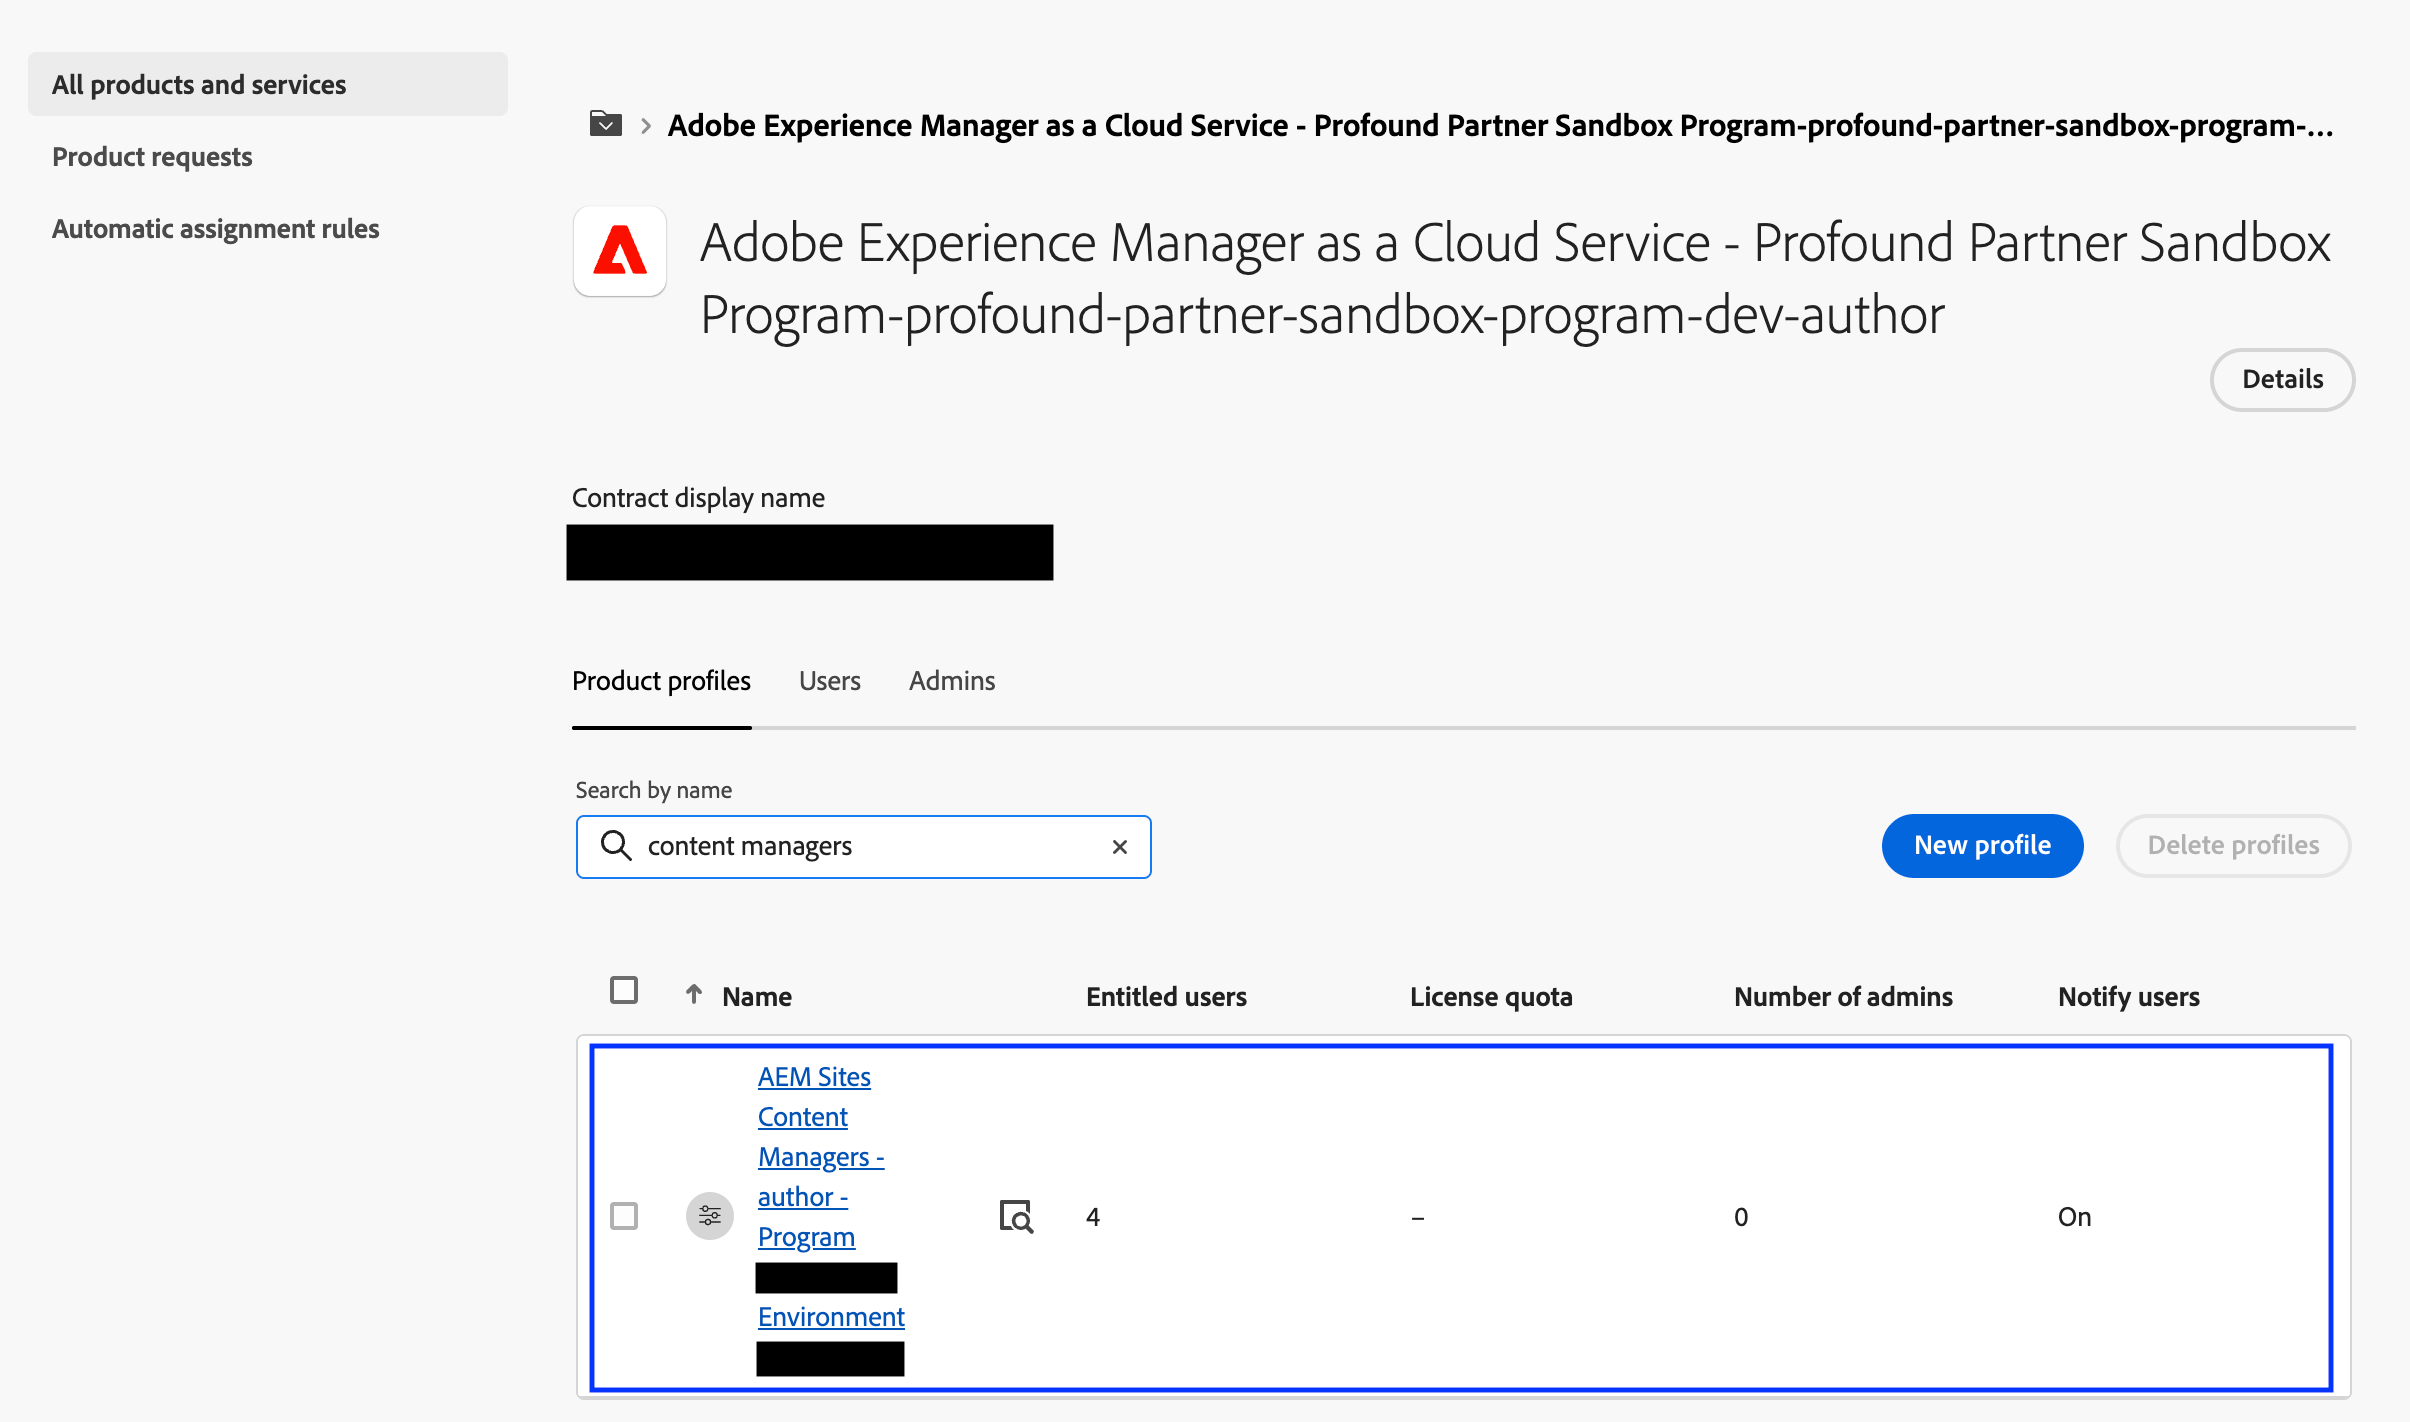
 * プログラムと環境に対して **AEM Sites Content Managers - author...** プロファイルが存在することを確認します。
 Profound で認証を行うには、OAuth 認証情報を作成します。作成できるのは、ご自身、または **AEM Sites Content Managers** プロダクトプロファイルで **Developer** ロールを持つユーザーです。
認証情報の作成者に **Developer** ロールを割り当てるには、[ステップ 2](#step-2) の続きから作業します。
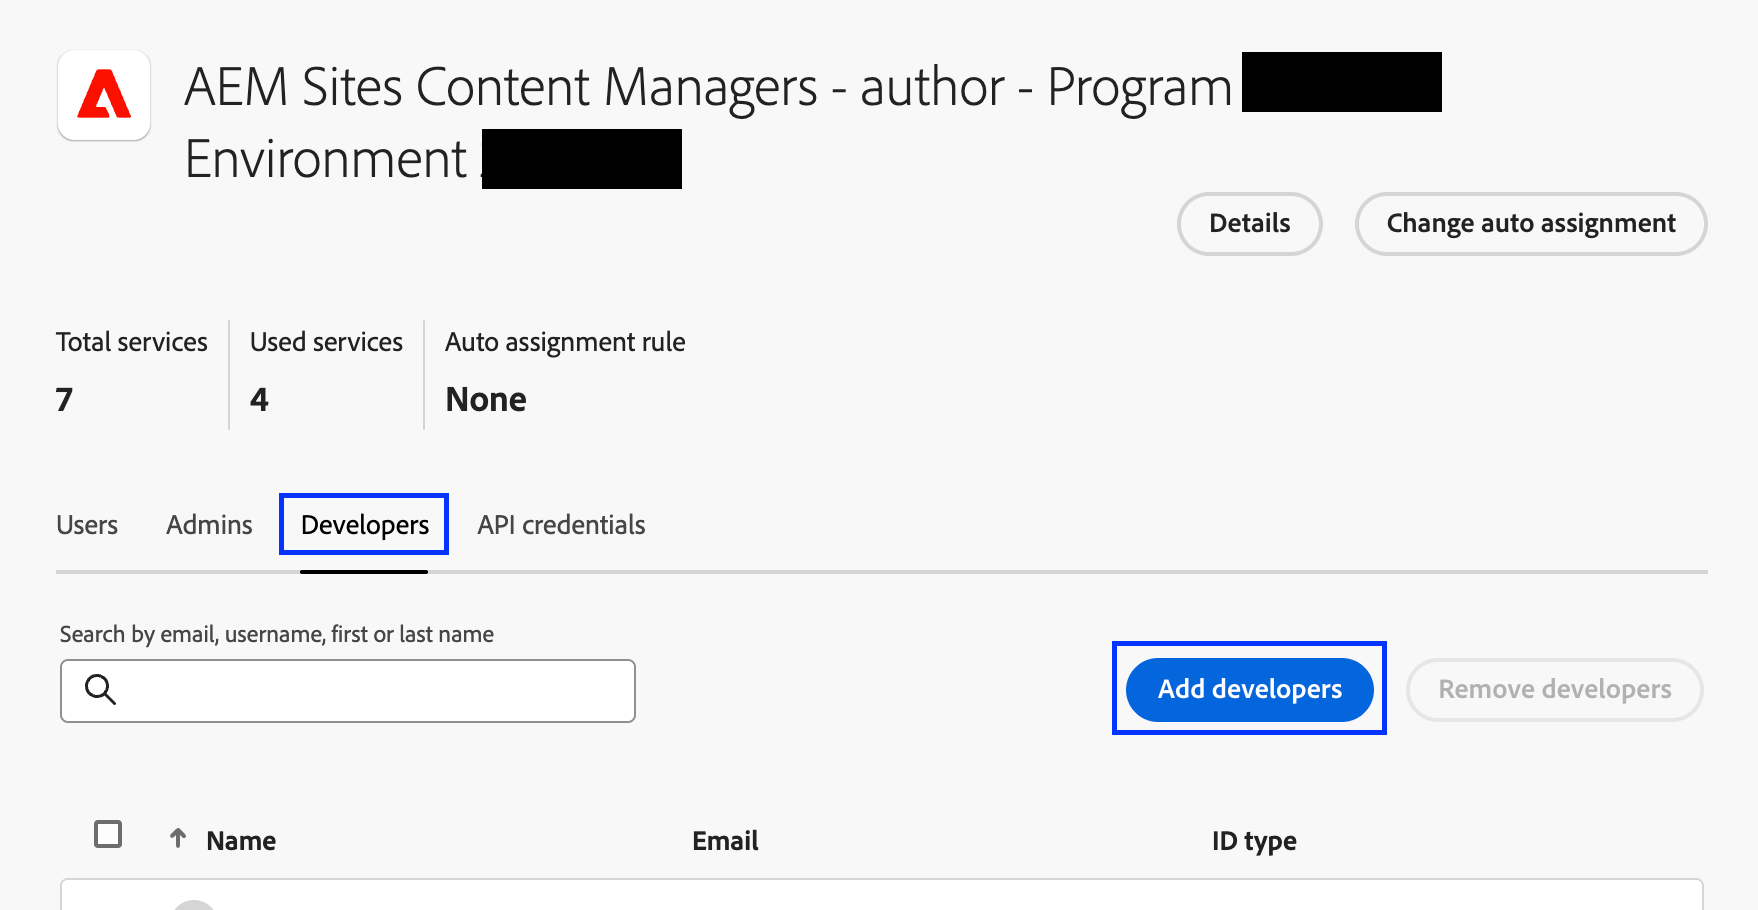
* [Adobe Admin Console](https://adminconsole.adobe.com/) の環境のページで、**AEM Sites Content Managers - author...** プロダクトプロファイルを選択します。
* **Developers** タブを開き、**Add developers** を選択します。
Profound で認証を行うには、OAuth 認証情報を作成します。作成できるのは、ご自身、または **AEM Sites Content Managers** プロダクトプロファイルで **Developer** ロールを持つユーザーです。
認証情報の作成者に **Developer** ロールを割り当てるには、[ステップ 2](#step-2) の続きから作業します。
* [Adobe Admin Console](https://adminconsole.adobe.com/) の環境のページで、**AEM Sites Content Managers - author...** プロダクトプロファイルを選択します。
* **Developers** タブを開き、**Add developers** を選択します。
 * OAuth 認証情報を作成するユーザーのメールアドレスまたはユーザー名を追加し、**Save** を選択します。
Adobe のプロダクトプロファイルへの開発者の割り当てについて詳しくは、Adobe の [Manage developers in Adobe Admin Console](https://helpx.adobe.com/enterprise/using/manage-developers.html) ガイドをご覧ください。
* [Adobe Developer Console](https://developer.adobe.com/console) を開きます。これらの手順を順番に進めている場合は、Author AEM 環境を所有する組織([ステップ 1](#step-1) と同じ組織)ですでにサインインしているはずです。
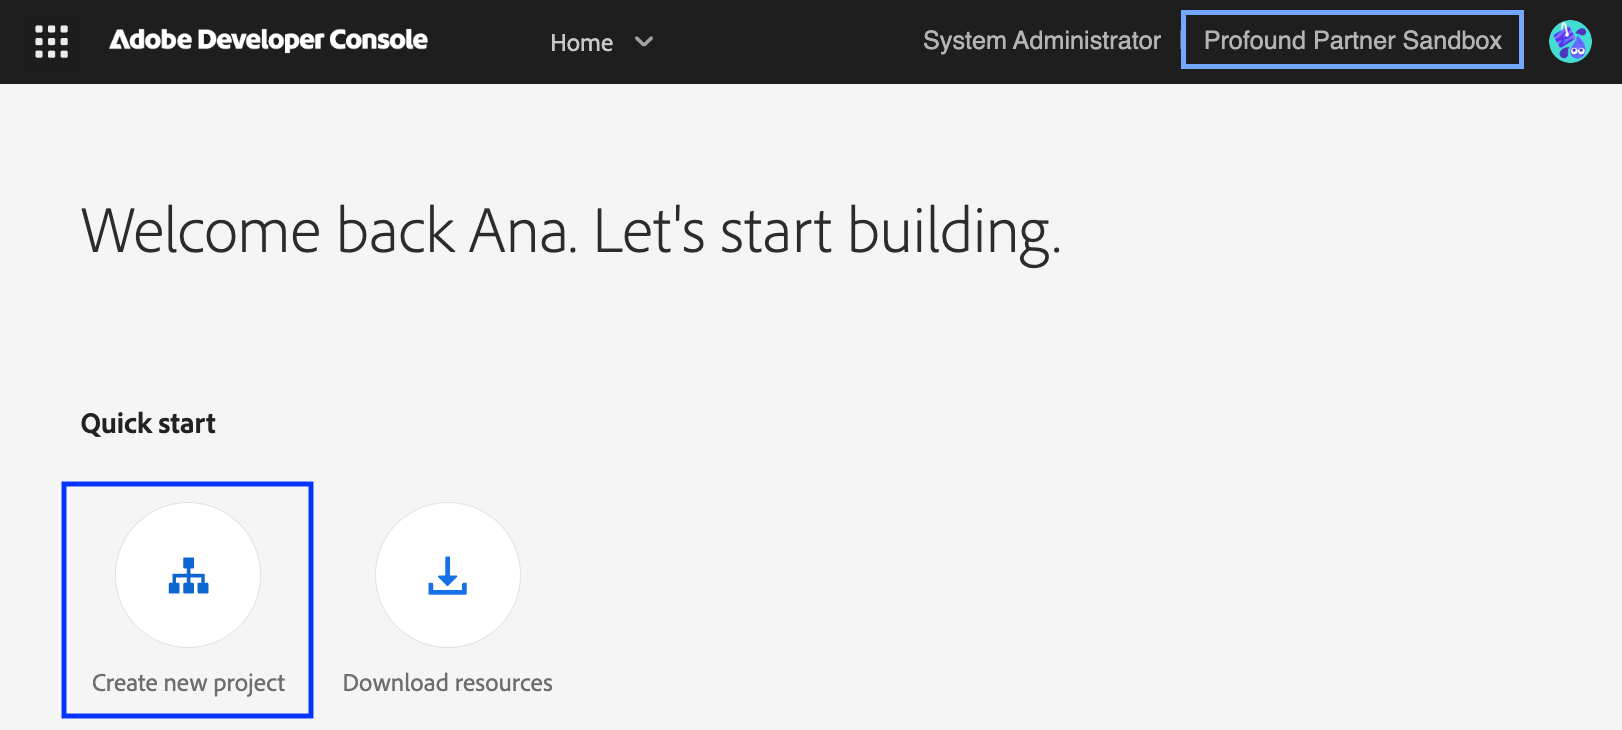
* **Quick start** セクションで **Create new project** を選択するか、上部のナビゲーションメニューで **Projects** に移動して **Create new project** を選択します。
* OAuth 認証情報を作成するユーザーのメールアドレスまたはユーザー名を追加し、**Save** を選択します。
Adobe のプロダクトプロファイルへの開発者の割り当てについて詳しくは、Adobe の [Manage developers in Adobe Admin Console](https://helpx.adobe.com/enterprise/using/manage-developers.html) ガイドをご覧ください。
* [Adobe Developer Console](https://developer.adobe.com/console) を開きます。これらの手順を順番に進めている場合は、Author AEM 環境を所有する組織([ステップ 1](#step-1) と同じ組織)ですでにサインインしているはずです。
* **Quick start** セクションで **Create new project** を選択するか、上部のナビゲーションメニューで **Projects** に移動して **Create new project** を選択します。
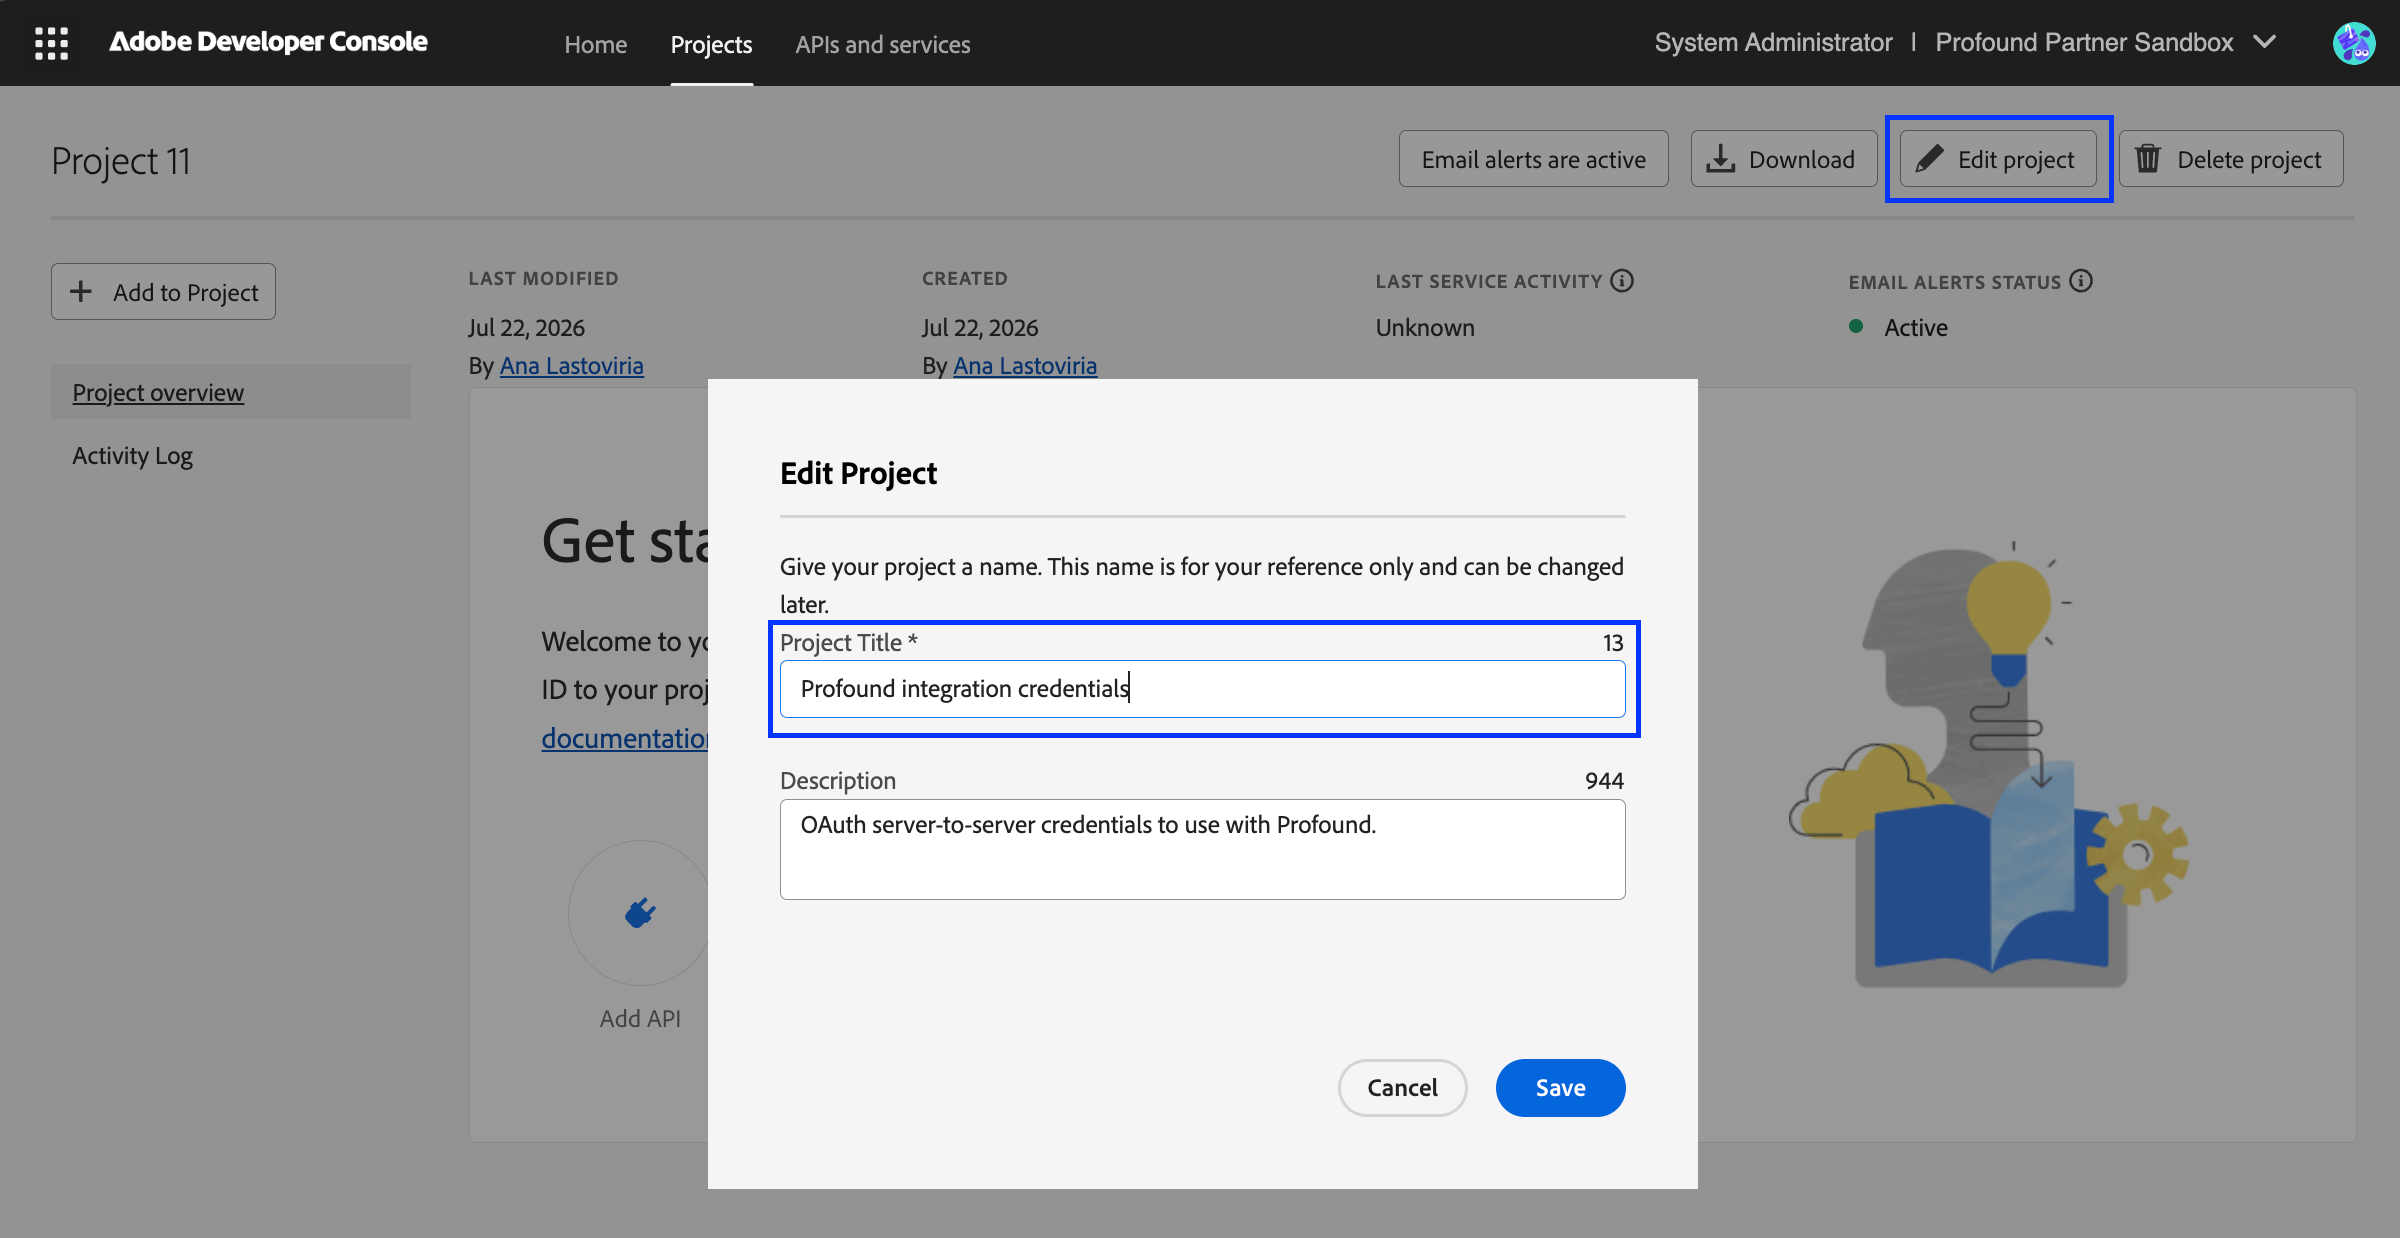
 * プロジェクトページで **Edit project** を選択し、プロジェクトにわかりやすい名前(**Profound integration credentials** など)を付けて、**Save** を選択します。
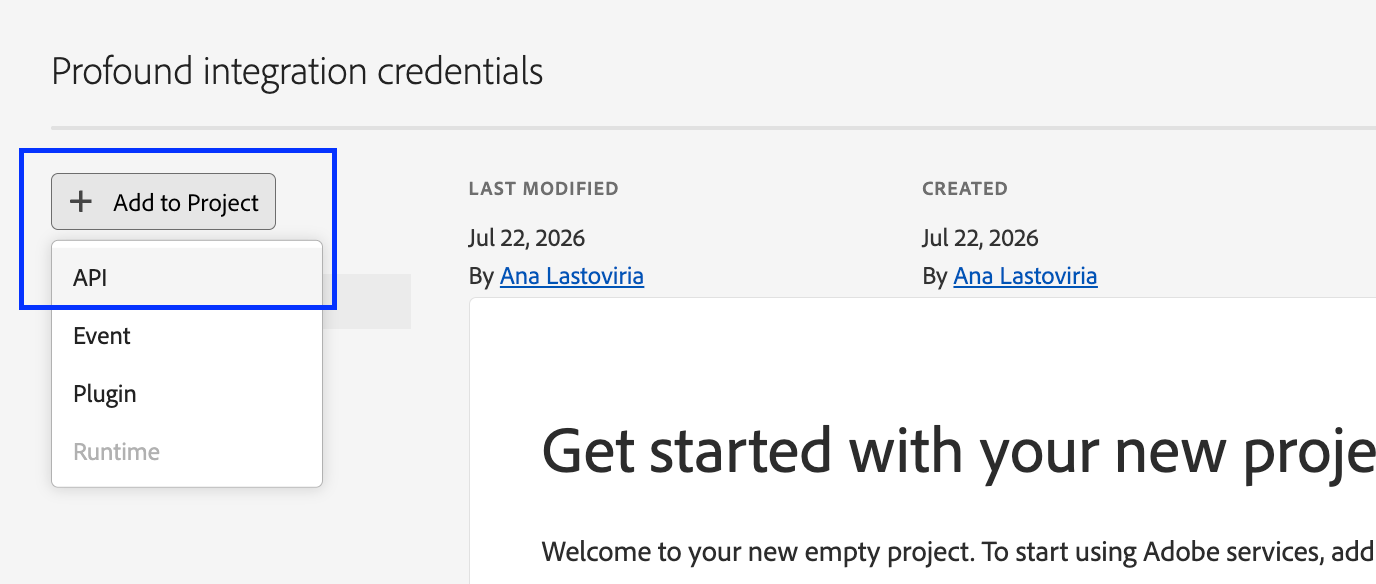
 * **Add to Project** > **API** を選択します。
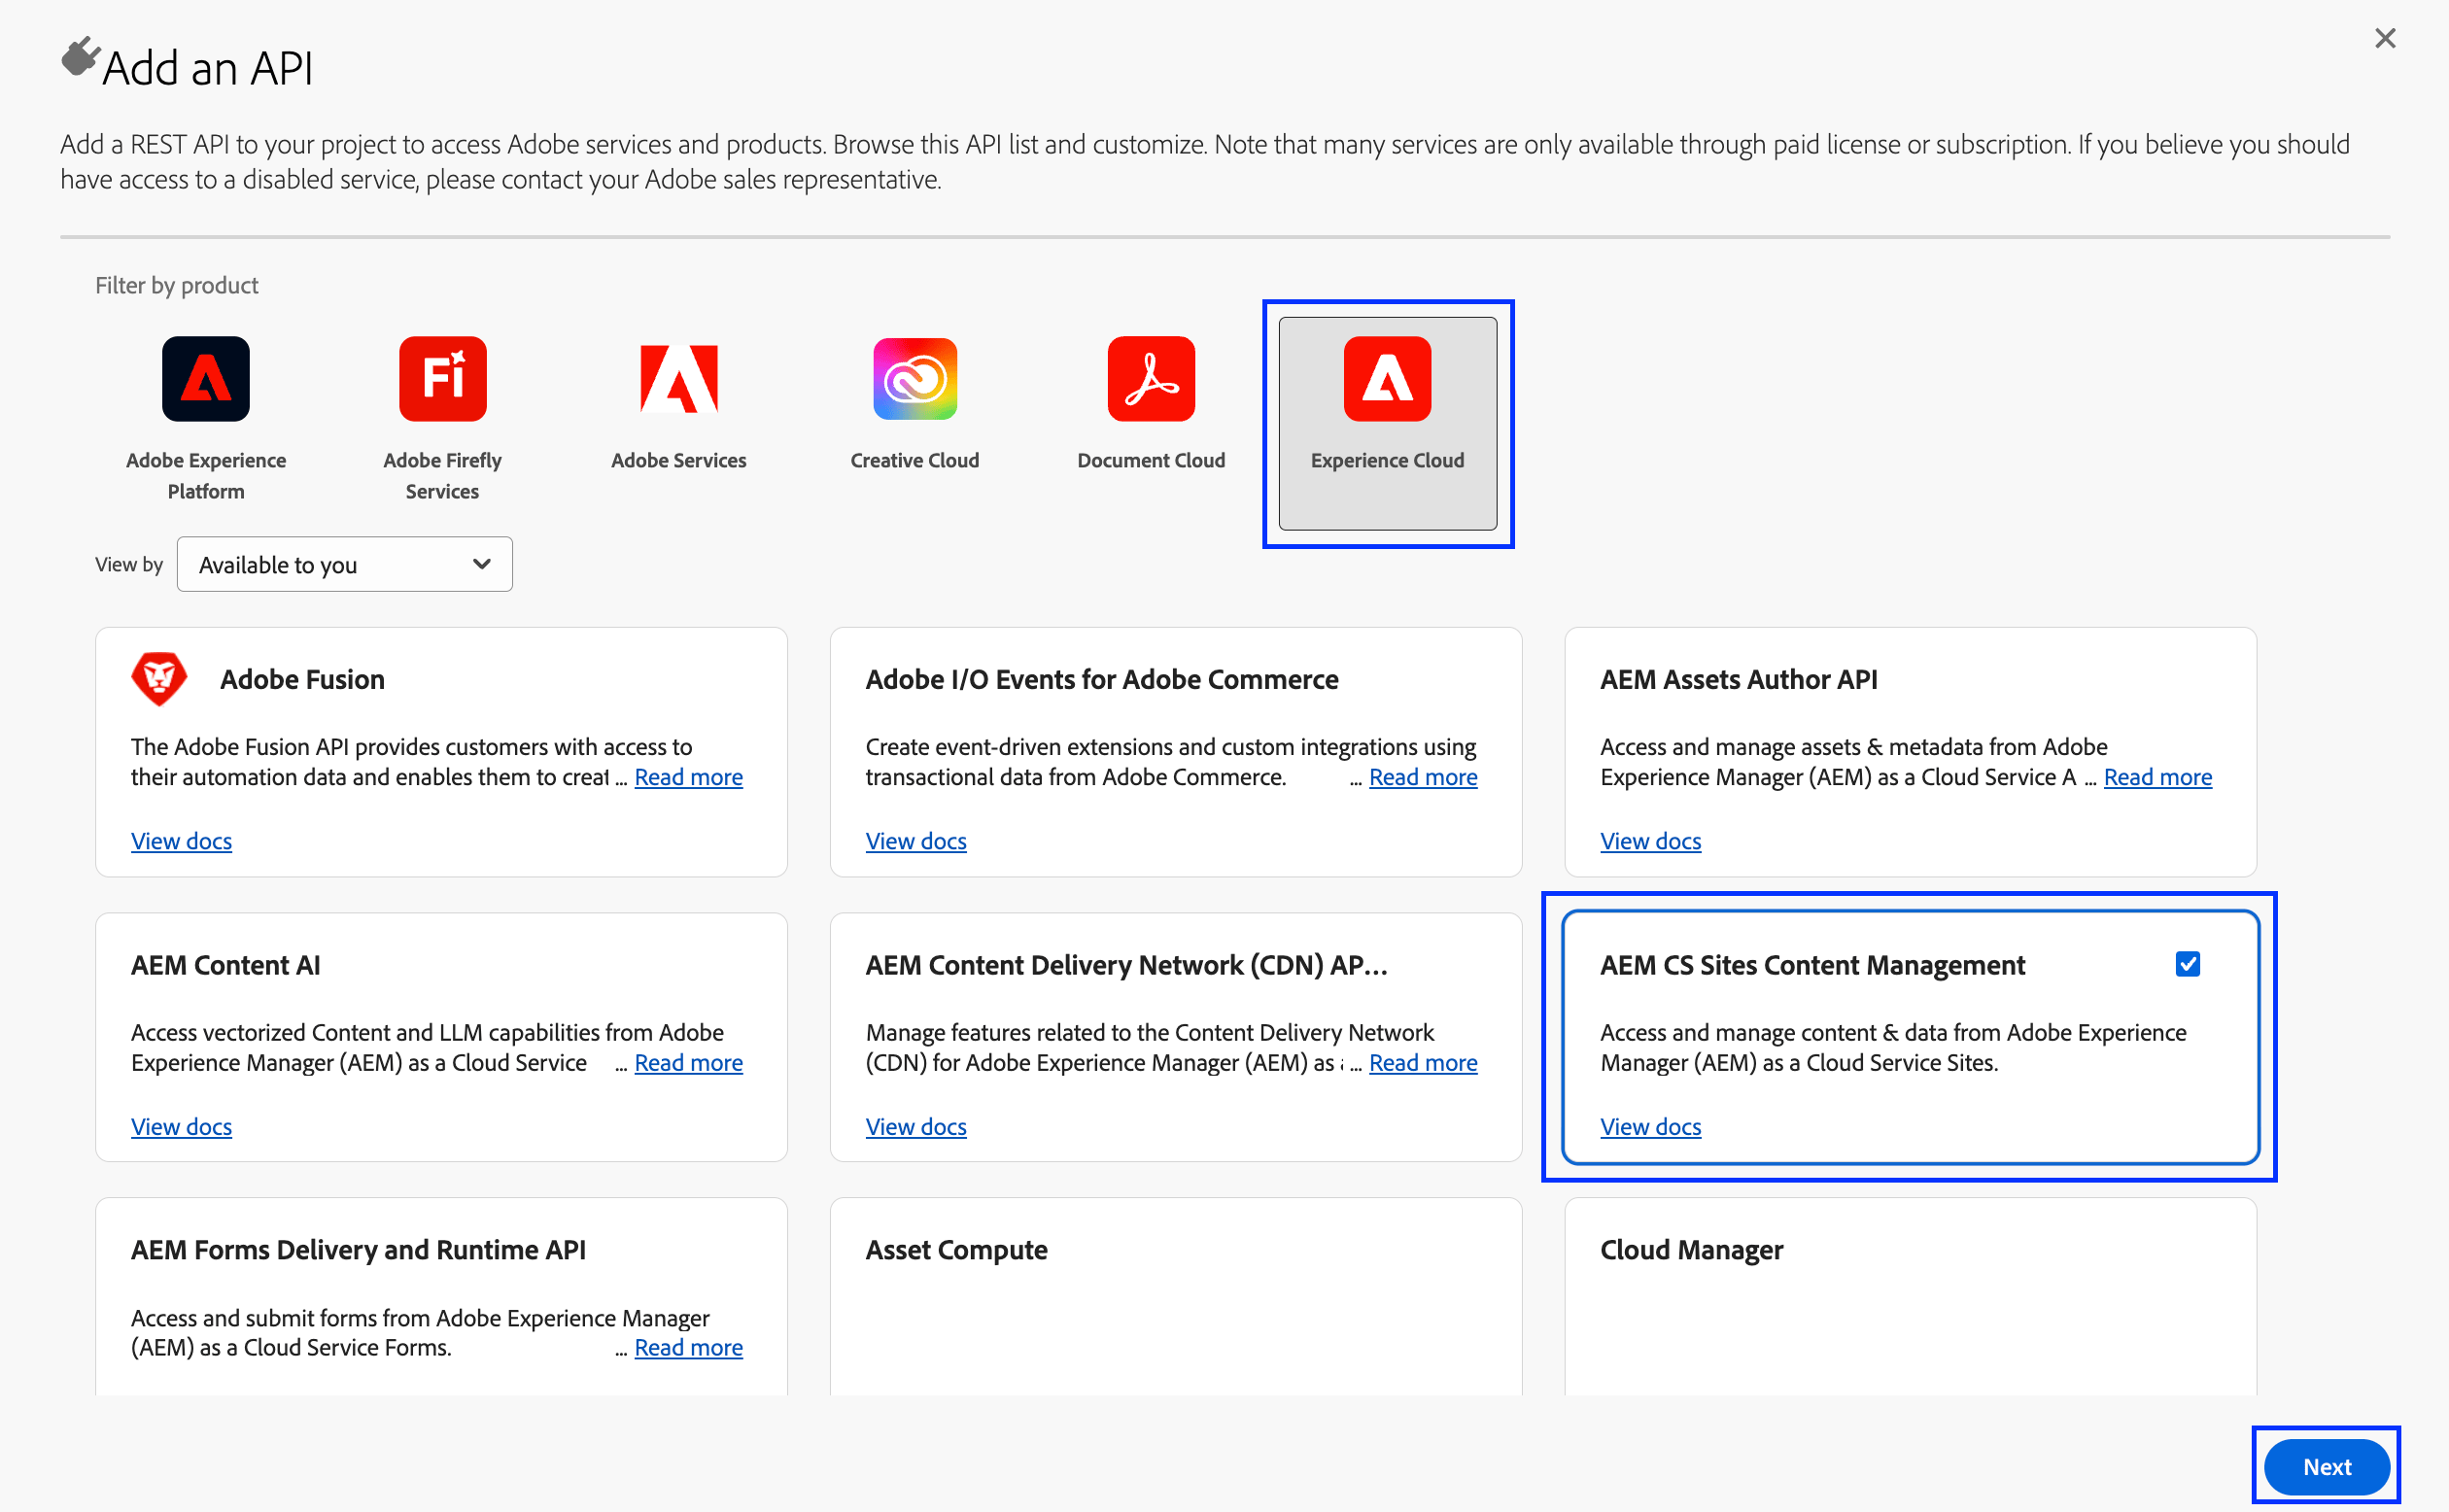
 * **Add an API** ページで、API 一覧を **Experience Cloud** で絞り込み、**AEM CS Sites Content Management** を選択して、**Next** を選択します。
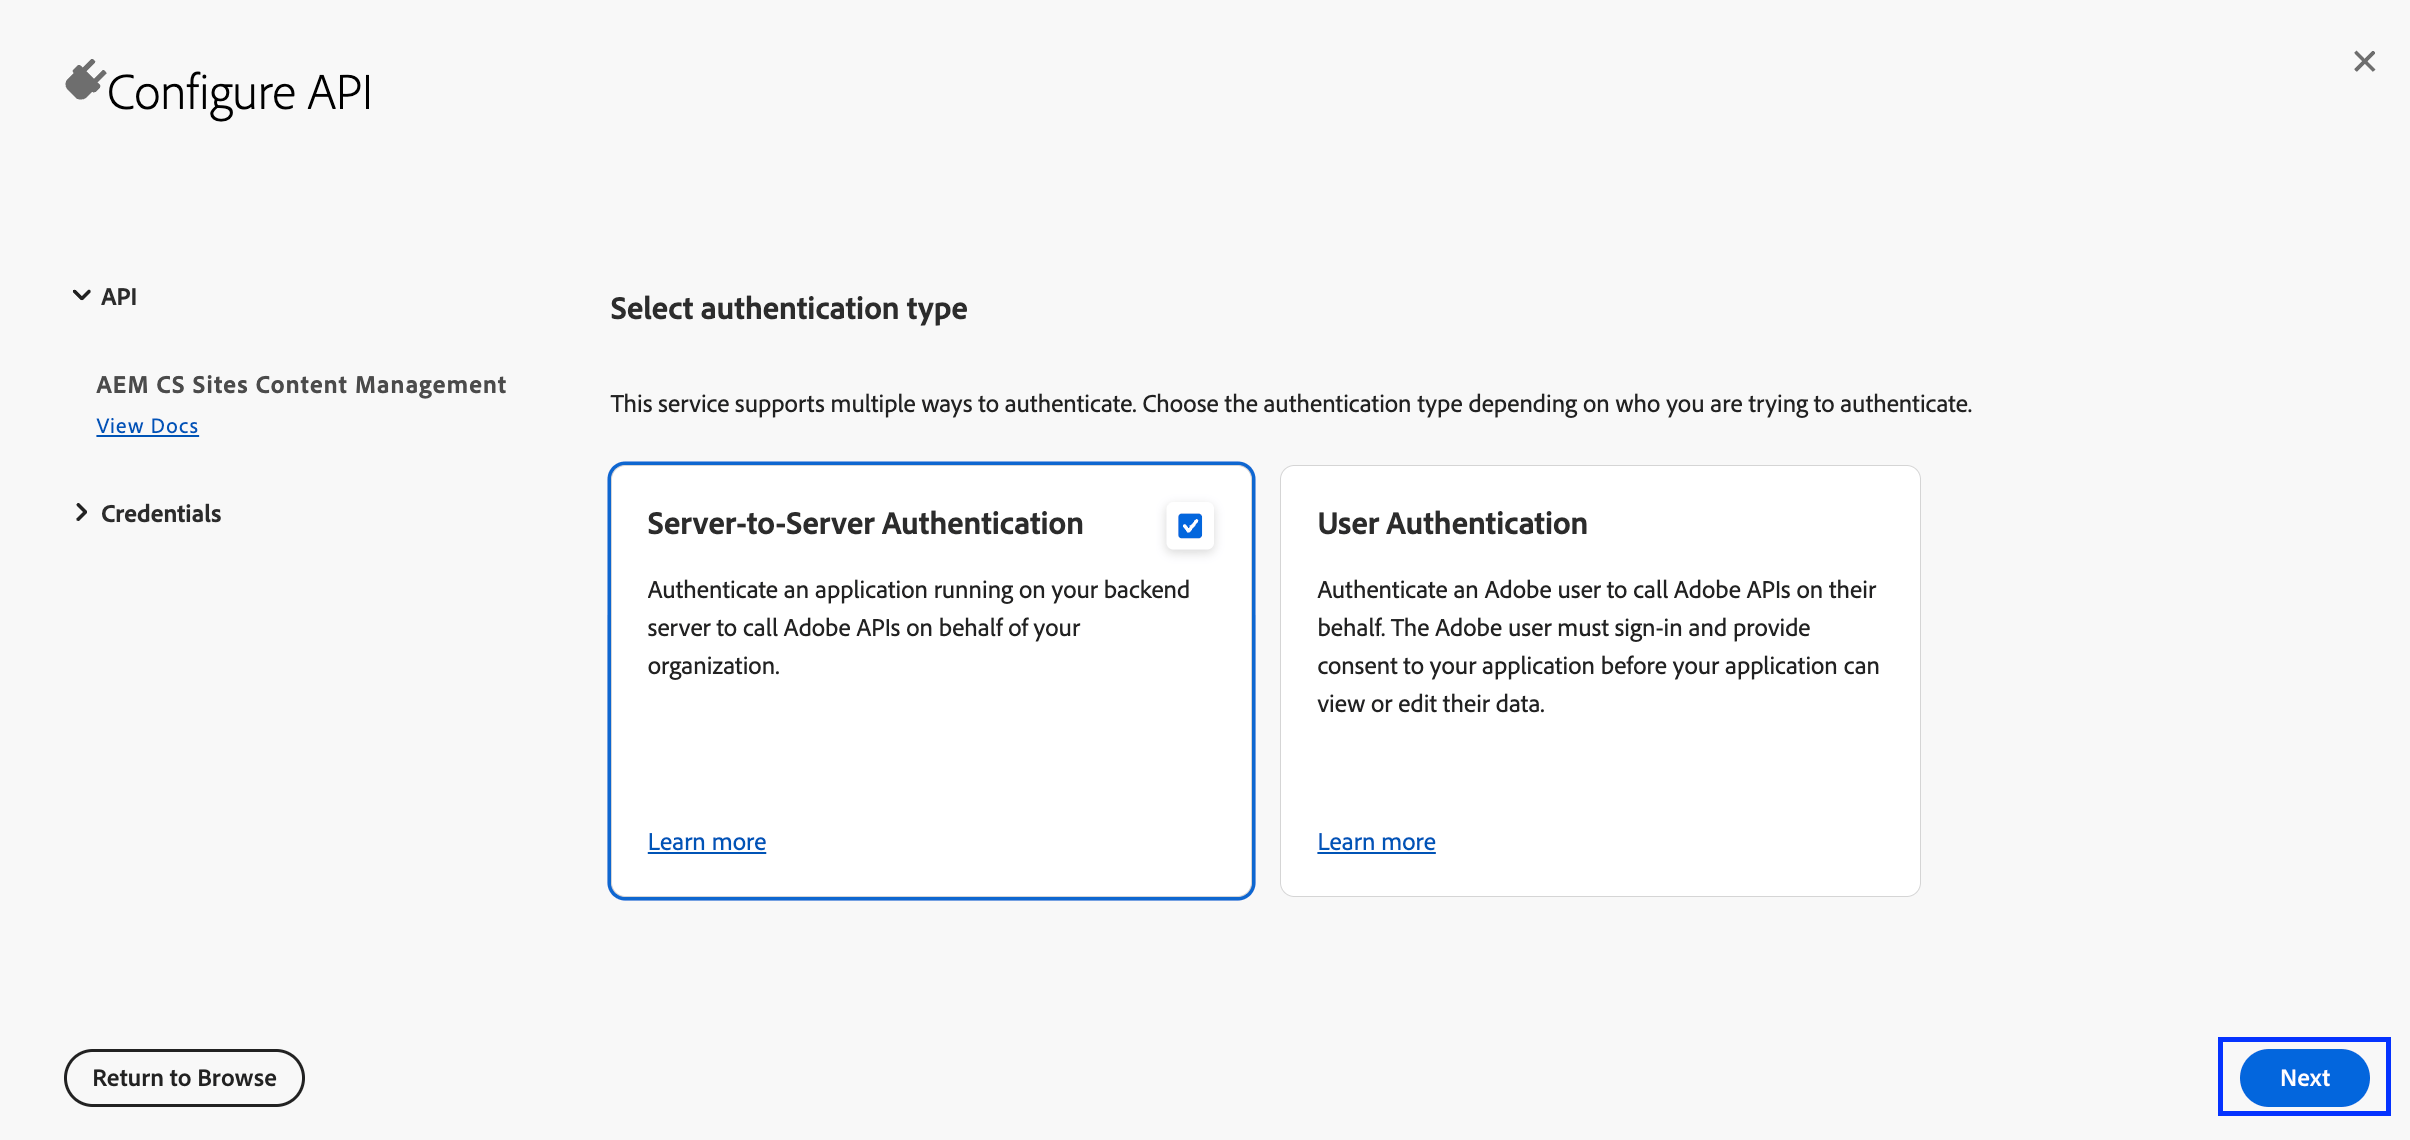
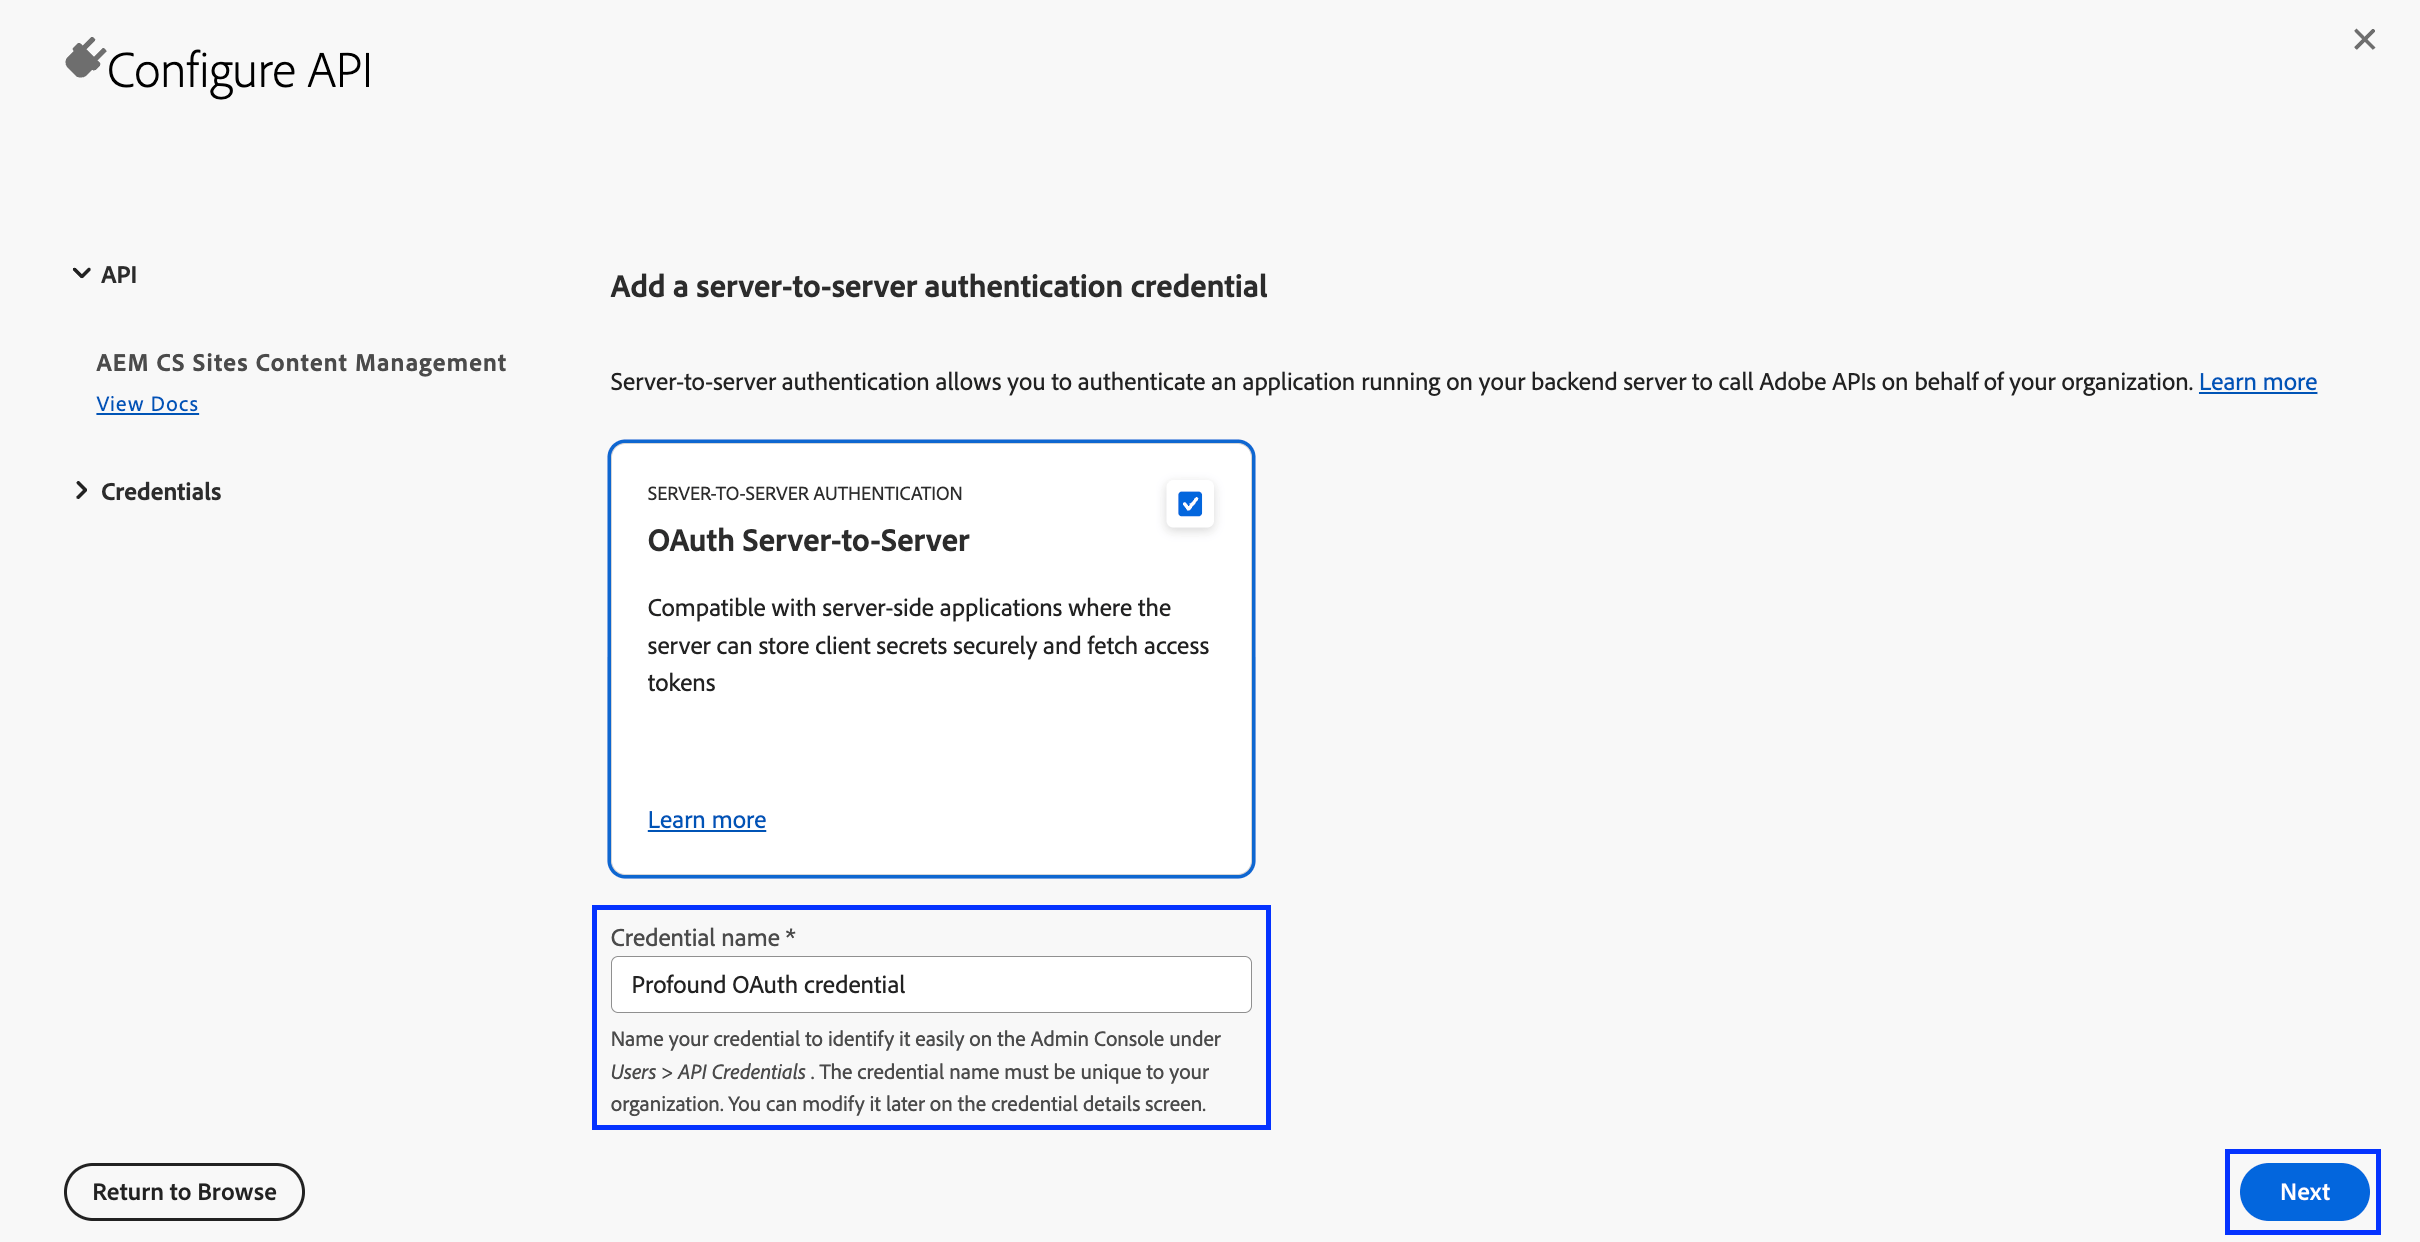
 * 認証タイプとして **Server-to-Server** > **OAuth Server-to-Server** を選択します。
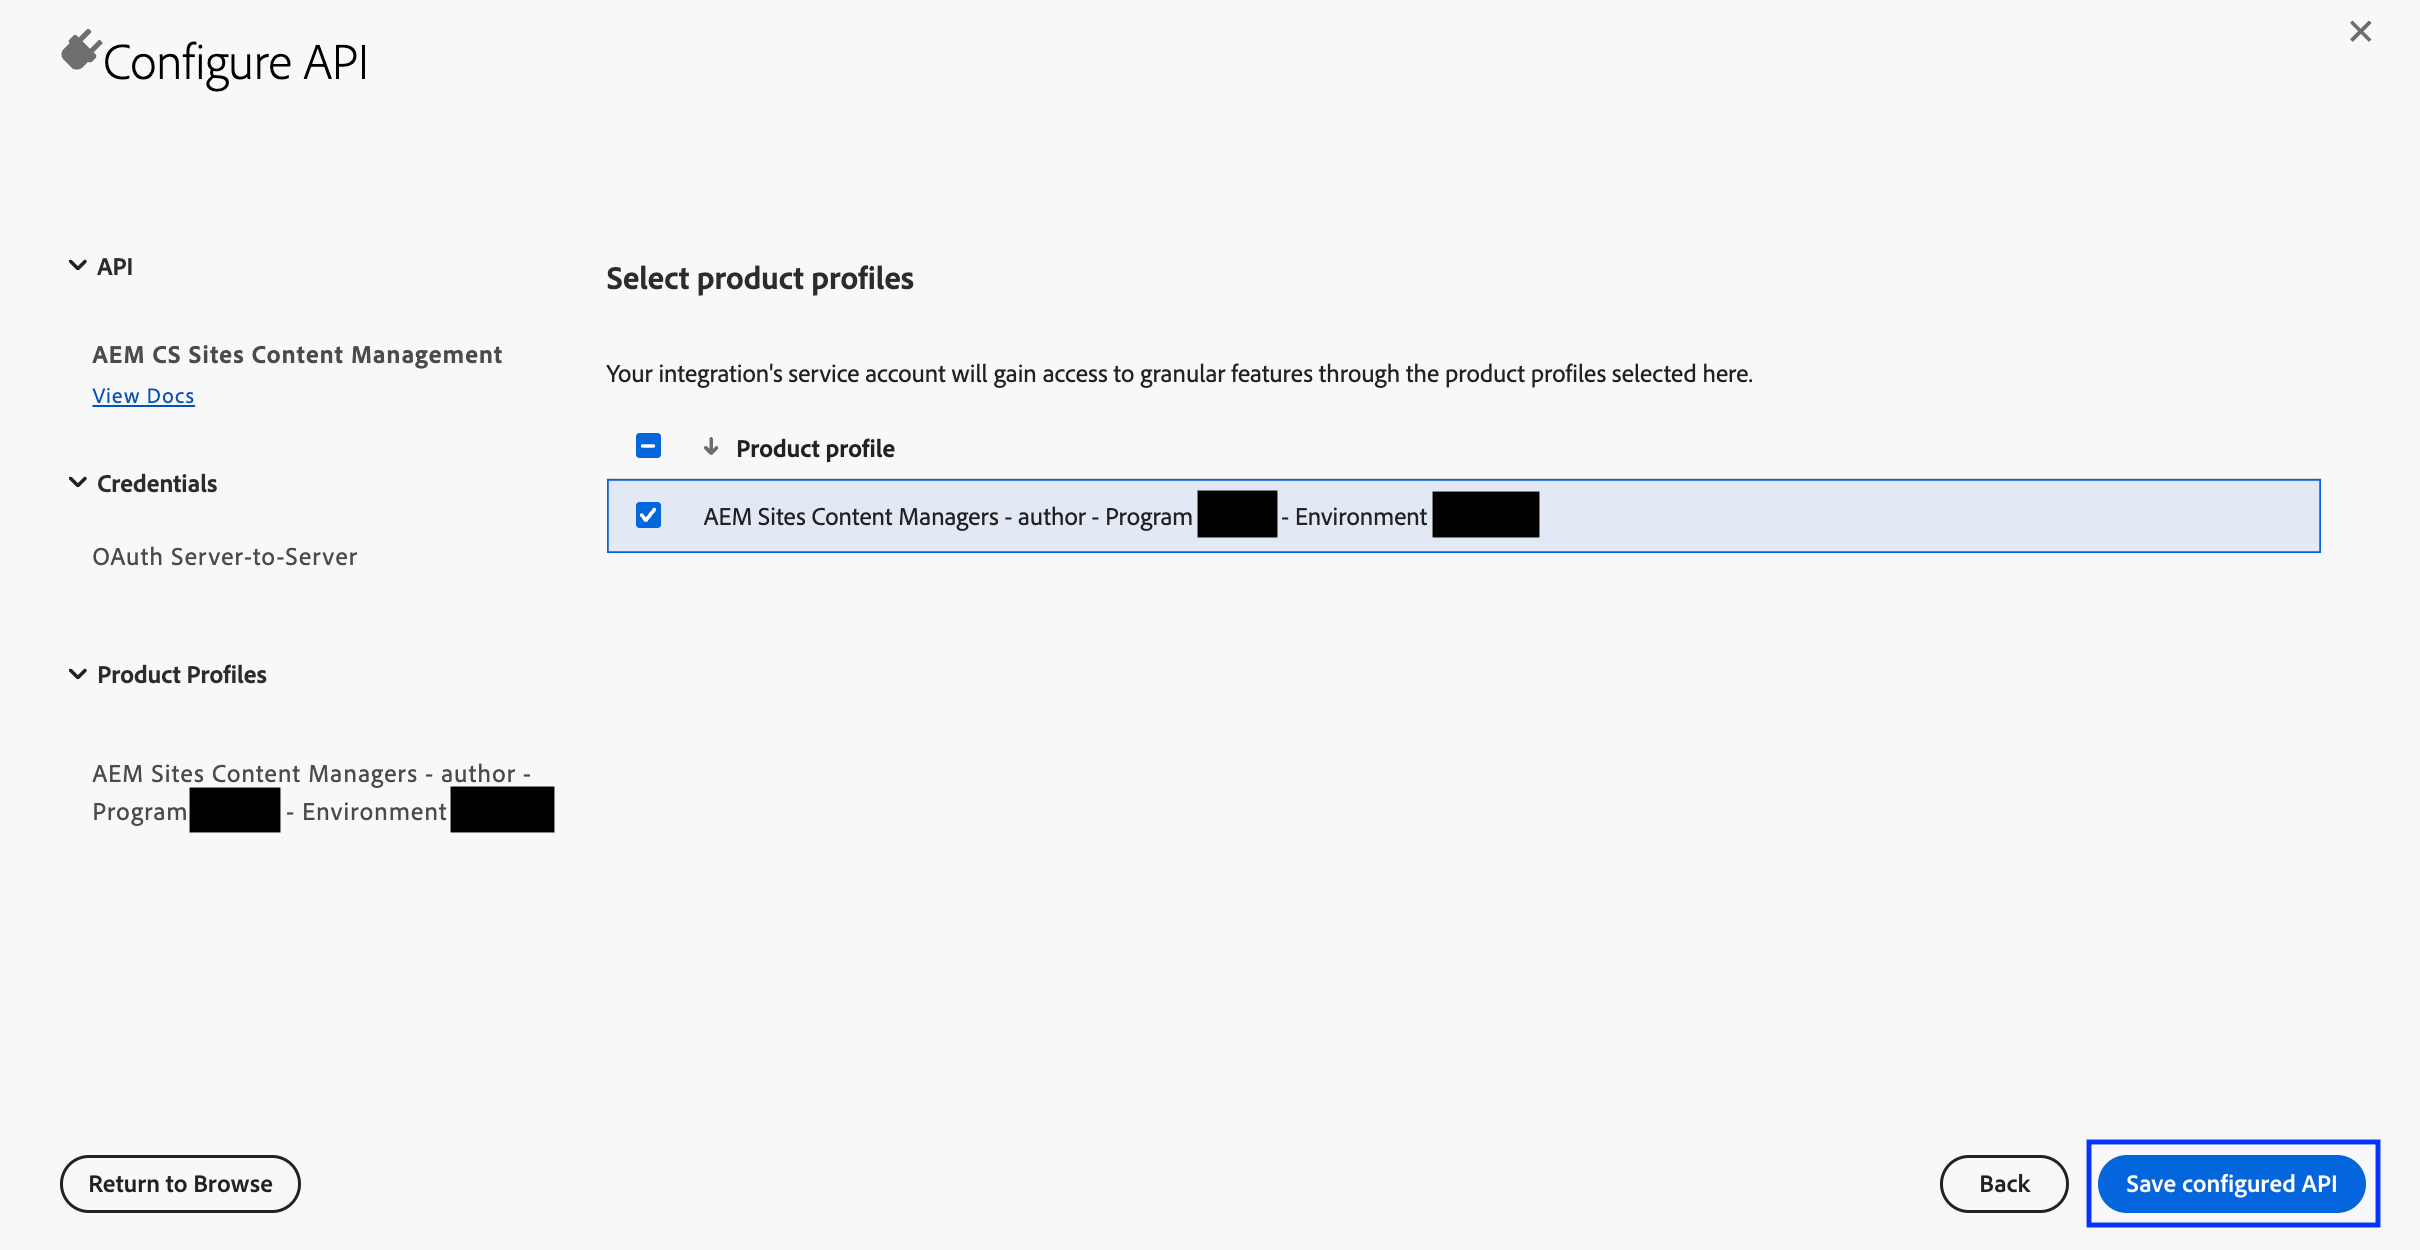
 * [ステップ 2](#step-2) で準備した Author プロダクトプロファイルを選択し、設定を保存します。
 AEM Sites Content Management API は、Profound が使用するフォルダーへのアクセスも提供します。追加の認証情報は必要ありません。
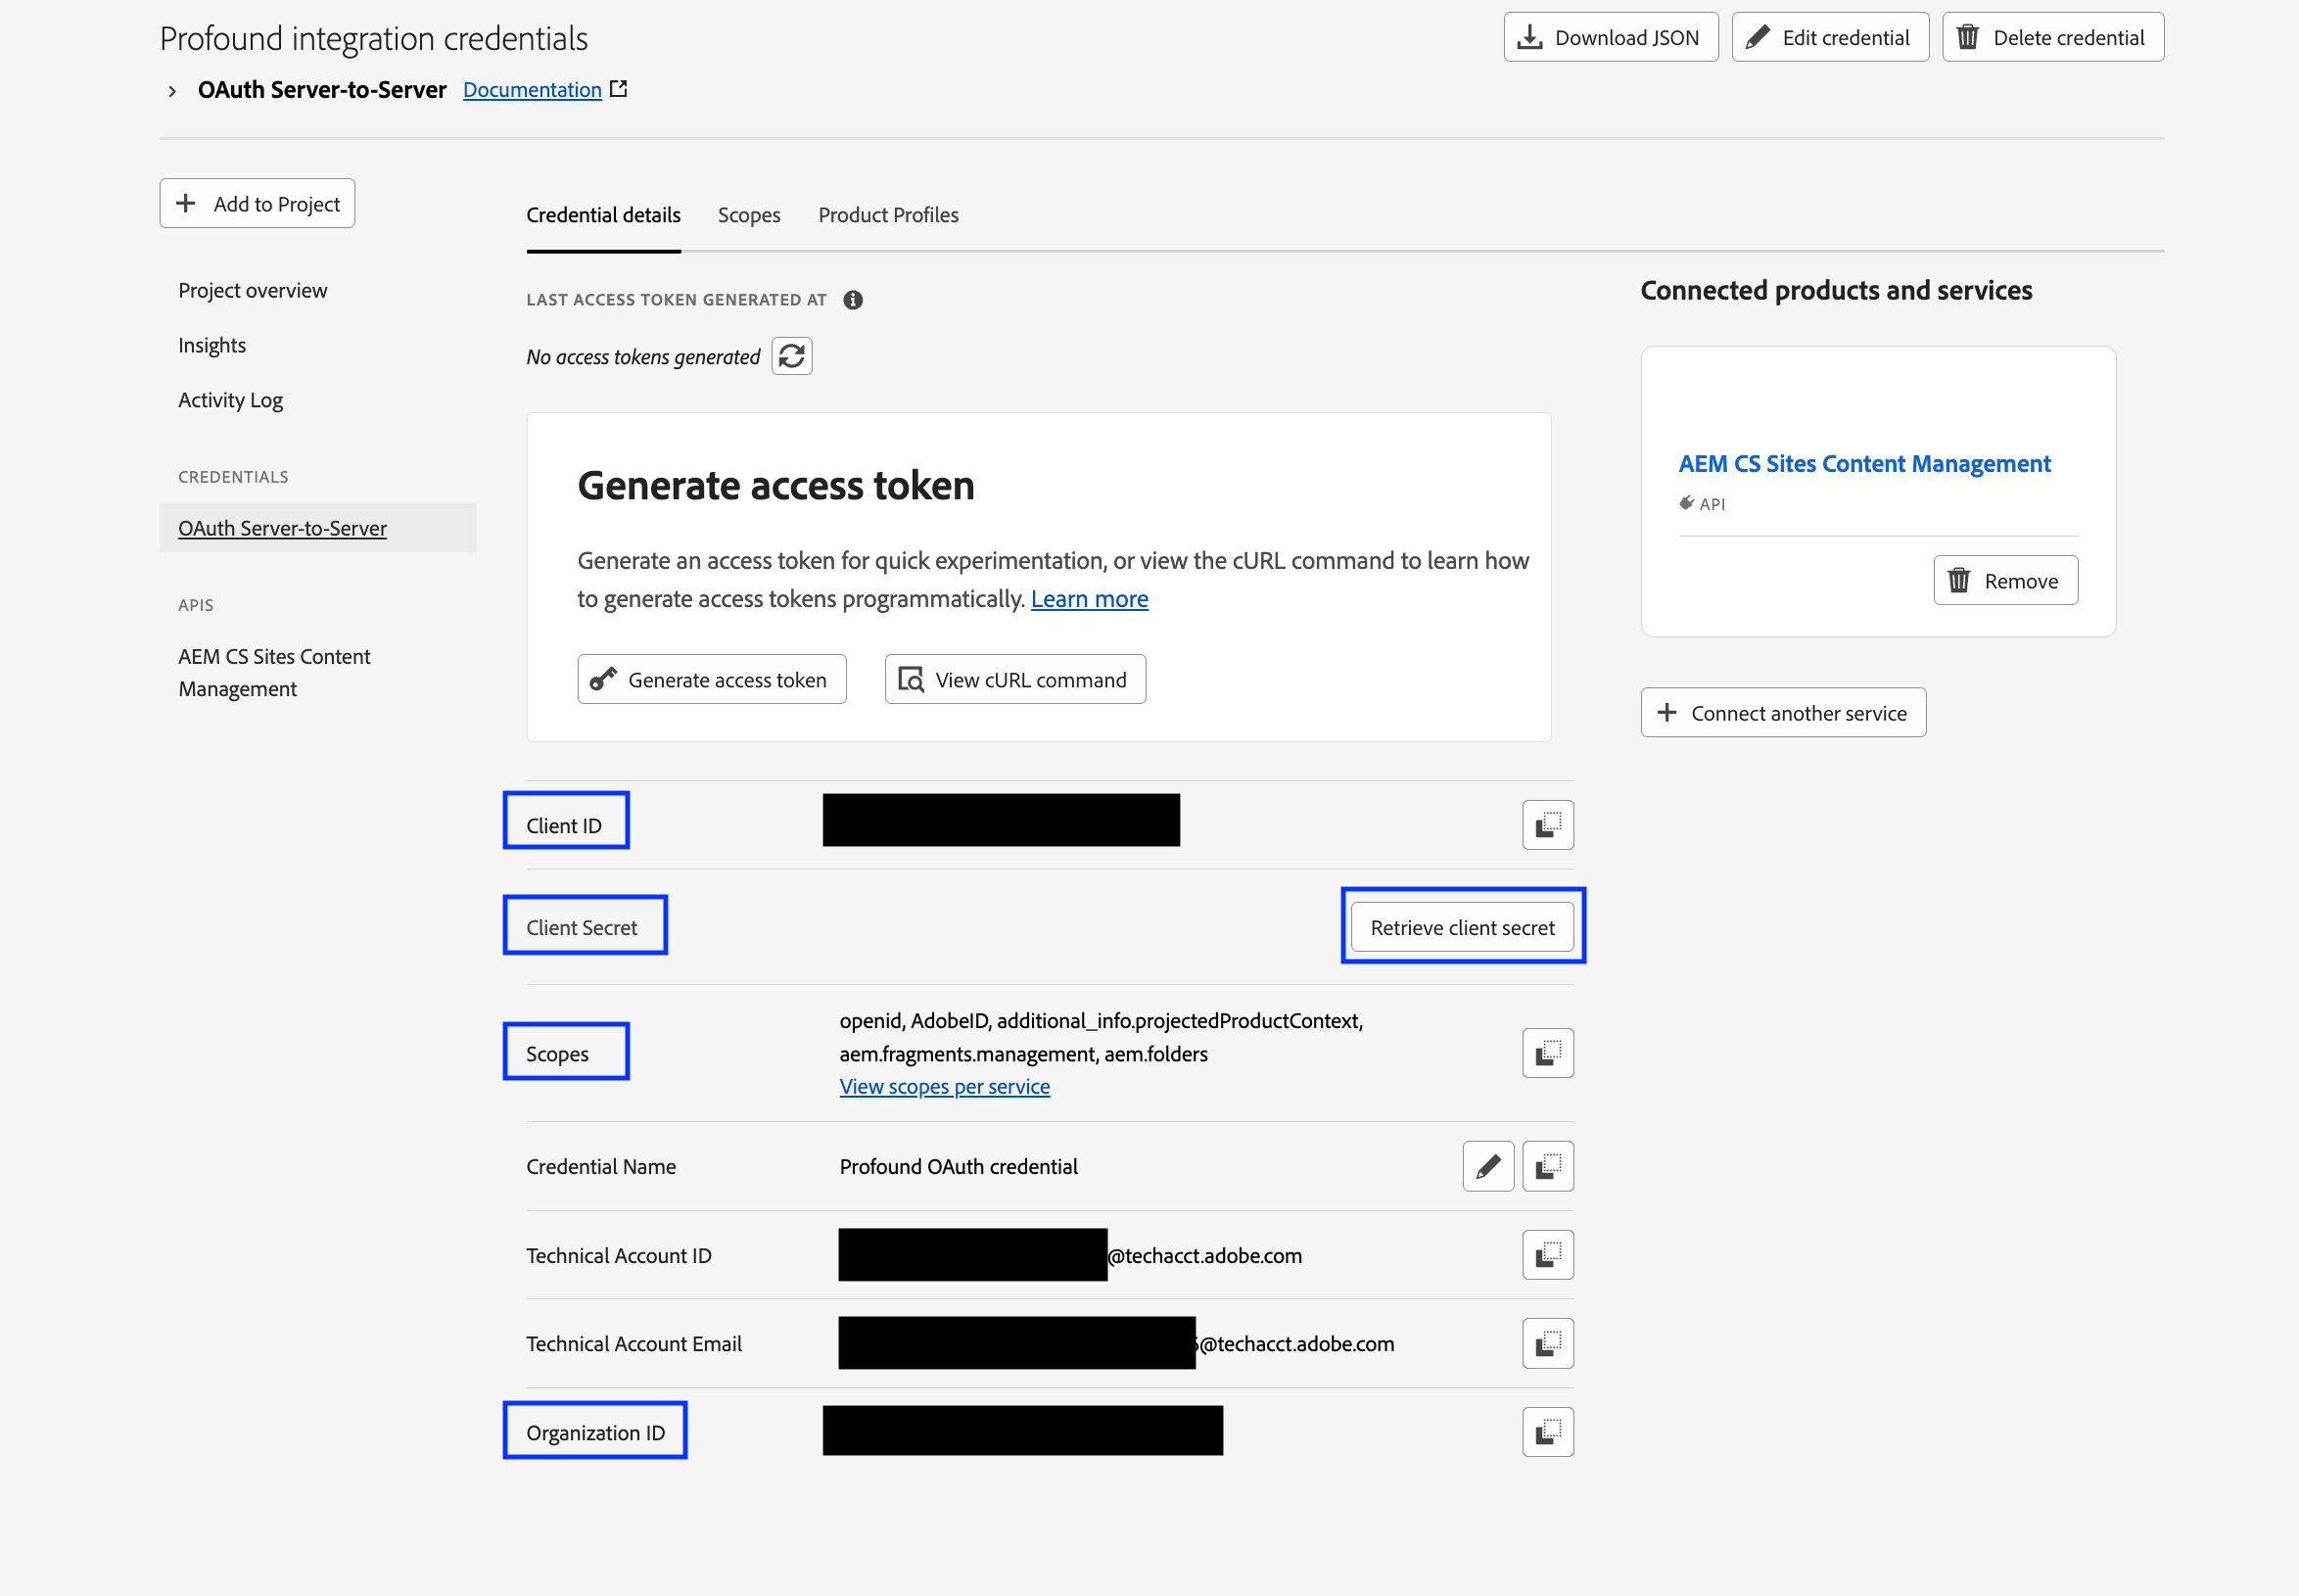
API 設定を保存すると、[Adobe Developer Console](https://developer.adobe.com/console) のプロジェクトページに戻ります。**Credentials** セクションで、新しい OAuth Server-to-Server 認証情報を選択します。認証情報のページから、Profound で AEM インテグレーションを作成するために必要な値をコピーします。
* **Client ID**
* **Client Secret**
* **Scopes** — Adobe に表示されているとおりに、値全体を正確にコピーします
* **Organization ID** — 任意。AEM テナントで `x-gw-ims-org-id` ヘッダーが必要な場合にのみコピーします
AEM Sites Content Management API は、Profound が使用するフォルダーへのアクセスも提供します。追加の認証情報は必要ありません。
API 設定を保存すると、[Adobe Developer Console](https://developer.adobe.com/console) のプロジェクトページに戻ります。**Credentials** セクションで、新しい OAuth Server-to-Server 認証情報を選択します。認証情報のページから、Profound で AEM インテグレーションを作成するために必要な値をコピーします。
* **Client ID**
* **Client Secret**
* **Scopes** — Adobe に表示されているとおりに、値全体を正確にコピーします
* **Organization ID** — 任意。AEM テナントで `x-gw-ims-org-id` ヘッダーが必要な場合にのみコピーします
 認証情報を使用する前に、そのクライアント ID を Author 環境に登録します。
* [Adobe Cloud Manager](https://experience.adobe.com/#/cloud-manager) に戻り、プログラムを開いて、左サイドバーで **Repositories** を選択します。
* 環境の設定パイプラインで使用されている、Adobe が管理するリポジトリとブランチを特定します。
認証情報を使用する前に、そのクライアント ID を Author 環境に登録します。
* [Adobe Cloud Manager](https://experience.adobe.com/#/cloud-manager) に戻り、プログラムを開いて、左サイドバーで **Repositories** を選択します。
* 環境の設定パイプラインで使用されている、Adobe が管理するリポジトリとブランチを特定します。
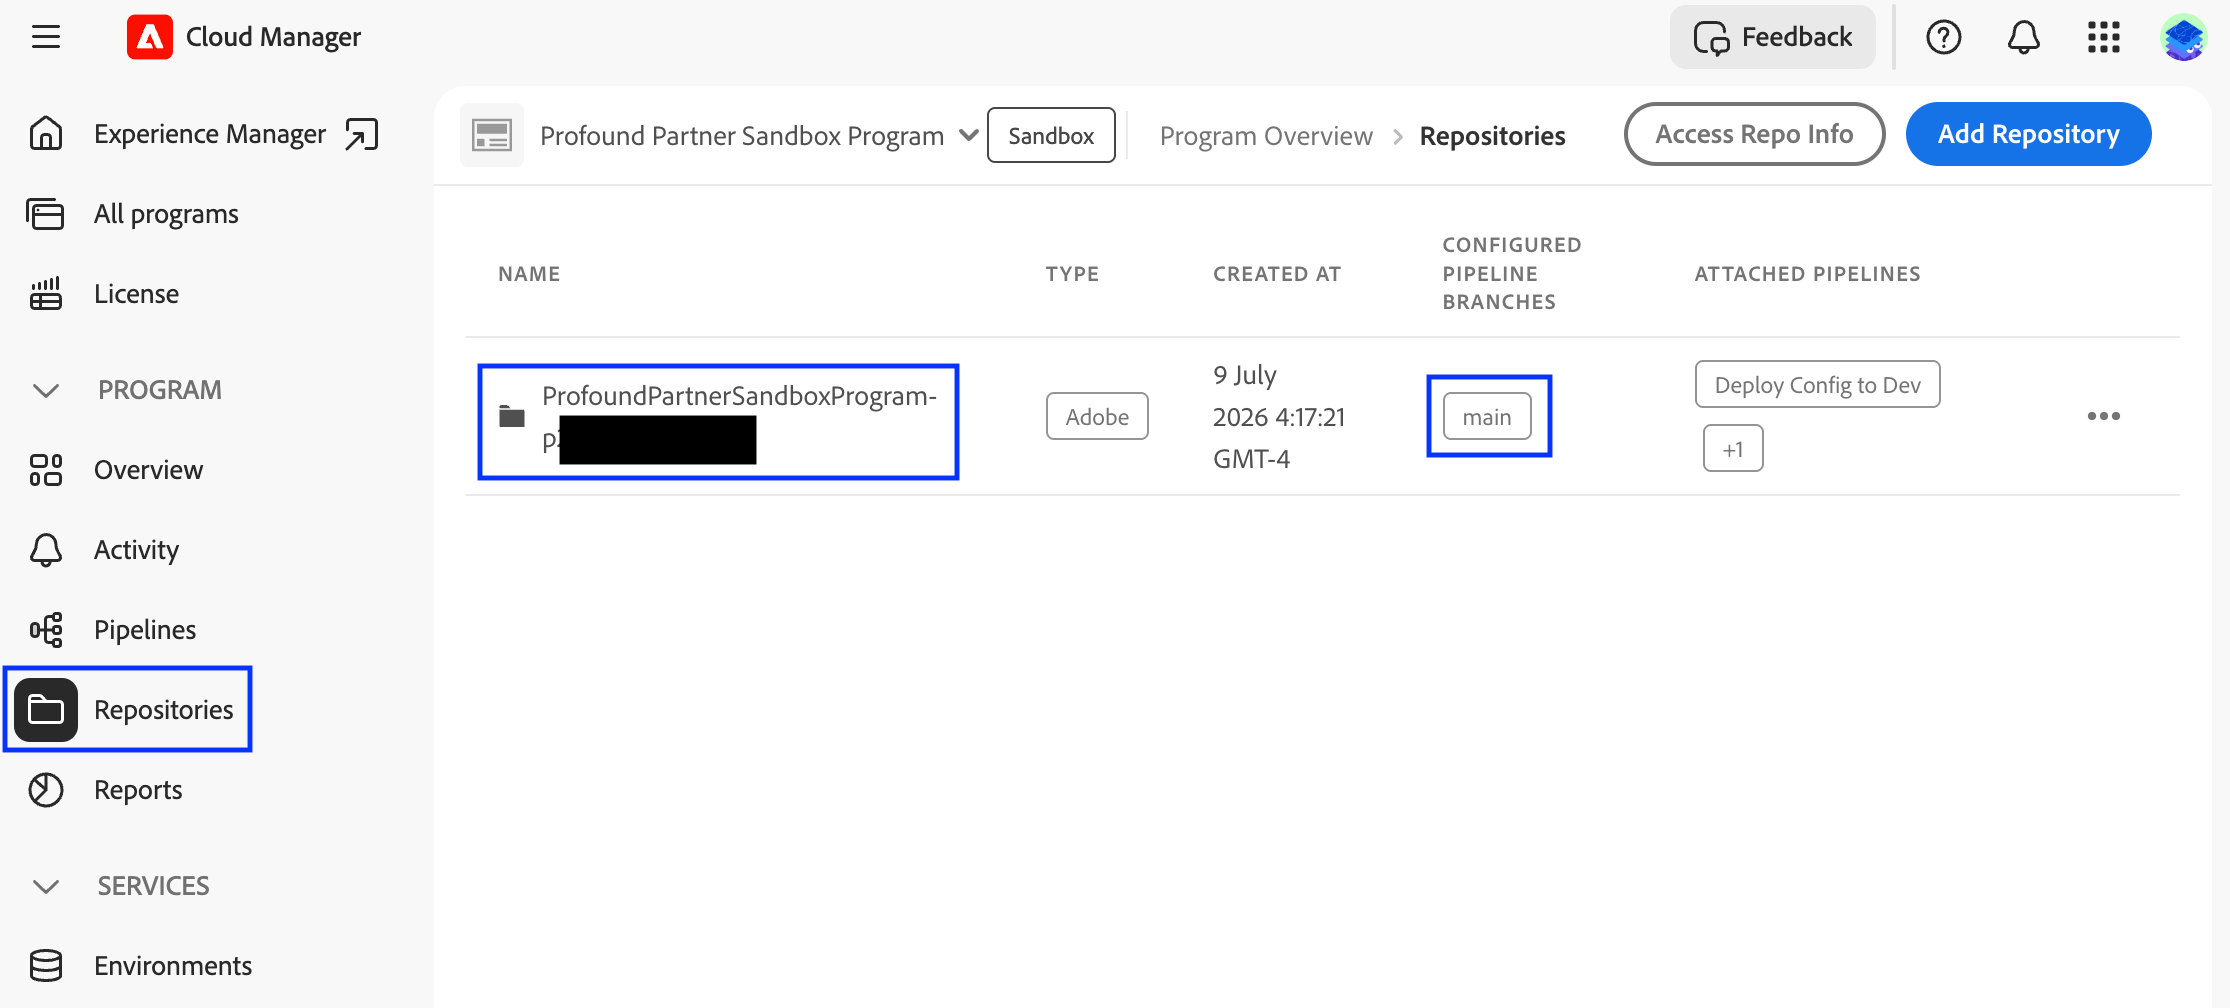 * **Access Repo Info** を選択し、リポジトリの URL とアクセス認証情報をコピーします。
* 通常の開発ワークフローを使用してリポジトリをローカルマシンにクローンし、ルートディレクトリにある `config/api.yaml` ファイルを、次の設定で作成または更新します。
```yaml theme={null}
kind: "API"
version: "1"
metadata:
envTypes: ["dev", "stage", "prod"]
data:
allowedClientIDs:
author:
- ""
```
`` を、[ステップ 5](#step-5) で Developer Console からコピーしたクライアント ID に置き換えます。
他の API 認証情報がすでに設定されている場合は、既存の設定を維持し、`allowedClientIDs` の下にある `author` リストにクライアント ID を追加してください。
リポジトリの管理とパイプラインの設定について詳しくは、以下の Adobe リソースをご覧ください。
* [AEM API client ID registration guide](https://experienceleague.adobe.com/en/docs/experience-manager-cloud-service/content/implementing/developing/open-api-based-apis#registering-a-client-id)
* [Manage repositories in Cloud Manager](https://experienceleague.adobe.com/en/docs/experience-manager-cloud-service/content/implementing/using-cloud-manager/managing-code/managing-repositories)
* [Use config pipelines](https://experienceleague.adobe.com/en/docs/experience-manager-cloud-service/content/operations/config-pipeline) ガイド
* [Invoke OpenAPI-based AEM APIs using OAuth Server-to-Server authentication](https://experienceleague.adobe.com/en/docs/experience-manager-learn/cloud-service/aem-apis/openapis/invoke-api-using-oauth-s2s) チュートリアル
* [Adobe Cloud Manager](https://experience.adobe.com/#/cloud-manager) のプログラムページのまま、左サイドバーで **Pipelines** を選択します。
* **Add Pipeline** を選択し、開発環境の場合は **Add Non-Production Pipeline** を、ステージングおよび本番環境の場合は **Add Production Pipeline** を選択します。
* **Access Repo Info** を選択し、リポジトリの URL とアクセス認証情報をコピーします。
* 通常の開発ワークフローを使用してリポジトリをローカルマシンにクローンし、ルートディレクトリにある `config/api.yaml` ファイルを、次の設定で作成または更新します。
```yaml theme={null}
kind: "API"
version: "1"
metadata:
envTypes: ["dev", "stage", "prod"]
data:
allowedClientIDs:
author:
- ""
```
`` を、[ステップ 5](#step-5) で Developer Console からコピーしたクライアント ID に置き換えます。
他の API 認証情報がすでに設定されている場合は、既存の設定を維持し、`allowedClientIDs` の下にある `author` リストにクライアント ID を追加してください。
リポジトリの管理とパイプラインの設定について詳しくは、以下の Adobe リソースをご覧ください。
* [AEM API client ID registration guide](https://experienceleague.adobe.com/en/docs/experience-manager-cloud-service/content/implementing/developing/open-api-based-apis#registering-a-client-id)
* [Manage repositories in Cloud Manager](https://experienceleague.adobe.com/en/docs/experience-manager-cloud-service/content/implementing/using-cloud-manager/managing-code/managing-repositories)
* [Use config pipelines](https://experienceleague.adobe.com/en/docs/experience-manager-cloud-service/content/operations/config-pipeline) ガイド
* [Invoke OpenAPI-based AEM APIs using OAuth Server-to-Server authentication](https://experienceleague.adobe.com/en/docs/experience-manager-learn/cloud-service/aem-apis/openapis/invoke-api-using-oauth-s2s) チュートリアル
* [Adobe Cloud Manager](https://experience.adobe.com/#/cloud-manager) のプログラムページのまま、左サイドバーで **Pipelines** を選択します。
* **Add Pipeline** を選択し、開発環境の場合は **Add Non-Production Pipeline** を、ステージングおよび本番環境の場合は **Add Production Pipeline** を選択します。
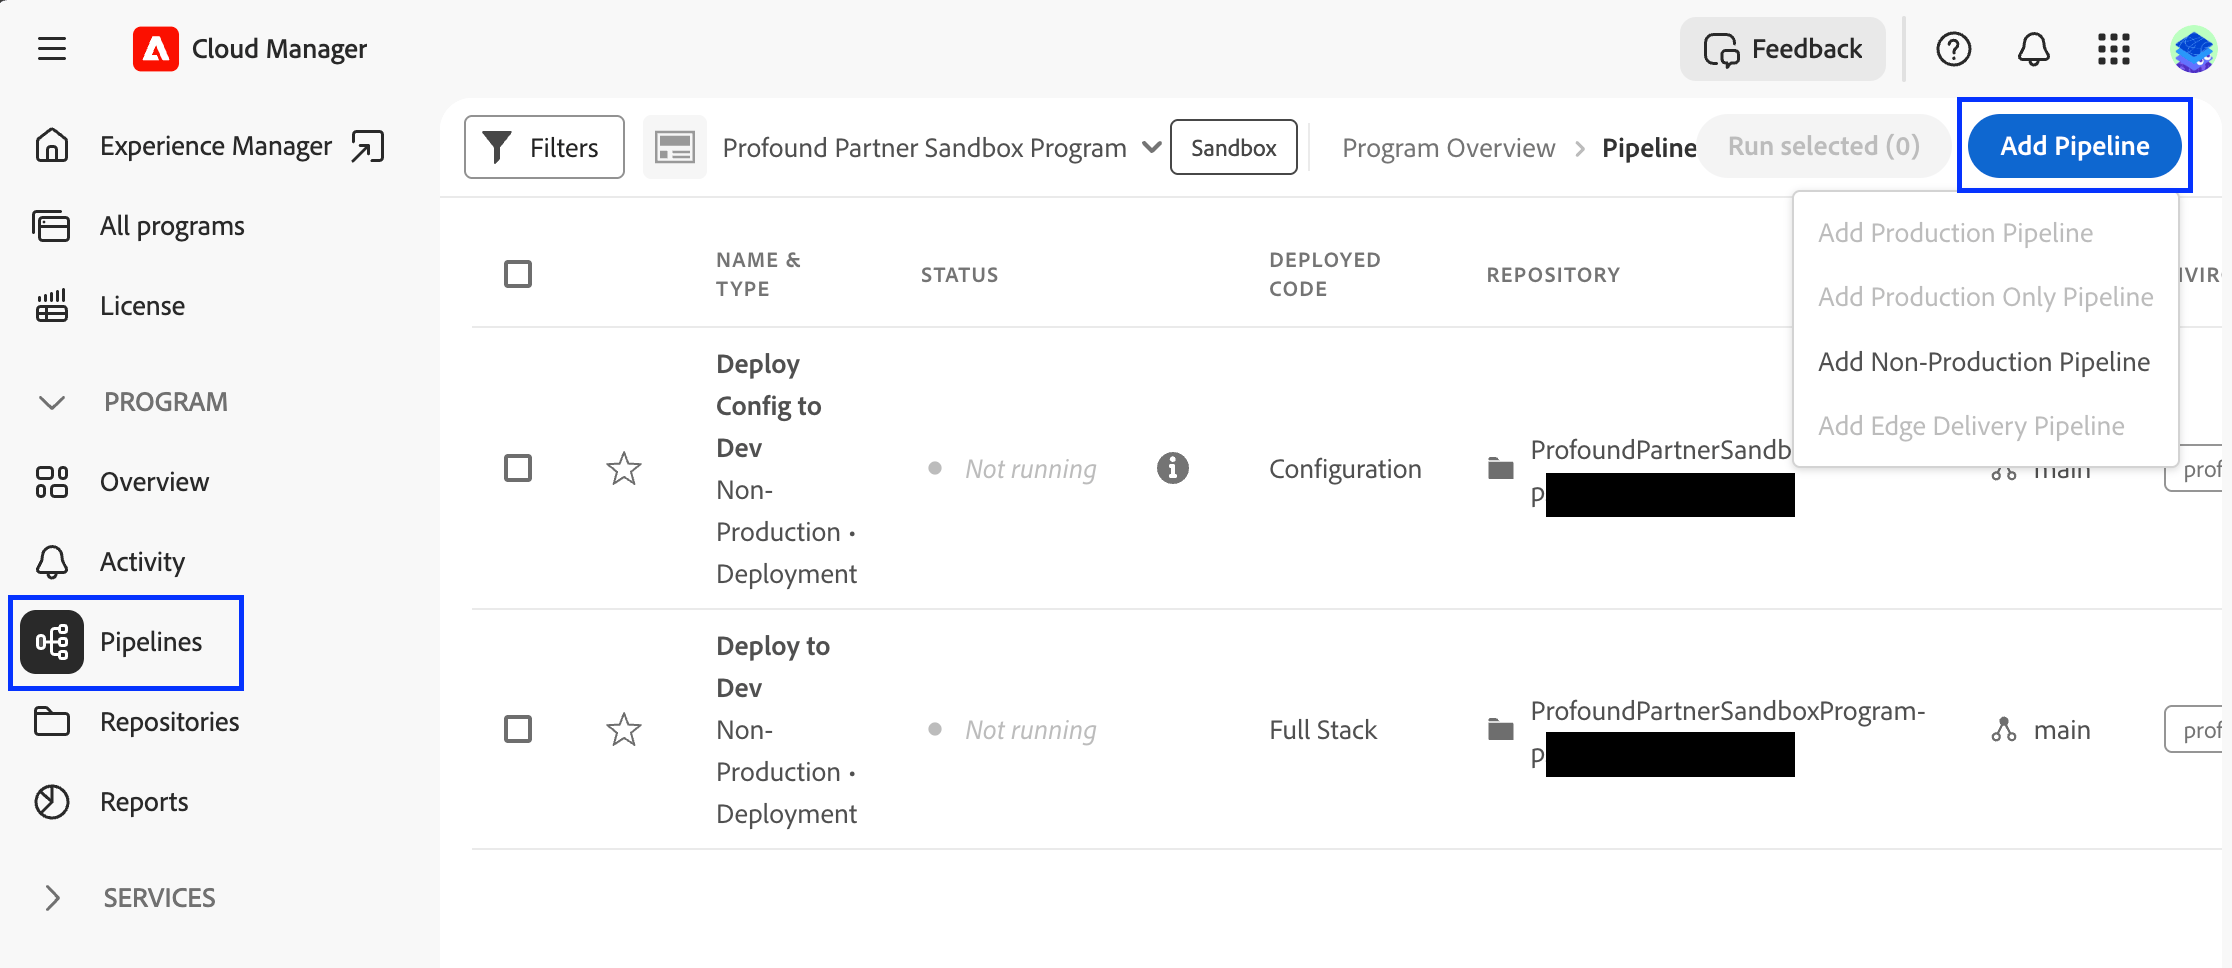 * **Add Pipeline** ダイアログで **Deployment Pipeline** を選択し、パイプラインにわかりやすい名前を付けて、**Continue** を選択します。
* 次の画面で、以下のように値を入力します。
* Select code to deploy: **Targeted deployment**
* Include: **Config**
* Eligible Deployment Environments: ドロップダウンから AEM 環境を選択します
* Repository、Git Branch、Code Location: [ステップ 6](#step-6) のリポジトリ、ブランチ、設定ディレクトリ
* **Save** を選択します。
新しい設定パイプラインが、**Pipelines** セクションのパイプライン一覧に表示されます。パイプラインを選択し、**Run selected** を選択します。デプロイが正常に完了するまで待ちます。
* **Add Pipeline** ダイアログで **Deployment Pipeline** を選択し、パイプラインにわかりやすい名前を付けて、**Continue** を選択します。
* 次の画面で、以下のように値を入力します。
* Select code to deploy: **Targeted deployment**
* Include: **Config**
* Eligible Deployment Environments: ドロップダウンから AEM 環境を選択します
* Repository、Git Branch、Code Location: [ステップ 6](#step-6) のリポジトリ、ブランチ、設定ディレクトリ
* **Save** を選択します。
新しい設定パイプラインが、**Pipelines** セクションのパイプライン一覧に表示されます。パイプラインを選択し、**Run selected** を選択します。デプロイが正常に完了するまで待ちます。
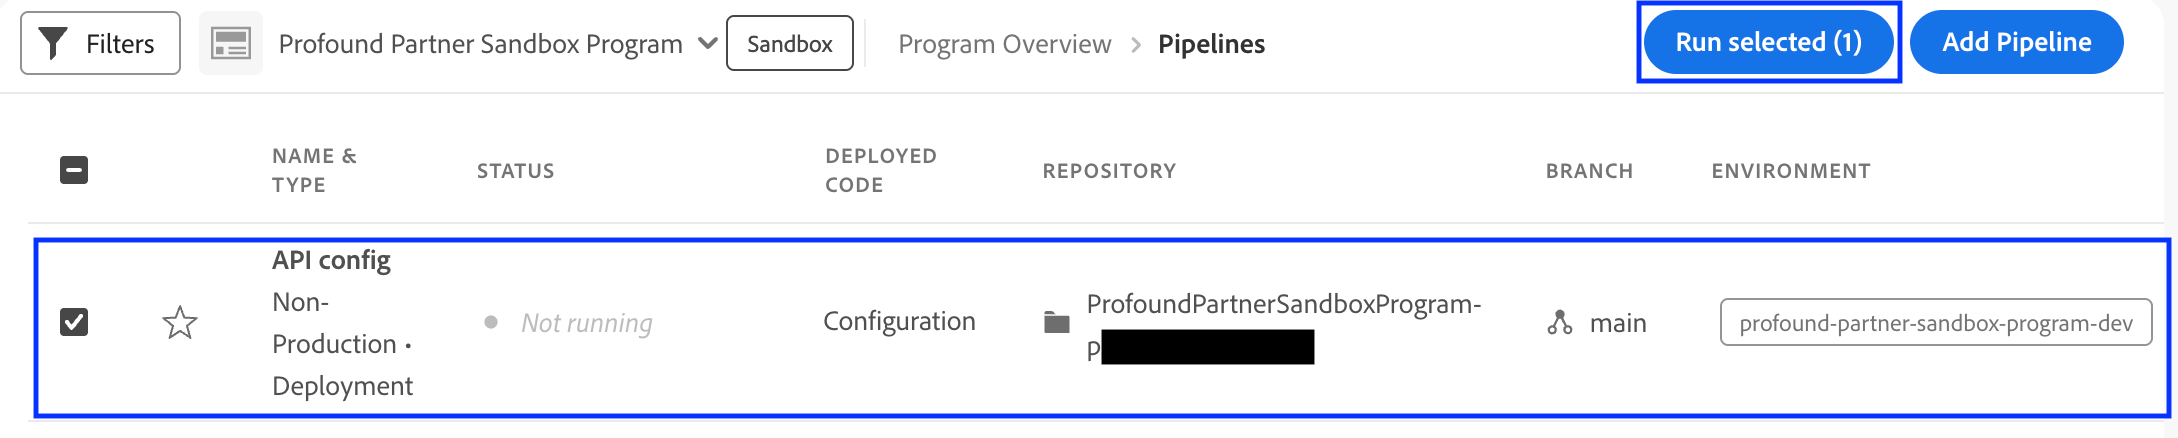 設定パイプラインのデプロイについて詳しくは、以下の Adobe リソースをご覧ください。
* [Use config pipelines](https://experienceleague.adobe.com/en/docs/experience-manager-cloud-service/content/operations/config-pipeline) ガイド
* [Cloud Manager CI/CD pipelines](https://experienceleague.adobe.com/en/docs/experience-manager-cloud-service/content/implementing/using-cloud-manager/cicd-pipelines/introduction-ci-cd-pipelines) の概要
* [Profound](https://platform.tryprofound.com) で、プラットフォームの左上隅にある組織名を選択し、**Settings** を選択します。
* 左サイドバーで、**Account** の下にある **Integrations** を選択します。
* **Adobe Experience Manager (S2S)** を検索して選択します。
設定パイプラインのデプロイについて詳しくは、以下の Adobe リソースをご覧ください。
* [Use config pipelines](https://experienceleague.adobe.com/en/docs/experience-manager-cloud-service/content/operations/config-pipeline) ガイド
* [Cloud Manager CI/CD pipelines](https://experienceleague.adobe.com/en/docs/experience-manager-cloud-service/content/implementing/using-cloud-manager/cicd-pipelines/introduction-ci-cd-pipelines) の概要
* [Profound](https://platform.tryprofound.com) で、プラットフォームの左上隅にある組織名を選択し、**Settings** を選択します。
* 左サイドバーで、**Account** の下にある **Integrations** を選択します。
* **Adobe Experience Manager (S2S)** を検索して選択します。
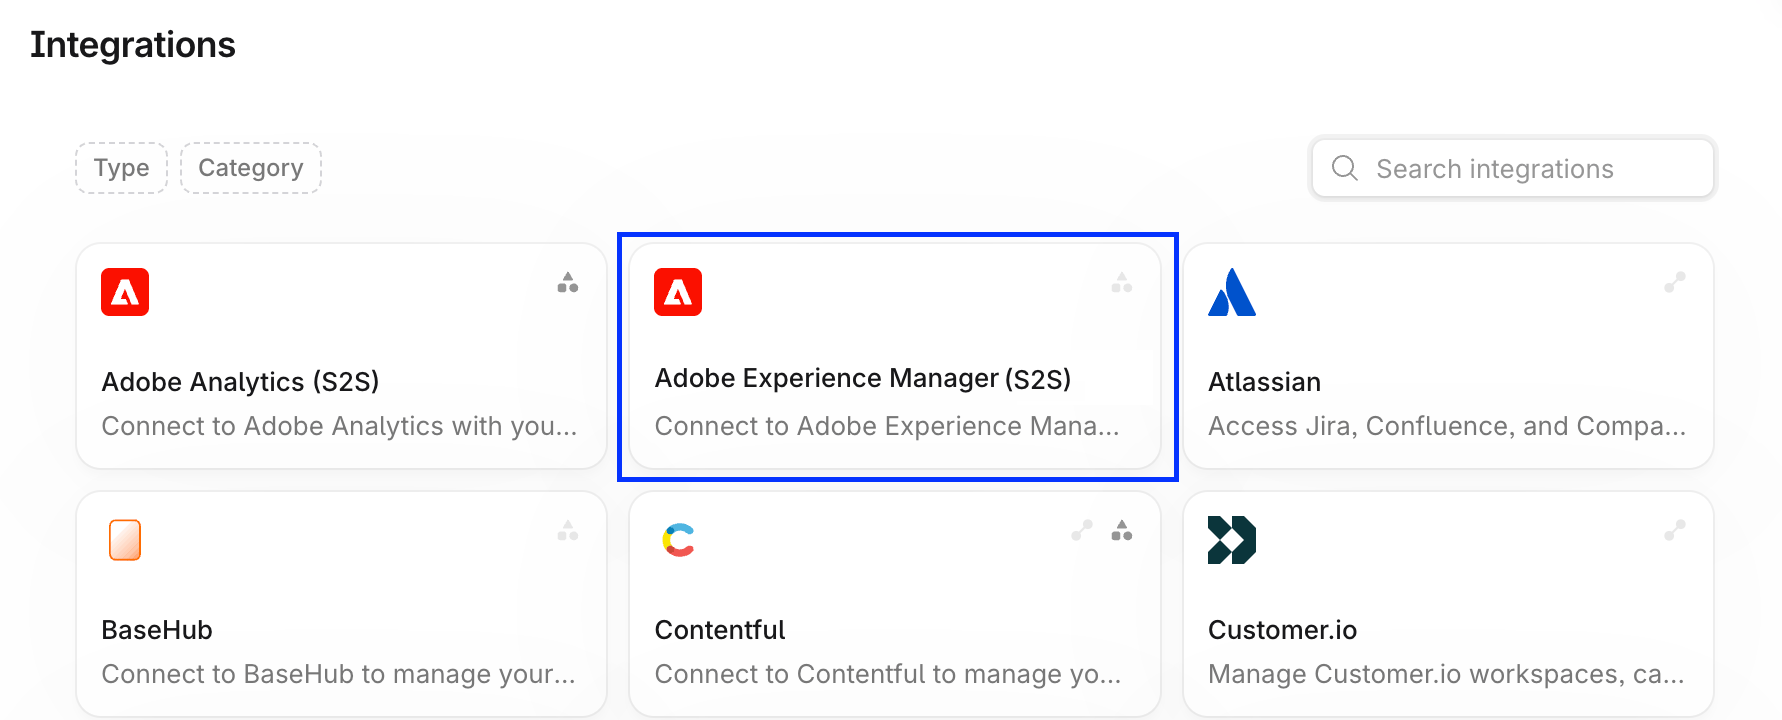 * Adobe Experience Manager (S2S) インテグレーション画面で、**+ Add account** を選択します。
* **Connect Adobe Experience Manager (S2S)** ダイアログで、[ステップ 1](#step-1) の Author URL と、[ステップ 5](#step-5) で取得したクライアントシークレット、クライアント ID、スコープ、組織 ID を入力します。
* **Connect account** を選択します。
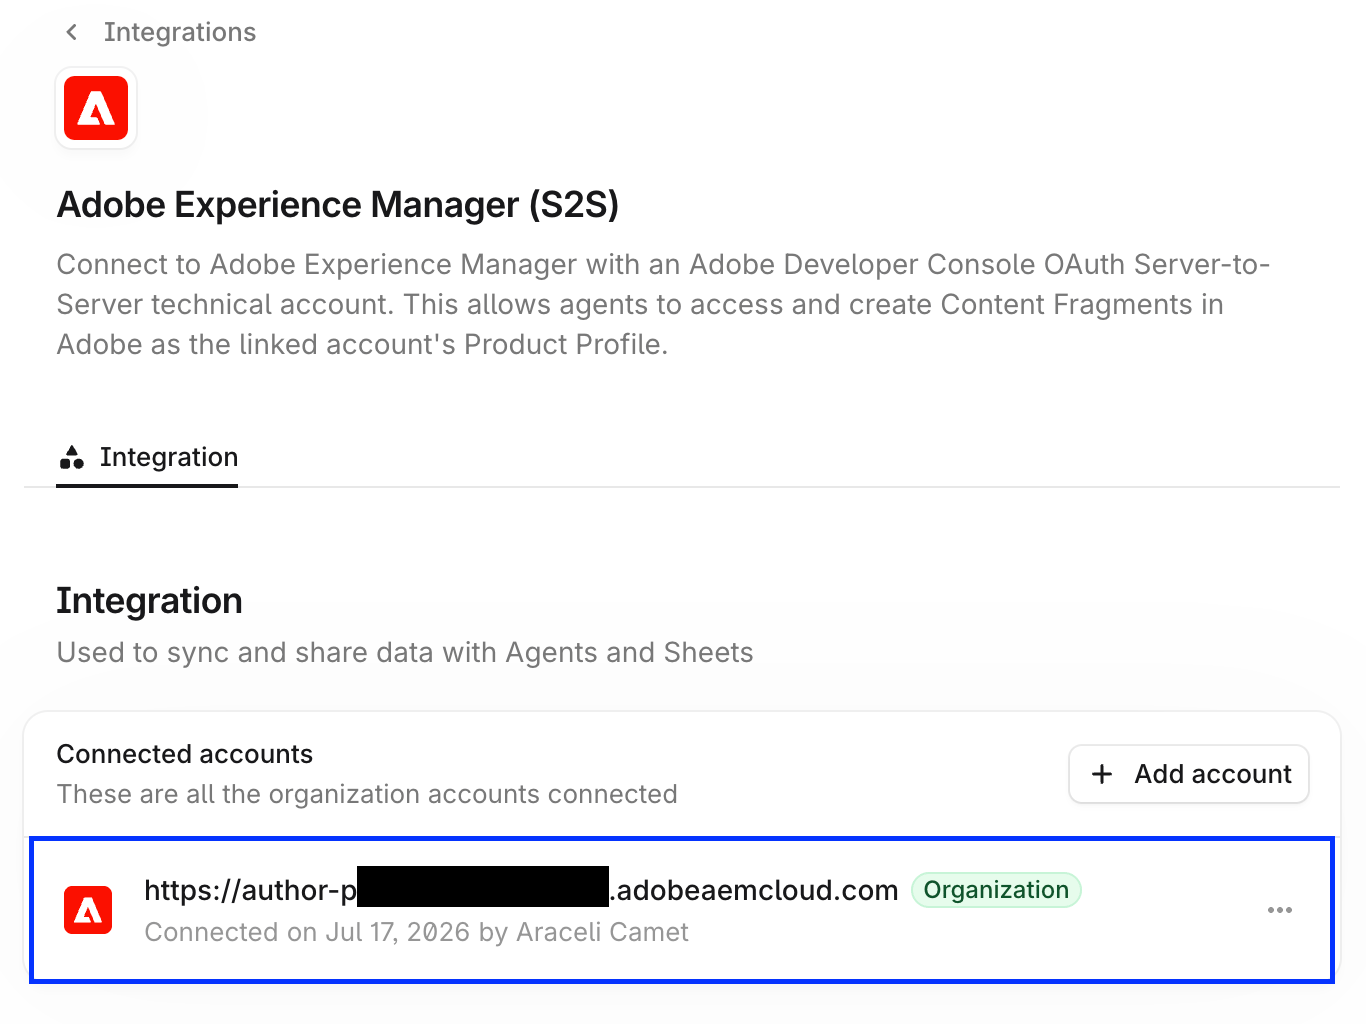
接続に成功すると、接続済みアカウントの一覧に AEM 環境が表示されます。
* Adobe Experience Manager (S2S) インテグレーション画面で、**+ Add account** を選択します。
* **Connect Adobe Experience Manager (S2S)** ダイアログで、[ステップ 1](#step-1) の Author URL と、[ステップ 5](#step-5) で取得したクライアントシークレット、クライアント ID、スコープ、組織 ID を入力します。
* **Connect account** を選択します。
接続に成功すると、接続済みアカウントの一覧に AEM 環境が表示されます。
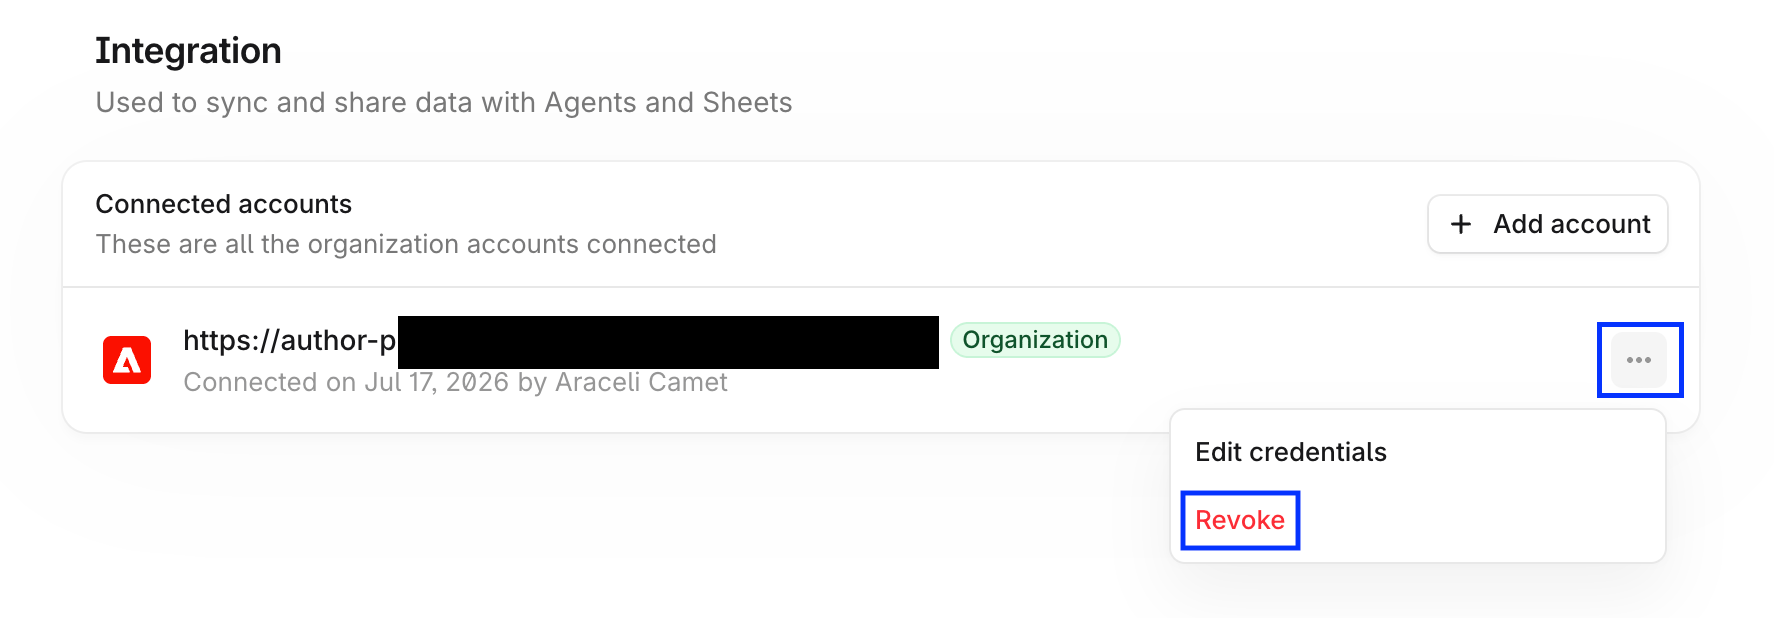
 インテグレーションアカウントのアクションメニューで **Revoke** を選択すると、AEM 環境への Profound のアクセスをいつでも取り消せます。
 Profound が AEM 環境を操作するために必要なすべての権限を持っていることを確認するには、AEM の Agent ノードが正常に実行されることを確認します。
* [Profound](https://platform.tryprofound.com) で[新しい Agent を作成する](https://help.tryprofound.com/articles/2212787792-create-an-agent)か、既存の Agent の下書きを開きます。
* Adobe Experience Manager の **List Content Fragments** ノードと **Get Content Fragment** ノードを追加し、接続済みの AEM インスタンスを選択します。
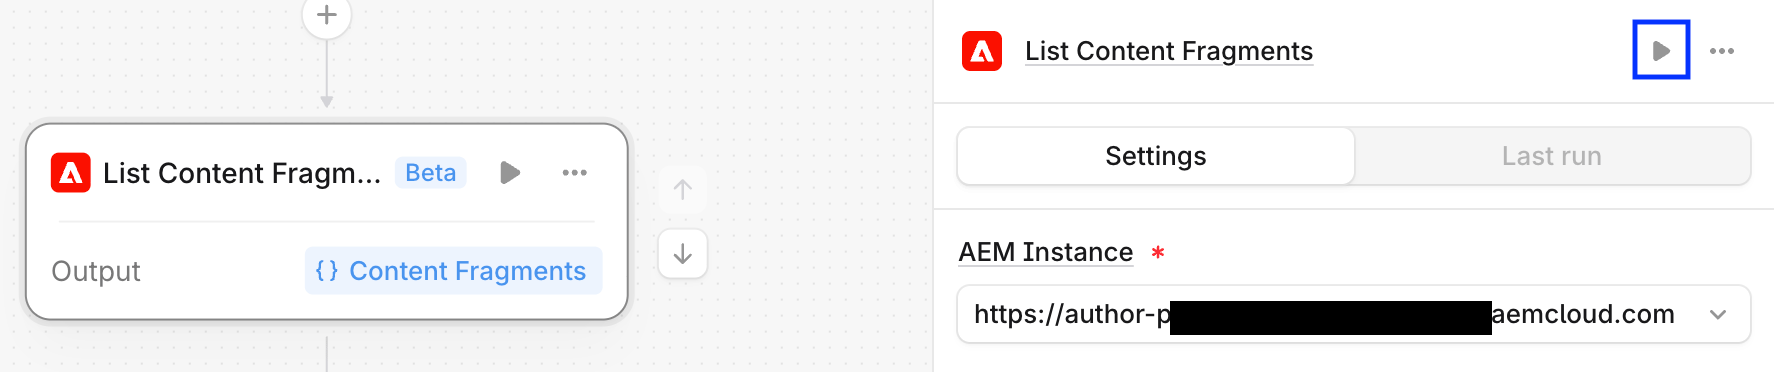
* ノード設定パネルで **Test node**(再生アイコン)を選択し、AEM の出力に想定どおりのデータが含まれていることを確認します。
Profound が AEM 環境を操作するために必要なすべての権限を持っていることを確認するには、AEM の Agent ノードが正常に実行されることを確認します。
* [Profound](https://platform.tryprofound.com) で[新しい Agent を作成する](https://help.tryprofound.com/articles/2212787792-create-an-agent)か、既存の Agent の下書きを開きます。
* Adobe Experience Manager の **List Content Fragments** ノードと **Get Content Fragment** ノードを追加し、接続済みの AEM インスタンスを選択します。
* ノード設定パネルで **Test node**(再生アイコン)を選択し、AEM の出力に想定どおりのデータが含まれていることを確認します。
 * Profound Agents でコンテンツフラグメントの作成や更新を行う予定の場合は、**Create Content Fragment** ノードと **Update Content Fragment** ノードも同じ方法でテストしてください。
テスト用のコンテンツは、AEM 環境で直接削除してください。現在の Profound Agent ノードには削除操作が含まれていません。
## AEM 認証情報のローテーション
### クライアントシークレットのみをローテーションする
Adobe では、1 つの OAuth Server-to-Server 認証情報に 2 つのクライアントシークレットを設定できるため、クライアント ID を変更せずにローテーションできます。
[Adobe の開発者向けドキュメント](https://developer.adobe.com/developer-console/docs/guides/authentication/ServerToServerAuthentication/implementation#rotating-client-secrets)の手順に従ってクライアントシークレットをローテーションし、Profound で認証情報を更新します(接続済みアカウントのアクションメニューで **Integrations** > **Adobe Experience Manager (S2S)** > **Edit credentials**)。
この手順ではクライアント ID は変わらないため、`api.yaml` を更新したり再デプロイしたりする必要はありません。
### OAuth 認証情報全体をローテーションする
AEM の OAuth 認証情報全体を置き換えるには、次の手順を実行します。
1. セットアップガイドの[ステップ 4](#step-4) の説明に従って、新しい認証情報を生成します。
2. セットアップガイドの[ステップ 6](#step-6) の手順に従って、新しいクライアント ID を `config/api.yaml` にデプロイします。
3. Profound で認証情報を更新します。
新しい接続を確認するまでは、古いクライアント ID の登録を残しておいてください。
## ベストプラクティス
* **Author** 環境のみを使用してください。Profound は AEM の Publish や Preview には接続しません。環境について詳しくは、[AEM as a Cloud Service のチュートリアル](https://experienceleague.adobe.com/en/docs/experience-manager-learn/cloud-service/cloud-manager/environments)をご覧ください。
* Profound Agent の読み取りノードと書き込みノードを個別にテストし、フォルダーとリポジトリの権限を確認してください。
* クライアントシークレットやその他の認証情報は、必ず承認されたシークレットマネージャーに保存し、スクリーンショット、チケット、ソース管理には決して含めないでください。
* Profound Agents でコンテンツフラグメントの作成や更新を行う予定の場合は、**Create Content Fragment** ノードと **Update Content Fragment** ノードも同じ方法でテストしてください。
テスト用のコンテンツは、AEM 環境で直接削除してください。現在の Profound Agent ノードには削除操作が含まれていません。
## AEM 認証情報のローテーション
### クライアントシークレットのみをローテーションする
Adobe では、1 つの OAuth Server-to-Server 認証情報に 2 つのクライアントシークレットを設定できるため、クライアント ID を変更せずにローテーションできます。
[Adobe の開発者向けドキュメント](https://developer.adobe.com/developer-console/docs/guides/authentication/ServerToServerAuthentication/implementation#rotating-client-secrets)の手順に従ってクライアントシークレットをローテーションし、Profound で認証情報を更新します(接続済みアカウントのアクションメニューで **Integrations** > **Adobe Experience Manager (S2S)** > **Edit credentials**)。
この手順ではクライアント ID は変わらないため、`api.yaml` を更新したり再デプロイしたりする必要はありません。
### OAuth 認証情報全体をローテーションする
AEM の OAuth 認証情報全体を置き換えるには、次の手順を実行します。
1. セットアップガイドの[ステップ 4](#step-4) の説明に従って、新しい認証情報を生成します。
2. セットアップガイドの[ステップ 6](#step-6) の手順に従って、新しいクライアント ID を `config/api.yaml` にデプロイします。
3. Profound で認証情報を更新します。
新しい接続を確認するまでは、古いクライアント ID の登録を残しておいてください。
## ベストプラクティス
* **Author** 環境のみを使用してください。Profound は AEM の Publish や Preview には接続しません。環境について詳しくは、[AEM as a Cloud Service のチュートリアル](https://experienceleague.adobe.com/en/docs/experience-manager-learn/cloud-service/cloud-manager/environments)をご覧ください。
* Profound Agent の読み取りノードと書き込みノードを個別にテストし、フォルダーとリポジトリの権限を確認してください。
* クライアントシークレットやその他の認証情報は、必ず承認されたシークレットマネージャーに保存し、スクリーンショット、チケット、ソース管理には決して含めないでください。