> ## Documentation Index
> Fetch the complete documentation index at: https://docs.tryprofound.com/llms.txt
> Use this file to discover all available pages before exploring further.
# Drupal を Profound に接続する
このガイドでは、Drupal アカウントを Profound に接続する手順を説明します。接続すると、Profound Agents が Drupal のコンテンツに直接アクセスし、編集や管理を行えるようになります。
## 始める前に
次のものが必要です。
* 管理者ロール、またはユーザーと権限を管理できるその他のロールを持つ [Drupal](https://www.drupal.org/) アカウント(詳しくは Drupal の [Roles and Permissions ドキュメント](https://www.drupal.org/docs/roles-and-permissions)をご覧ください)
* 公開されている HTTPS の Drupal Web サイト
* [JSON:API](https://www.drupal.org/docs/core-modules-and-themes/core-modules/jsonapi-module) Drupal コアモジュール: Profound が実行するすべてのアクションを支えます
* [JSON:API Permission Access](https://www.drupal.org/project/jsonapi_permission_access) モジュール: 特定のユーザーロールに対して API 認証アクセスを有効にします
* [Key auth](https://www.drupal.org/project/key_auth) モジュール: Profound がユーザーに代わってアクションを実行できるよう、API キー認証を有効にします
* [Profound](https://www.tryprofound.com/) アカウント
## セットアップガイド
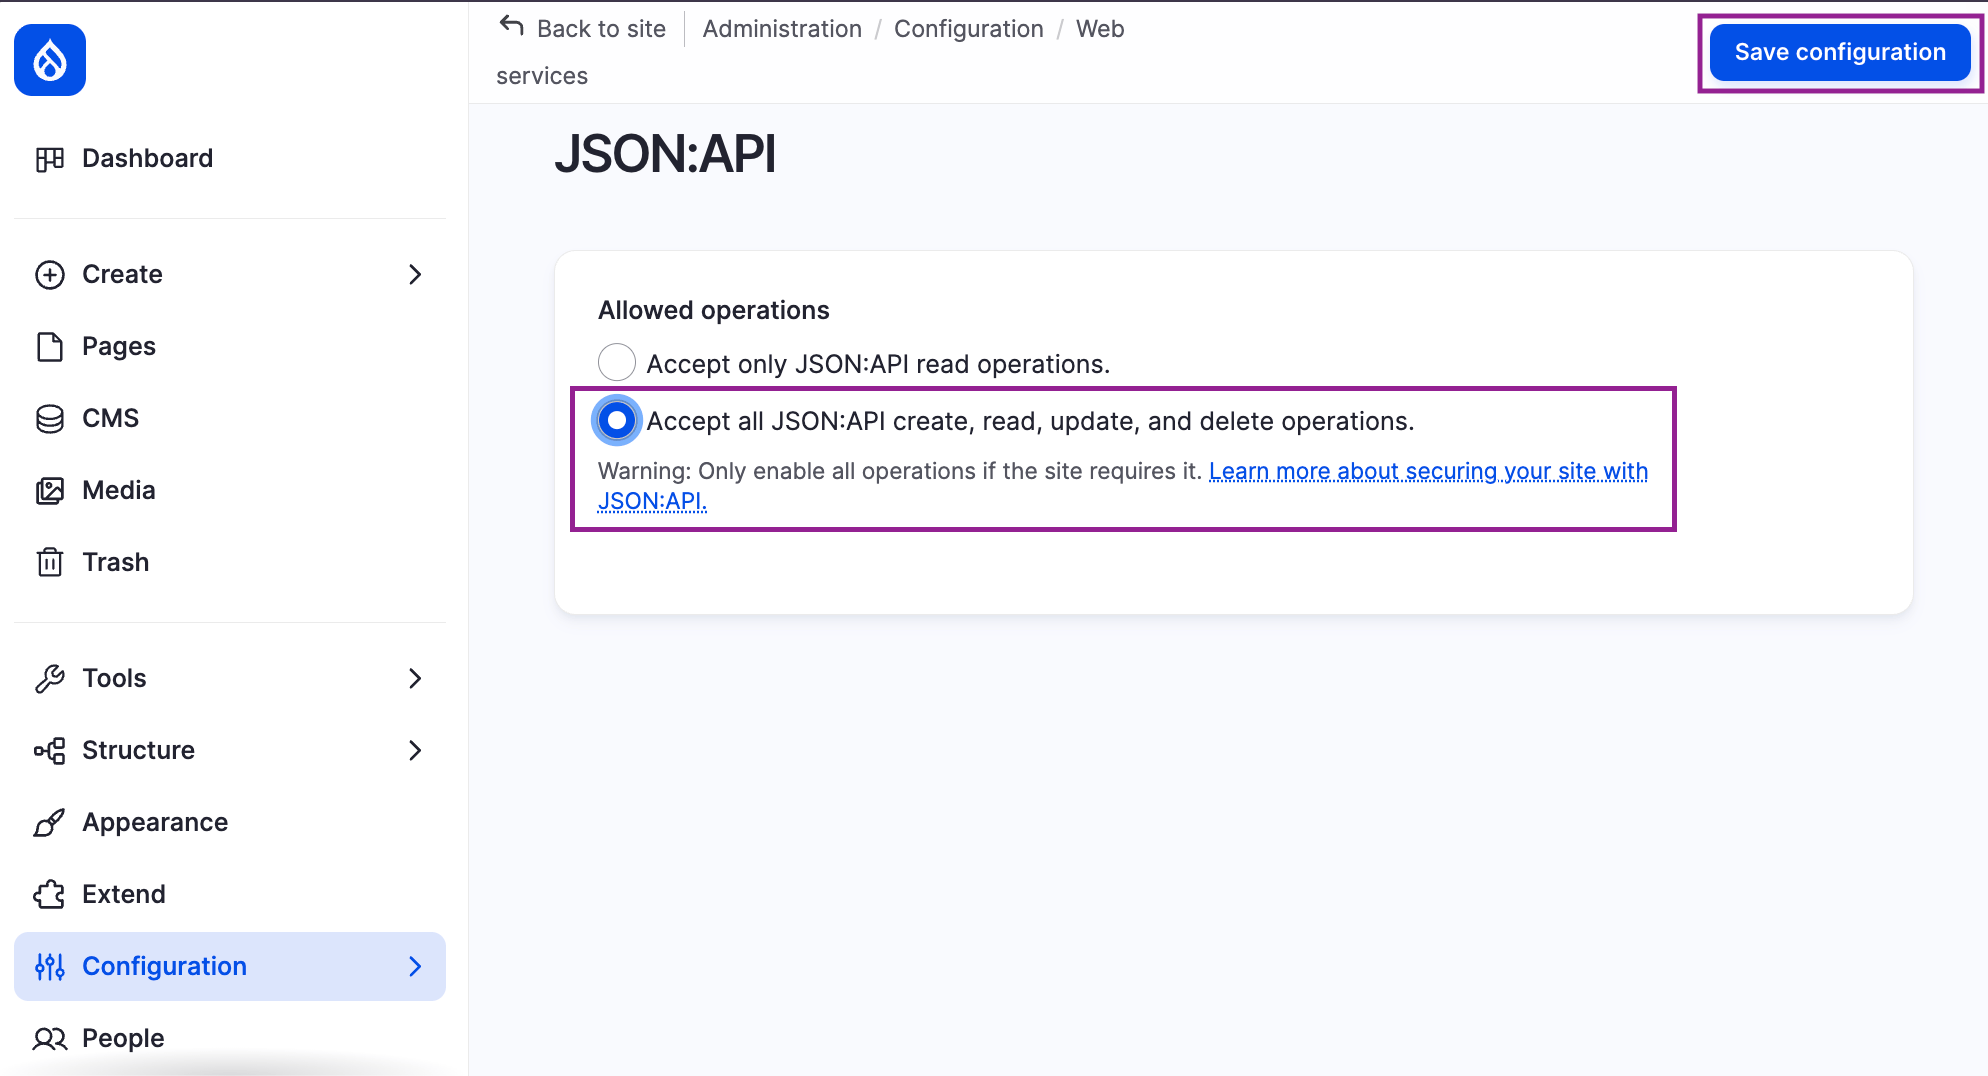
* Drupal で **Configuration > Web Services > JSON:API** に移動します。
* **Accept all JSON:API create, read, update, and delete operations** を有効にします。
* **Save configuration** を選択します。
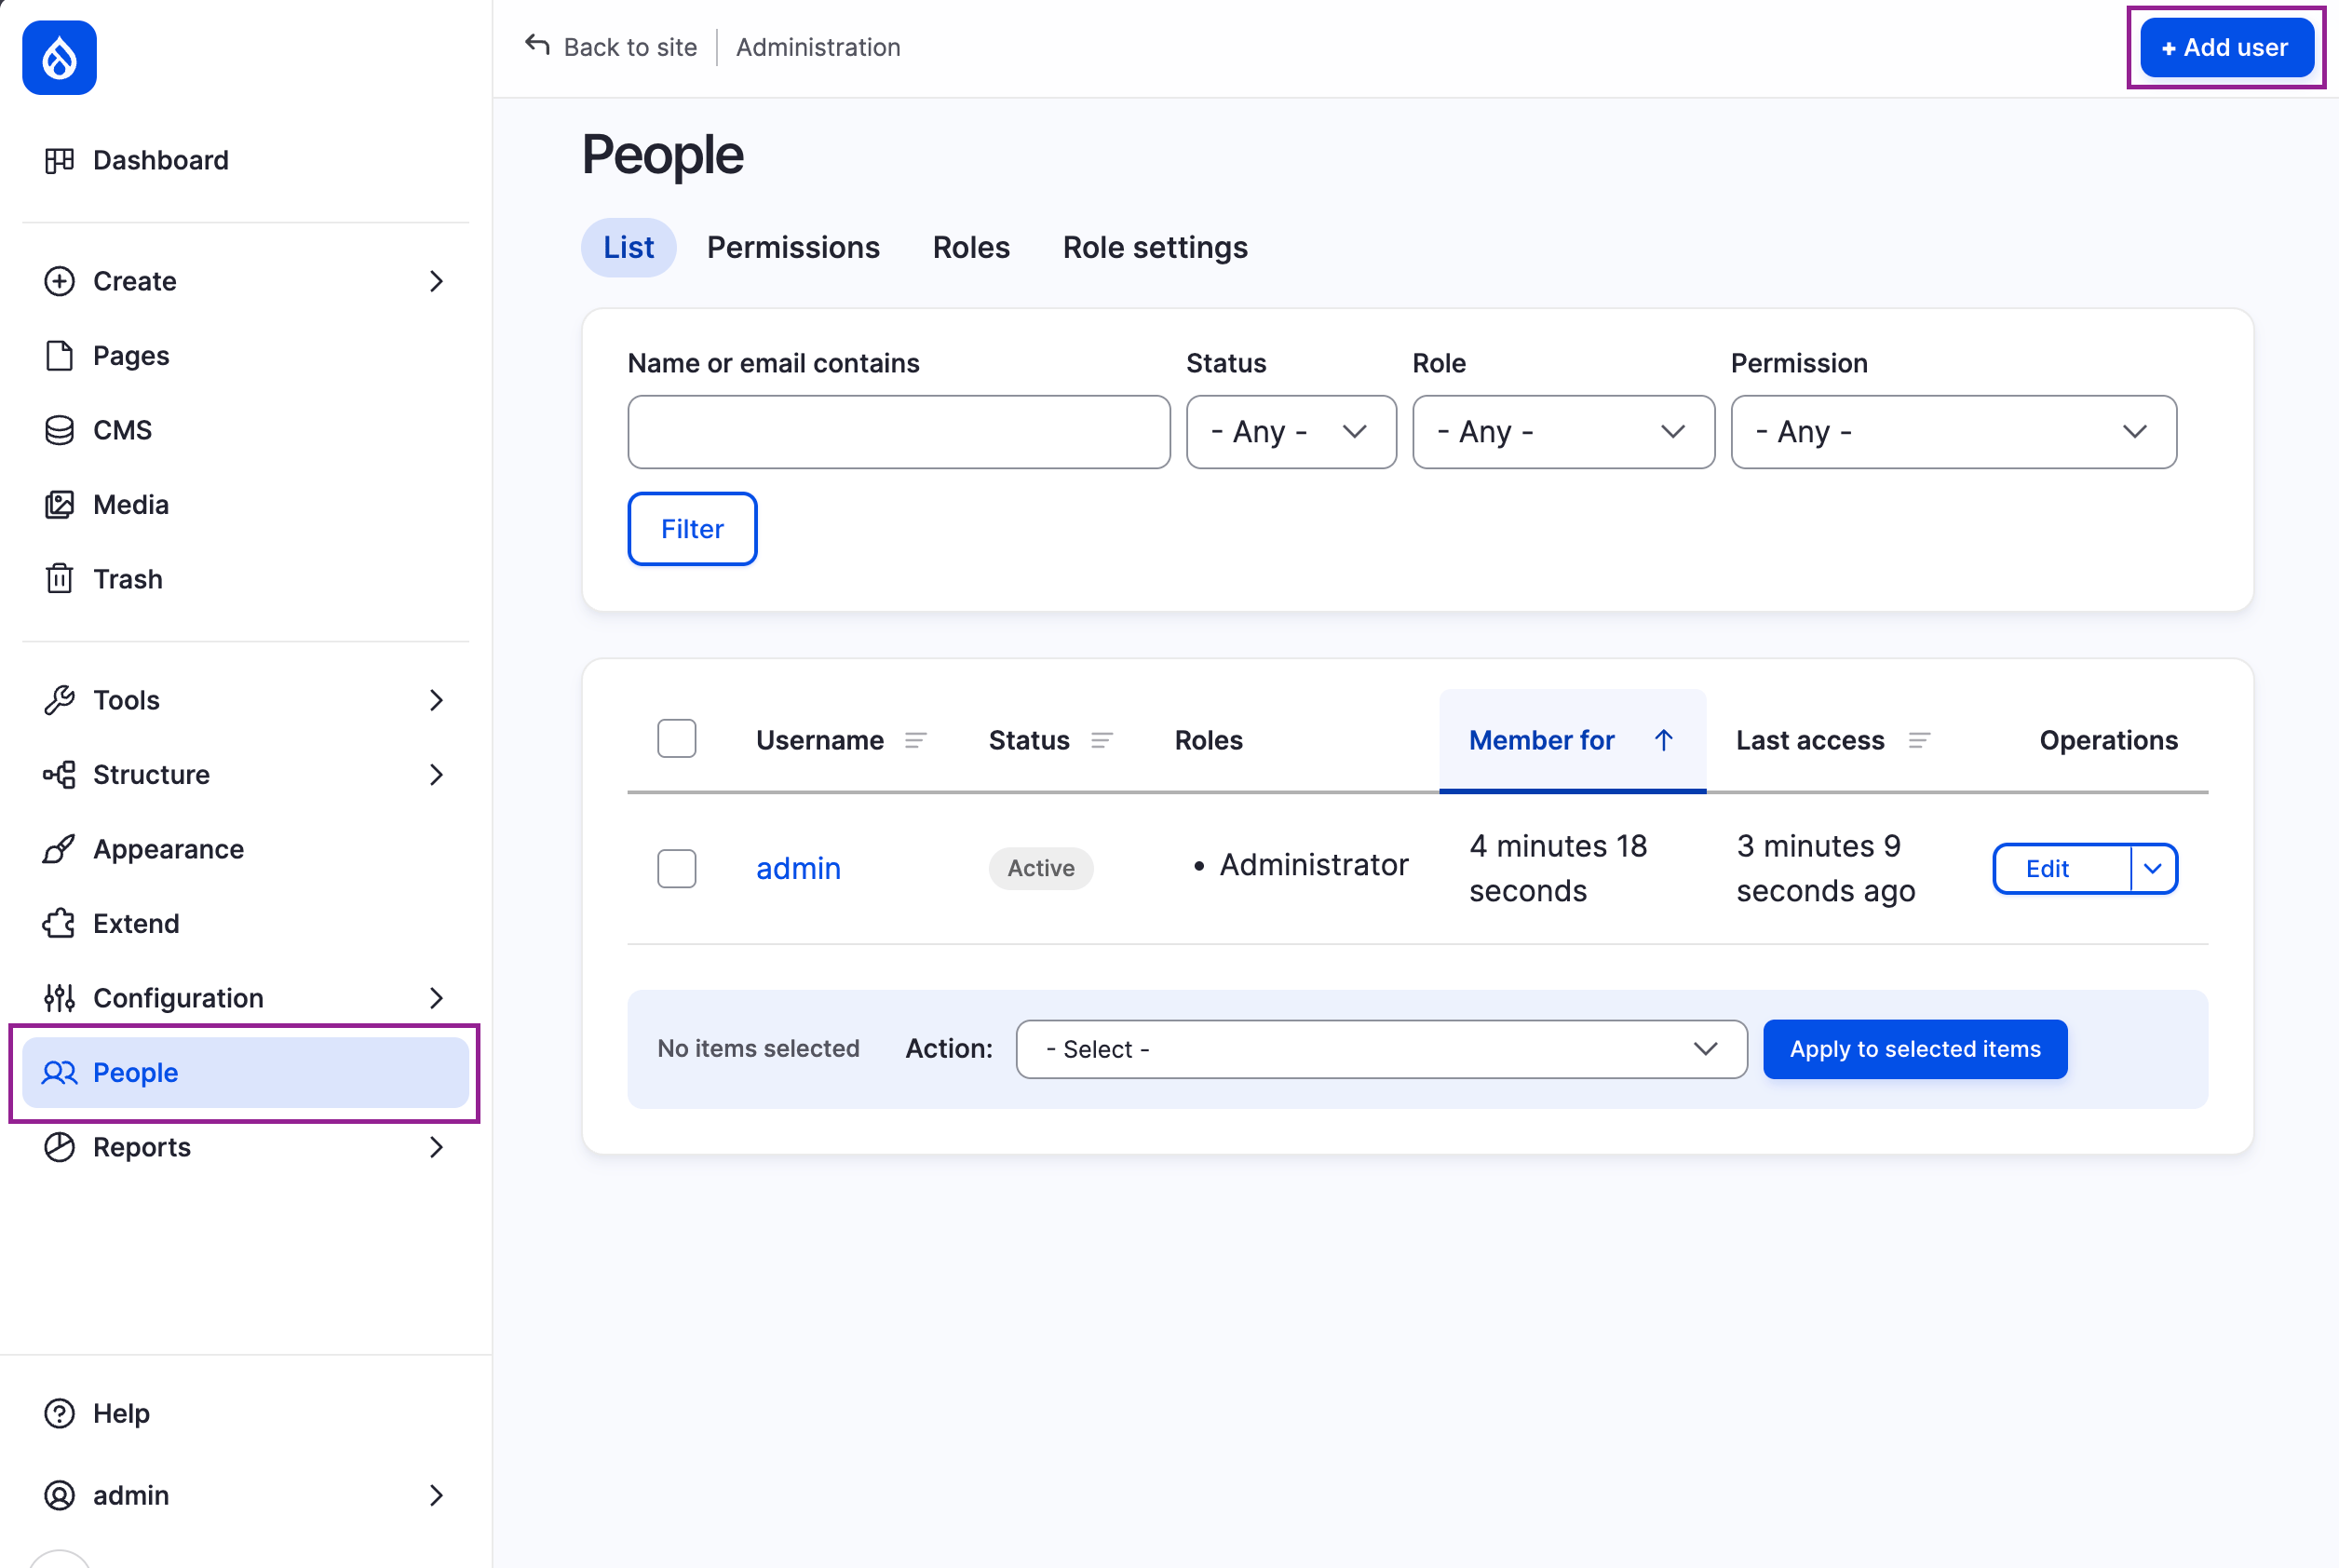
 * Drupal プラットフォームで、左サイドバーの **People** に移動し、**+ Add user** を選択します。
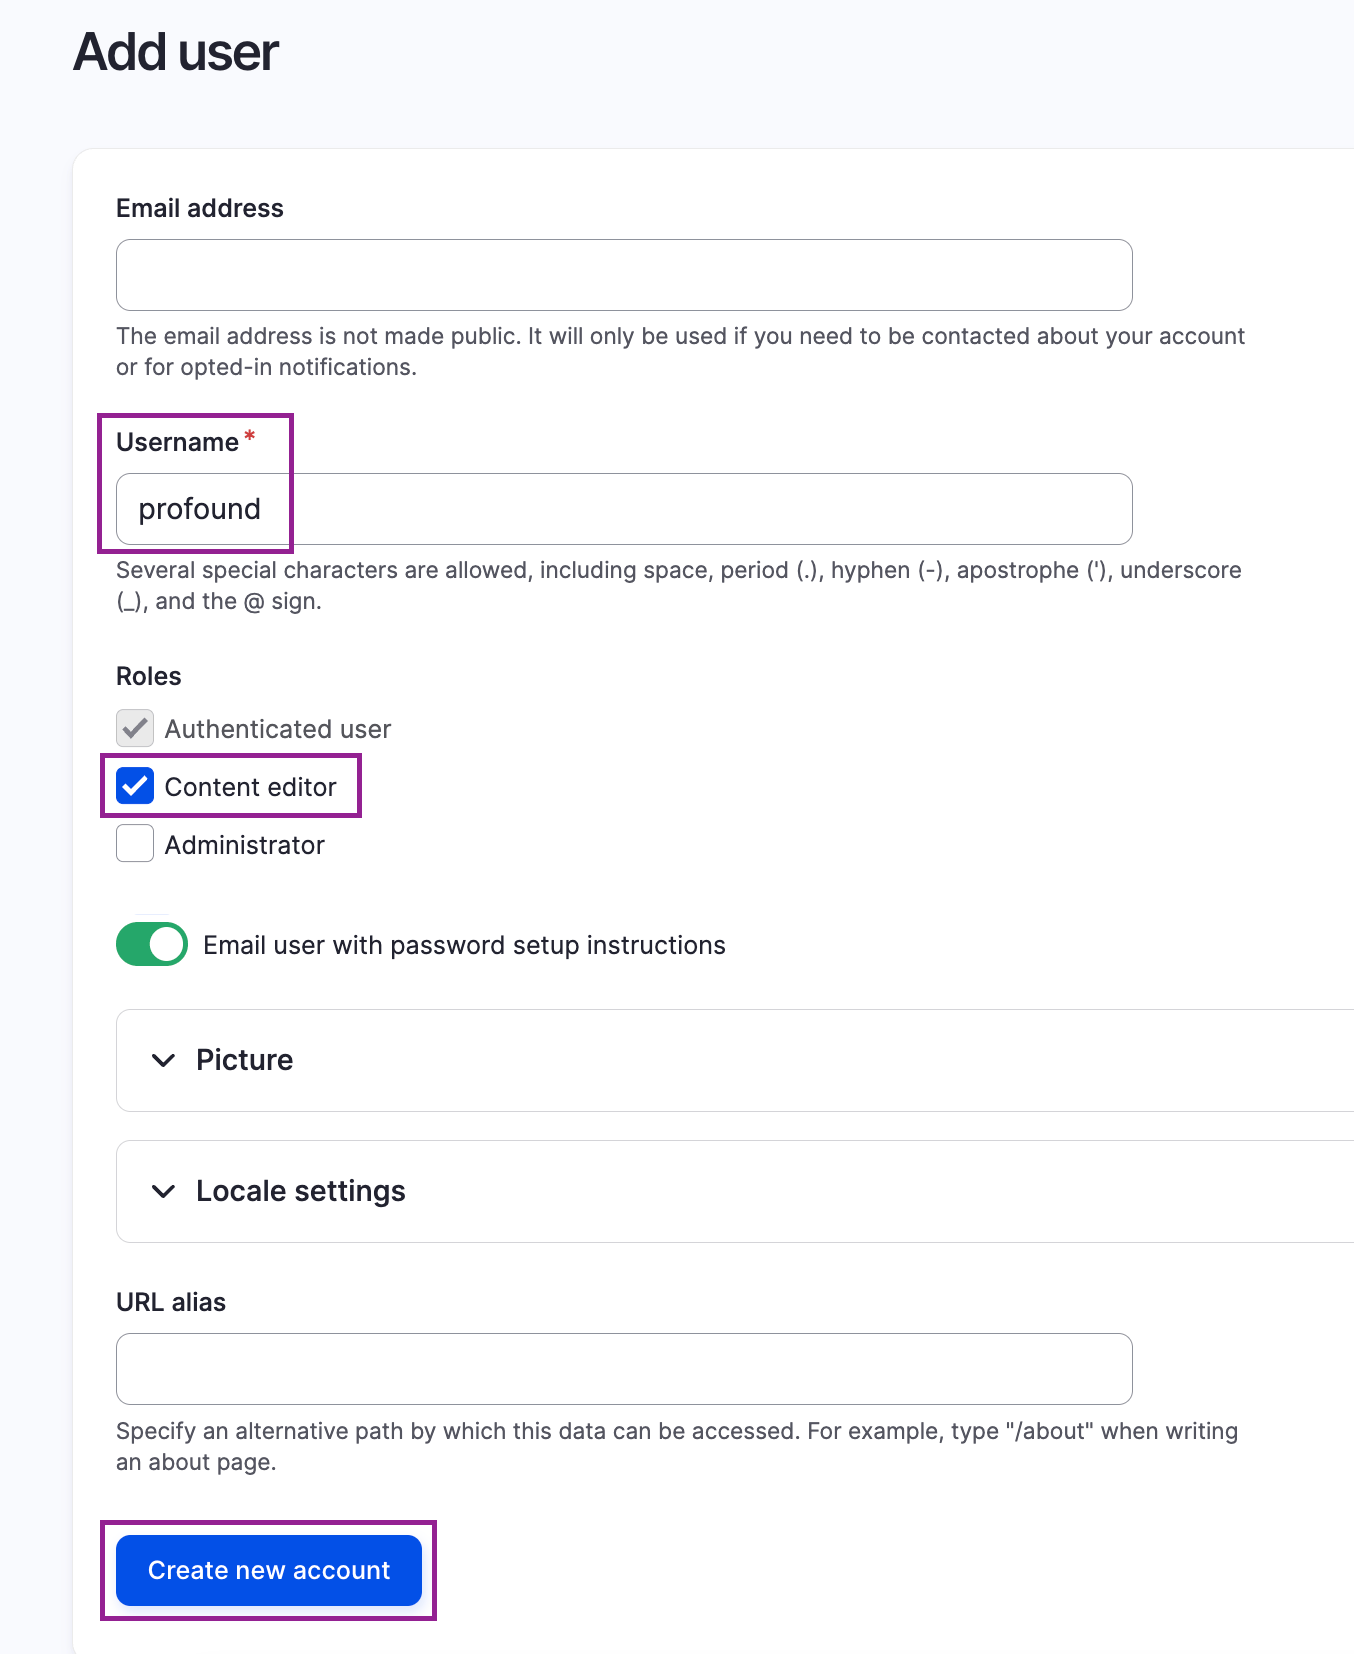
 * ユーザー名を `profound` とし、**Content editor** ロールまたはコンテンツ管理権限を持つその他のロールを付与して、**Create new account** を選択します。
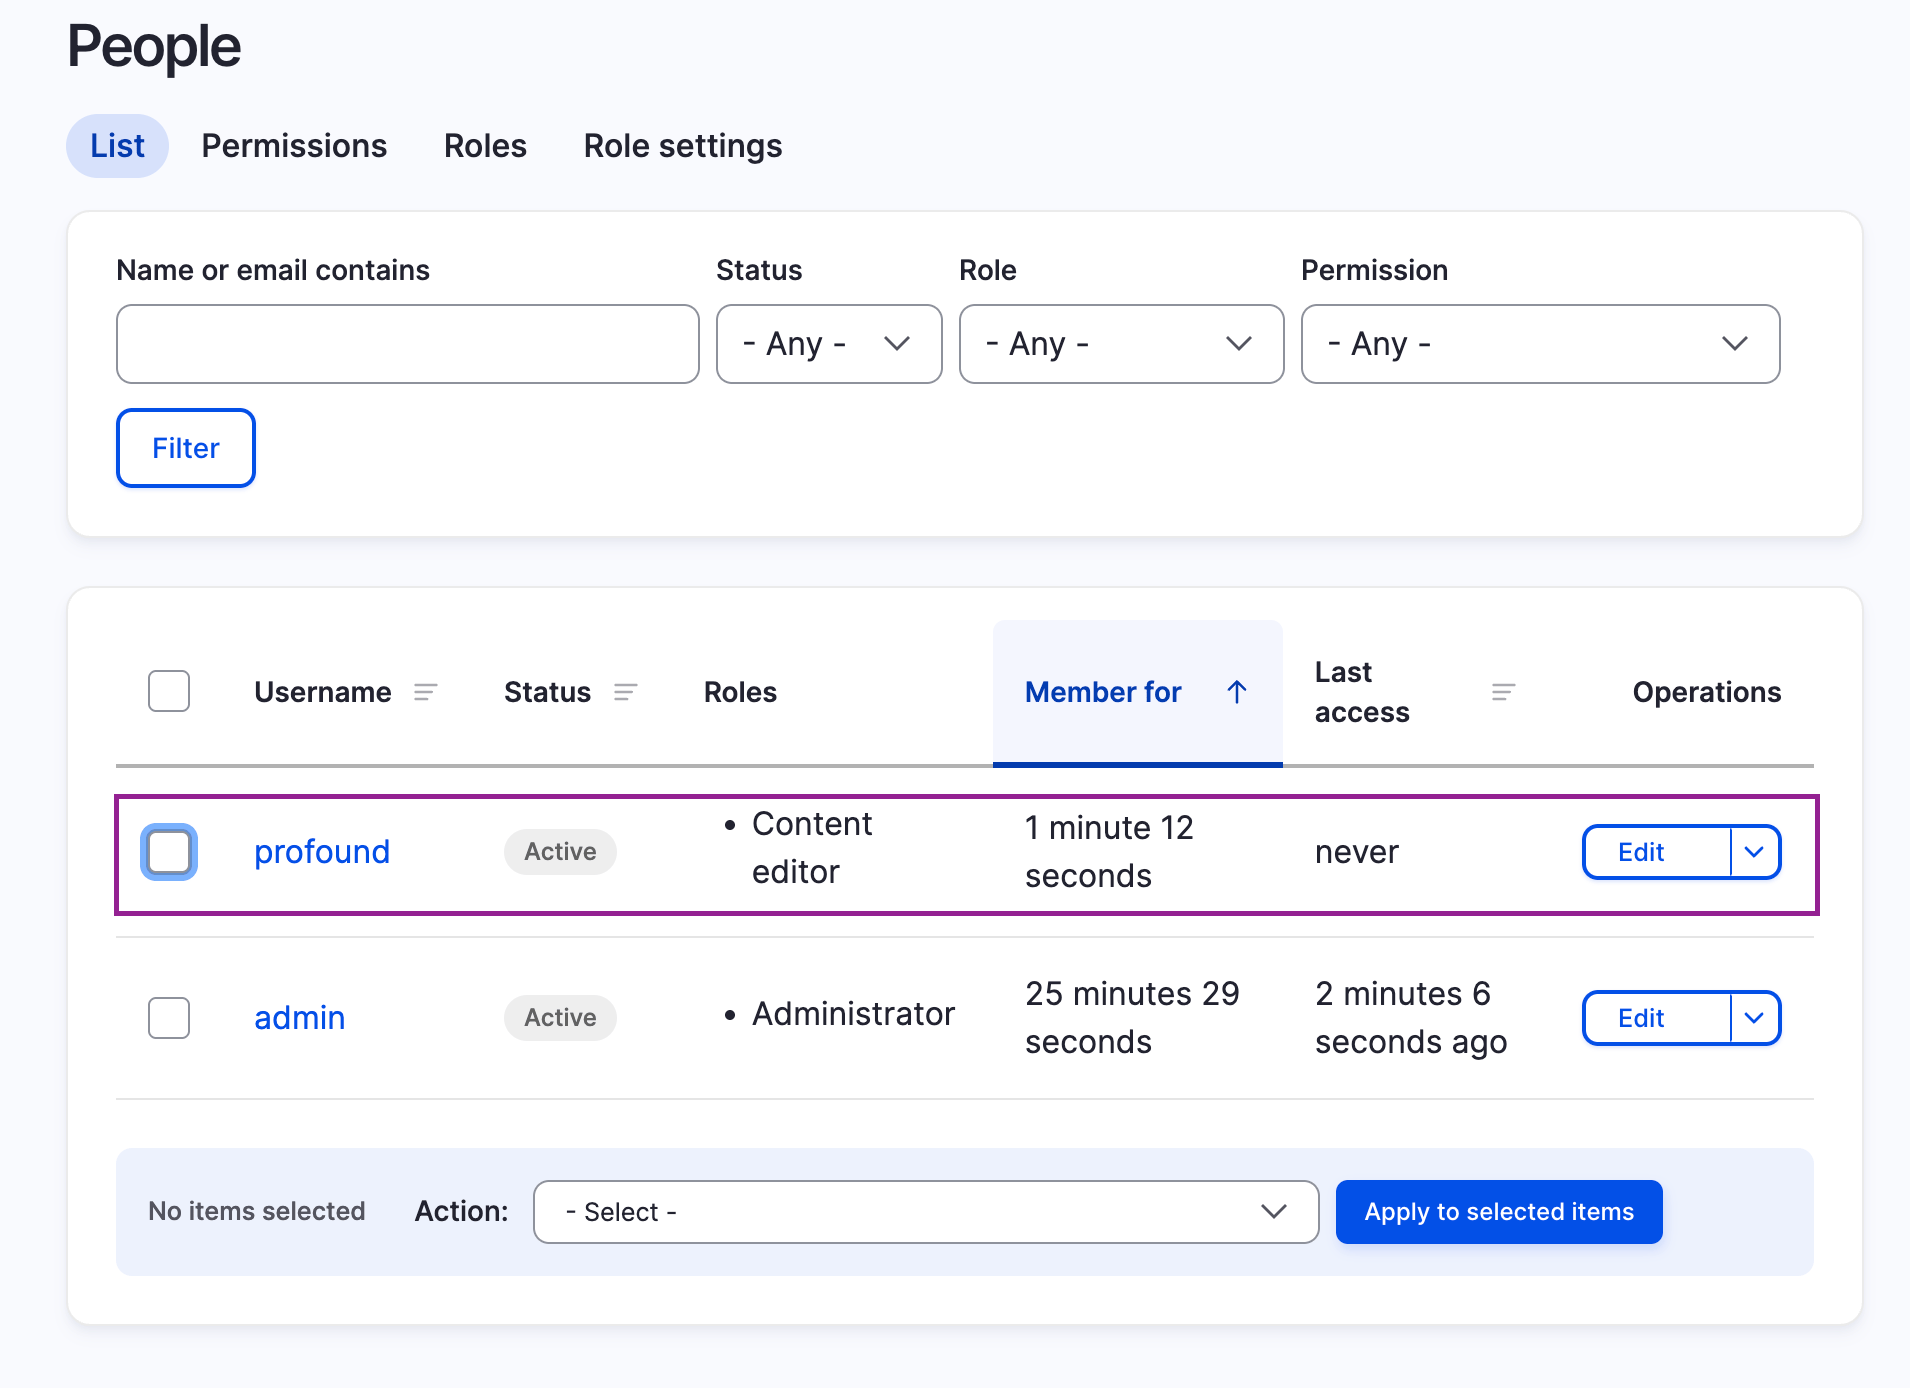
 * ユーザーが作成されると、ユーザー一覧に表示されます。
 Profound が API キーを使用して Drupal で認証できるようにするには、Profound ユーザーに割り当てたロールに対して **Access JSON:API** 権限と **Use key authentication** 権限を有効にします。
* Drupal で **People > Permissions** に移動します。
* 該当する権限を検索し、Profound ユーザーのロールに対して有効にします。
* **Save permissions** を選択します。
Drupal 標準の Content editor ロールには、Profound が必要なアクションを実行するのに十分なコンテンツ権限があります。Profound のコンテンツ権限を確認またはカスタマイズしたい場合は、Drupal の **Permissions** 画面でいつでも行えます。
* **People** に移動し、[ステップ 2](#step-2) で作成した `profound` ユーザーを選択します。
* ユーザーページの URL の末尾に `/key-auth` を追加します。例:
```text theme={null}
https://your-site.com/user/5/key-auth
```
* ユーザーのキー認証ページで、**Generate new key** を選択します。
Profound が API キーを使用して Drupal で認証できるようにするには、Profound ユーザーに割り当てたロールに対して **Access JSON:API** 権限と **Use key authentication** 権限を有効にします。
* Drupal で **People > Permissions** に移動します。
* 該当する権限を検索し、Profound ユーザーのロールに対して有効にします。
* **Save permissions** を選択します。
Drupal 標準の Content editor ロールには、Profound が必要なアクションを実行するのに十分なコンテンツ権限があります。Profound のコンテンツ権限を確認またはカスタマイズしたい場合は、Drupal の **Permissions** 画面でいつでも行えます。
* **People** に移動し、[ステップ 2](#step-2) で作成した `profound` ユーザーを選択します。
* ユーザーページの URL の末尾に `/key-auth` を追加します。例:
```text theme={null}
https://your-site.com/user/5/key-auth
```
* ユーザーのキー認証ページで、**Generate new key** を選択します。
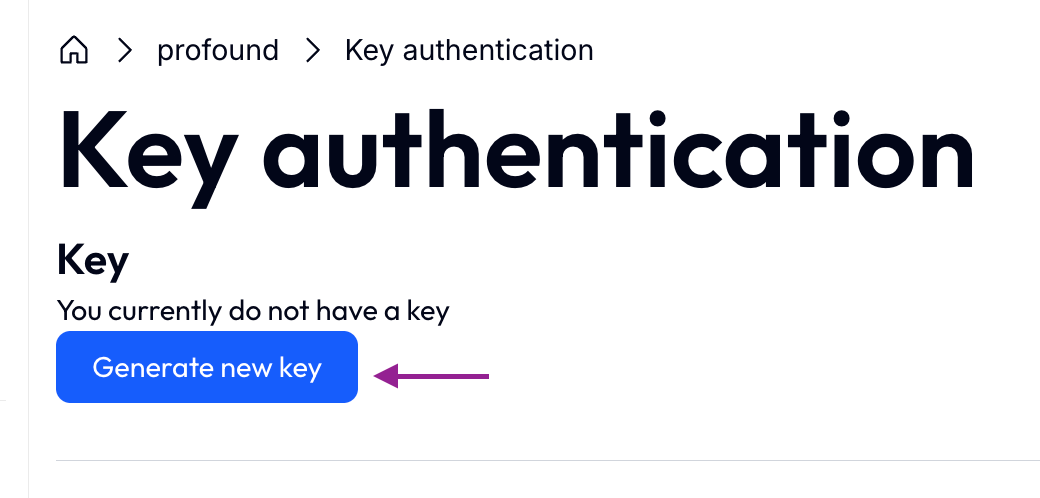 * API キーは安全な場所に保存してください。Profound でインテグレーションを設定する際に必要になります。
必要なものがすべて揃ったら、Profound プラットフォームで Drupal インテグレーションを作成します。
* Profound で、プラットフォームの左上にある組織名を選択し、**Settings** を選択します。
* 左サイドバーの **Account** の下にある **Integrations** を選択します。
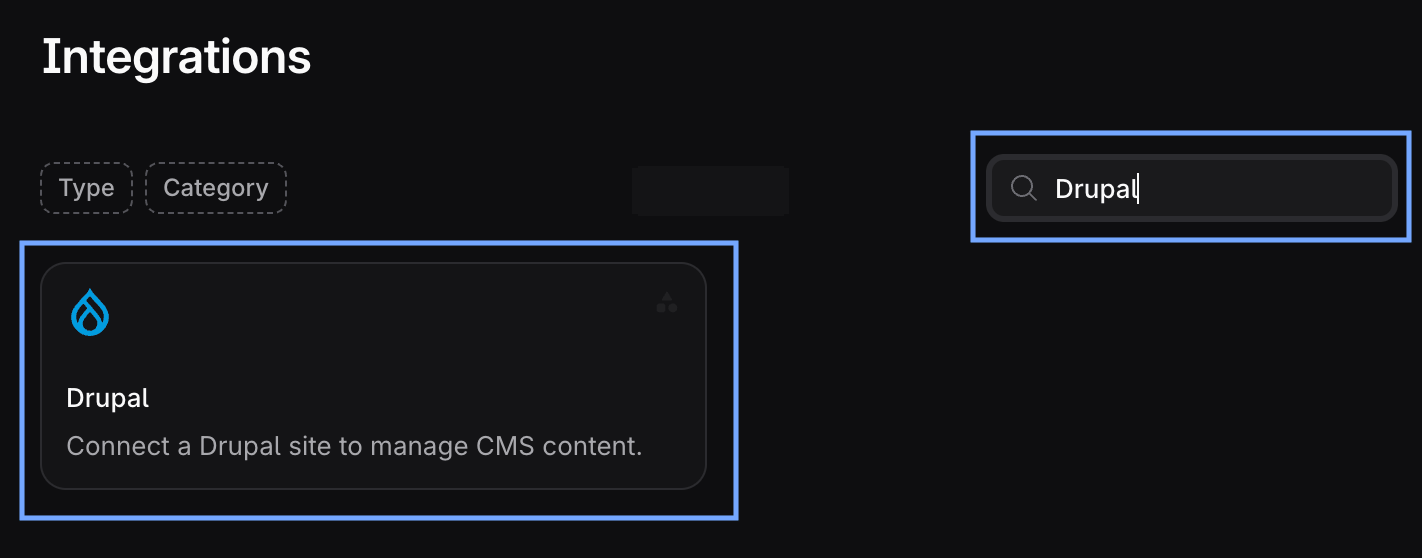
* **Drupal** を検索して選択します。
* API キーは安全な場所に保存してください。Profound でインテグレーションを設定する際に必要になります。
必要なものがすべて揃ったら、Profound プラットフォームで Drupal インテグレーションを作成します。
* Profound で、プラットフォームの左上にある組織名を選択し、**Settings** を選択します。
* 左サイドバーの **Account** の下にある **Integrations** を選択します。
* **Drupal** を検索して選択します。
 * Drupal インテグレーション画面で、**+ Add account** を選択します。
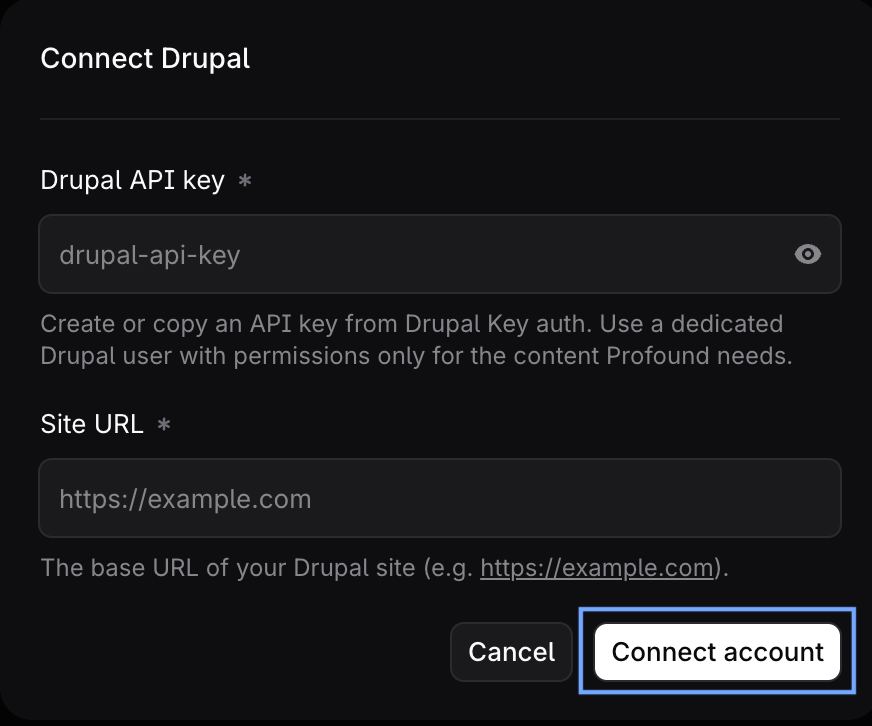
* **Connect Drupal** ダイアログで、[ステップ 4](#step-4) で生成した API キーと Drupal Web サイトのベース URL を入力します。
* **Connect Account** を選択します。
* Drupal インテグレーション画面で、**+ Add account** を選択します。
* **Connect Drupal** ダイアログで、[ステップ 4](#step-4) で生成した API キーと Drupal Web サイトのベース URL を入力します。
* **Connect Account** を選択します。
 接続済みアカウントの一覧に Drupal アカウントが表示されていれば、インテグレーションは成功しており、Profound で使用する準備が整っています。
インテグレーションアカウントのアクションメニューで **Revoke** を選択すると、いつでも Profound の Drupal アカウントへのアクセスを取り消せます。
接続済みアカウントの一覧に Drupal アカウントが表示されていれば、インテグレーションは成功しており、Profound で使用する準備が整っています。
インテグレーションアカウントのアクションメニューで **Revoke** を選択すると、いつでも Profound の Drupal アカウントへのアクセスを取り消せます。
 Agent ビルダー画面から直接 Drupal アカウントを Profound に接続することもできます。**Agents > + Create new** に移動し、Drupal ノードのいずれかをキャンバスに追加します。ノードを選択して設定パネルを開き、**Connect account** の手順に従ってください。
## ベストプラクティス
* Drupal Web サイトが公開されており、HTTPS を使用していることを確認してください。Profound は HTTPS 以外の Web サイトを拒否します。
* Profound の Drupal ユーザー専用に権限をカスタマイズするには、カスタムロールの作成を検討してください。詳しくは Drupal の [Roles and Permissions](https://www.drupal.org/docs/roles-and-permissions#s-create-a-custom-role) ドキュメントをご覧ください。
* Profound ユーザーの権限を確認する際は、Profound に使用させるコンテンツに対する権限のみを付与してください。
* API キーは、パスワードマネージャーのセキュアノートなど、常に安全な場所に保存してください。
## トラブルシューティング
### Drupal の Permissions 画面に JSON:API の権限がない
Drupal プラットフォームに JSON:API Permission Access モジュールがインストールされていることを確認してください。
* 左サイドバーの **Extend** に移動します。
* モジュールがインストールされている場合は、チェックボックスが選択された状態でモジュール一覧に表示されます。
* 一覧にない場合は、**Browse modules** タブからインストールしてください。
### Profound で「We couldn't save these credentials」エラーが表示される
Drupal アカウントを Profound に接続する際に、次のエラーが表示されることがあります。
```txt wrap theme={null}
We couldn't save these credentials
Drupal JSON:API is reachable without a valid API key. Configure JSON:API to require key authentication.
```
これは、Drupal に [JSON:API Permission Access](https://www.drupal.org/project/jsonapi_permission_access) モジュールがないか、Profound ユーザーに **Access JSON:API** 権限がない可能性が高いことを意味します。
その場合は、[ステップ 3](#step-3) の手順に従ってモジュールをインストールし、権限を有効にしてください。
Agent ビルダー画面から直接 Drupal アカウントを Profound に接続することもできます。**Agents > + Create new** に移動し、Drupal ノードのいずれかをキャンバスに追加します。ノードを選択して設定パネルを開き、**Connect account** の手順に従ってください。
## ベストプラクティス
* Drupal Web サイトが公開されており、HTTPS を使用していることを確認してください。Profound は HTTPS 以外の Web サイトを拒否します。
* Profound の Drupal ユーザー専用に権限をカスタマイズするには、カスタムロールの作成を検討してください。詳しくは Drupal の [Roles and Permissions](https://www.drupal.org/docs/roles-and-permissions#s-create-a-custom-role) ドキュメントをご覧ください。
* Profound ユーザーの権限を確認する際は、Profound に使用させるコンテンツに対する権限のみを付与してください。
* API キーは、パスワードマネージャーのセキュアノートなど、常に安全な場所に保存してください。
## トラブルシューティング
### Drupal の Permissions 画面に JSON:API の権限がない
Drupal プラットフォームに JSON:API Permission Access モジュールがインストールされていることを確認してください。
* 左サイドバーの **Extend** に移動します。
* モジュールがインストールされている場合は、チェックボックスが選択された状態でモジュール一覧に表示されます。
* 一覧にない場合は、**Browse modules** タブからインストールしてください。
### Profound で「We couldn't save these credentials」エラーが表示される
Drupal アカウントを Profound に接続する際に、次のエラーが表示されることがあります。
```txt wrap theme={null}
We couldn't save these credentials
Drupal JSON:API is reachable without a valid API key. Configure JSON:API to require key authentication.
```
これは、Drupal に [JSON:API Permission Access](https://www.drupal.org/project/jsonapi_permission_access) モジュールがないか、Profound ユーザーに **Access JSON:API** 権限がない可能性が高いことを意味します。
その場合は、[ステップ 3](#step-3) の手順に従ってモジュールをインストールし、権限を有効にしてください。